 |
Matronics Email Lists
Web Forum Interface to the Matronics Email Lists
|
| View previous topic :: View next topic |
| Author |
Message |
craig.nelson(at)heraeus.c
Guest
|
 Posted: Mon Mar 03, 2008 8:17 pm Post subject: Lost mold strut faring Posted: Mon Mar 03, 2008 8:17 pm Post subject: Lost mold strut faring |
 |
|
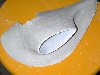
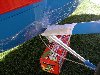
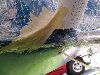
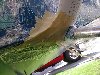
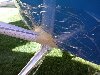
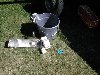
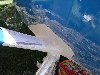
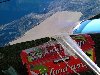
<<DSCN1892.JPG>> St <<DSCN1881.JPG>> ar <<DSCN1882.JPG>> te

<<DSCN1883.JPG>> d  <<DSCN1884.JPG>> a  <<DSCN1885.JPG>> st

<<DSCN1886.JPG>> ru <<DSCN1888.JPG>> t  <<DSCN1889.JPG>> fa

<<DSCN1890.JPG>> ring for the bottom of the strut today step 1 I applied

food wrap to the fusladge

Step 2 I covered thr spar with paper

Step 3 with masking tape I made the desired shape

Step 4 with gauz and plaster I covered the masking tape

Step 5 removed the plaster part from the plane

Step 6 cleaned it up now it"s ready for the resin and glass


Uncle craig
| | - The Matronics Kolb-List Email Forum - | | | Use the List Feature Navigator to browse the many List utilities available such as the Email Subscriptions page, Archive Search & Download, 7-Day Browse, Chat, FAQ, Photoshare, and much more:
http://www.matronics.com/Navigator?Kolb-List |
|
| Description: |
|
| Filesize: |
42.51 KB |
| Viewed: |
433 Time(s) |
|
| Description: |
|
| Filesize: |
79.84 KB |
| Viewed: |
391 Time(s) |
|
| Description: |
|
| Filesize: |
79.9 KB |
| Viewed: |
397 Time(s) |

|
| Description: |
|
| Filesize: |
72.5 KB |
| Viewed: |
406 Time(s) |

|
| Description: |
|
| Filesize: |
67.45 KB |
| Viewed: |
399 Time(s) |
|
| Description: |
|
| Filesize: |
75.04 KB |
| Viewed: |
401 Time(s) |
|
| Description: |
|
| Filesize: |
67.53 KB |
| Viewed: |
403 Time(s) |
|
| Description: |
|
| Filesize: |
82.43 KB |
| Viewed: |
397 Time(s) |
|
| Description: |
|
| Filesize: |
65.04 KB |
| Viewed: |
398 Time(s) |
|
| Description: |
|
| Filesize: |
68.93 KB |
| Viewed: |
411 Time(s) |
|
|
|
| Back to top |
|
 |
ElleryWeld(at)aol.com
Guest
|
| Posted: Mon Mar 03, 2008 8:38 pm Post subject: Lost mold strut faring |
|
|
Thanks for posting that info Uncle Craig I am going to try and see what kind of a mess I can make I'm going to start with some simple stuff first and if it turns out ok I might even try some more challenge things
Ellery in Maine
do not archive
In a message dated 3/3/2008 11:19:07 P.M. Eastern Standard Time, craig.nelson(at)heraeus.com writes:
| Quote: | <<DSCN1892.JPG>> St <<DSCN1881.JPG>> ar <<DSCN1882.JPG>> te
<<DSCN1883.JPG>> d <<DSCN1884.JPG>> a <<DSCN1885.JPG>> st
<<DSCN1886.JPG>> ru <<DSCN1888.JPG>> t <<DSCN1889.JPG>> fa
<<DSCN1890.JPG>> ring for the bottom of the strut today step 1 I applied
food wrap to the fusladge
Step 2 I covered thr spar with paper
Step 3 with masking tape I made the desired shape
Step 4 with gauz and plaster I covered the masking tape
Step 5 removed the plaster part from the plane
Step 6 cleaned it up now it"s ready for the resin and glass
Uncle craig |
It's Tax Time! Get tips, forms and advice on AOL Money & Finance.
[quote][b]
| | - The Matronics Kolb-List Email Forum - | | | Use the List Feature Navigator to browse the many List utilities available such as the Email Subscriptions page, Archive Search & Download, 7-Day Browse, Chat, FAQ, Photoshare, and much more:
http://www.matronics.com/Navigator?Kolb-List |
|
|
|
| Back to top |
|
|
jb92563

Joined: 23 Mar 2007
Posts: 314
Location: Southern California
|
| Posted: Tue Mar 04, 2008 12:27 pm Post subject: Re: Lost mold strut faring |
|
|
Nicely done....its always great to see how there are so many ways to get something custom done.


It occurred to me as I was squinting to see the first pic before I double clicked it, that the "Tape Fairing" looked like plastercine or clay.


Then I thought....stealing a kids plastercine and using that as the fairing material would allow you to get a very smooth fairing mold off it from the start and would not likely require much if any further cleaning up of the inside of the mold.


Plus you could teach your kid to do it and have him get the other side started for you.


I guess people use whatever you have on hand.  Good thing about this is that even if the other side fairing is not perfectly identical, you would never notice it since you can only see one side of the plane at a time


I can't think of a way to create a mirror image mold of that part for the other side though....probably just quicker to do the other side just like the first.


Hey, maybe you should keep those molds and make a few spares in case anyone else wants some.
| | - The Matronics Kolb-List Email Forum - | | | Use the List Feature Navigator to browse the many List utilities available such as the Email Subscriptions page, Archive Search & Download, 7-Day Browse, Chat, FAQ, Photoshare, and much more:
http://www.matronics.com/Navigator?Kolb-List |
|
_________________
Ray
Kolb UltraStar (Cuyuna UL-202)
Moni MotorGlider
Schreder HP-11 Glider
Grob 109 Motorglider
Do Not Archive |
|
| Back to top |
|
|
mdnanwelch7(at)hotmail.co
Guest
|
| Posted: Tue Mar 04, 2008 12:52 pm Post subject: Lost mold strut faring |
|
|
| Quote: | | Kolb guys, First, thank you Uncle Craig for the lost mold tips. It was very thoughtful of you to go to the trouble toshow us your handywork. I hope I'm not stepping on Uncle Craig's ideas, but I thought I would mention a trick I use when working withmolds for making my own fiberglass parts. I use joint compound, the stuff they use for taping and texturing walls. It is cheap, phenominally easy to sculpt,and absolutely falls apart when exposed to water (meaning it cleans up easy). Similar to Uncle Craig, I'll do a basic build-up with tape, thin woods strips, or whatever...just to get close. Then, I layer on some joint compound, fairly thick..maybe more than 1/2" thick. Let that set for about 24 hours, until it is nice and dried out. Then you are ready to start shaping your piece. Your best sculpting is done with the drywall sandpaper. It is made of heavy gauze and has holes in it, because the joint compound sands so fast you get lots of residue...quick. They have handheld sanding blocks. They work best. For curves and the like, just use the sandpaper loosely in your fingers, or wrapped around a little sponge. Joint compound smooths so fast, you have to be careful. You can shape something like a small fairing in a couple of minutes. If, for some reason you screw up, and sand off too much, no biggie!!! Layer a bit on, wait a day, and sand it again. Once you get that perfect shape you're after, put a thin coat of epoxy resin only, just to seal it. After that is cured, rub a couple of coats of hard car wax, or even better, mold release wax, on the sculpted piece. You can now put a couple of layers (maybe 4-6) over the waxed sculpted shape and then let that cure. Now carefully pry the outer fiberglass shell off the inner shape. You can now use the outer fiberglass shell for Then, I layer on some joint compound, fairly thick..maybe more than 1/2" thick. Let that set for about 24 hours, until |
0 | Quote: | | Then, I layer on some joint compound, fairly thick..maybe more than 1/2" thick. Let that set for about 24 hours, until |
1 | Quote: | | Then, I layer on some joint compound, fairly thick..maybe more than 1/2" thick. Let that set for about 24 hours, until |
2Connect and share in new ways with Windows Live. Get it now! [quote][b]
| | - The Matronics Kolb-List Email Forum - | | | Use the List Feature Navigator to browse the many List utilities available such as the Email Subscriptions page, Archive Search & Download, 7-Day Browse, Chat, FAQ, Photoshare, and much more:
http://www.matronics.com/Navigator?Kolb-List |
|
|
|
| Back to top |
|
|
Ed in JXN
Joined: 24 Mar 2006
Posts: 122
|
| Posted: Tue Mar 04, 2008 7:23 pm Post subject: Lost mold strut faring |
|
|
Hi Craig,


        In the future, would it be possible to post a link to the pics?

Hung my dial-up connection pretty bad.


Thanx,


Ed in JXN

MkII/503

---
| | - The Matronics Kolb-List Email Forum - | | | Use the List Feature Navigator to browse the many List utilities available such as the Email Subscriptions page, Archive Search & Download, 7-Day Browse, Chat, FAQ, Photoshare, and much more:
http://www.matronics.com/Navigator?Kolb-List |
|
|
|
| Back to top |
|
|
smlplanet(at)msn.com
Guest
|
| Posted: Tue Mar 04, 2008 9:04 pm Post subject: Lost mold strut faring |
|
|
That is good information for those that are thinking about or have made their own parts. You might consider using hot mud (joint compound/drywall mud) if you make a mistake or sand to much. The hot mud comes in 15, 30, 90 min. drying times so be ready to apply it when mixed. This way you won't have to wait
24 hrs for it to cure.
[quote] From: mdnanwelch7(at)hotmail.com
To: kolb-list(at)matronics.com
Subject: RE: Lost mold strut faring
Date: Tue, 4 Mar 2008 12:49:51 -0800
.ExternalClass .EC_hmmessage P {padding:0px;} .ExternalClass EC_body.hmmessage {font-size:10pt;font-family:Tahoma;} | Quote: | | Kolb guys, First, thank you Uncle Craig for the lost mold tips. It was very thoughtful of you to go to the trouble toshow us your handywork. I hope I'm not stepping on Uncle Craig's ideas, but I thought I would mention a trick I use when working withmolds for making my own fiberglass parts. I use joint compound, the stuff they use for taping and texturing walls. It is cheap, phenominally easy to sculpt,and absolutely falls apart when exposed to water (meaning it cleans up easy). Similar to Uncle Craig, I'll do a basic build-up with tape, thin woods strips, or whatever...just to get close. Then, I layer on some joint compound, fairly thick..maybe more than 1/2" thick. Let that set for about 24 hours, until it is nice and dried out. Then you are ready to start shaping your piece. Your best sculpting is done with the drywall sandpaper. It is made of heavy gauze and has holes in it, because the joint compound sands so fast you get lots of residue...quick. They have handheld sanding blocks. They work best. For curves and the like, just use the sandpaper loosely in your fingers, or wrapped around a little sponge. Joint compound smooths so fast, you have to be careful. You can shape something like a small fairing in a couple of minutes. If, for some reason you screw up, and sand off too much, no biggie!!! Layer a bit on, wait a day, and sand it again. Once you get that perfect shape you're after, put a thin coat of epoxy resin only, just to seal it. After that is cured, rub a couple of coats of hard car wax, or even better, mold release wax, on the sculpted piece. You can now put a couple of layers (maybe 4-6) over the waxed sculpted shape and then let that cure. Now carefully pry the outer fiberglass shell off the inner shape. You can now use the outer fiberglass shell for Then, I layer on some joint compound, fairly thick..maybe more than 1/2" thick. Let that set for about 24 hours, until |
0 | Quote: | | Then, I layer on some joint compound, fairly thick..maybe more than 1/2" thick. Let that set for about 24 hours, until |
1 | Quote: | | Then, I layer on some joint compound, fairly thick..maybe more than 1/2" thick. Let that set for about 24 hours, until |
2
Connect and share in new ways with Windows Live. Get it now! | Quote: | | Then, I layer on some joint compound, fairly thick..maybe more than 1/2" thick. Let that set for about 24 hours, until |
3[b]
| | - The Matronics Kolb-List Email Forum - | | | Use the List Feature Navigator to browse the many List utilities available such as the Email Subscriptions page, Archive Search & Download, 7-Day Browse, Chat, FAQ, Photoshare, and much more:
http://www.matronics.com/Navigator?Kolb-List |
|
|
|
| Back to top |
|
|
slyck(at)frontiernet.net
Guest
|
| Posted: Wed Mar 05, 2008 6:33 am Post subject: Lost mold strut faring |
|
|
There is also the lightweight microsphere-filled auto body filler. Sands easy and could be shaped through saran wrap by hand.
BB
do not archive
On 5, Mar 2008, at 12:01 AM, ross richardson wrote:
| Quote: | That is good information for those that are thinking about or have made their own parts. You might consider using hot mud (joint compound/drywall mud) if you make a mistake or sand to much. The hot mud comes in 15, 30, 90 min. drying times so be ready to apply it when mixed. This way you won't have to wait 24 hrs for it to cure. | Quote: | From: mdnanwelch7(at)hotmail.com (mdnanwelch7(at)hotmail.com)To: kolb-list(at)matronics.com (kolb-list(at)matronics.com)Subject: RE: Lost mold strut faringDate: Tue, 4 Mar 2008 12:49:51 -0800 | Quote: | | Kolb guys, First, thank you Uncle Craig for the lost mold tips. It was very thoughtful of you to go to the trouble toshow us your handywork. I hope I'm not stepping on Uncle Craig's ideas, but I thought I would mention a trick I use when working withmolds for making my own fiberglass parts. I use joint compound, the stuff they use for taping and texturing walls. It is cheap, phenominally easy to sculpt,and absolutely falls apart when exposed to water (meaning it cleans up easy). Similar to Uncle Craig, I'll do a basic build-up with tape, thin woods strips, or whatever...just to get close. Then, I layer on some joint compound, fairly thick..maybe more than 1/2" thick. Let that set for about 24 hours, until it is nice and dried out. Then you are ready to start shaping your piece. Your best sculpting is done with the drywall sandpaper. It is made of heavy gauze and has holes in it, because the joint compound sands so fast you get lots of residue...quick. They have handheld sanding blocks. They work best. For curves and the like, just use the sandpaper loosely in your fingers, or wrapped around a little sponge. Joint compound smooths so fast, you have to be careful. You can shape something like a small fairing in a couple of minutes. If, for some reason you screw up, and sand off too much, no biggie!!! Layer a bit on, wait a day, and sand it again. Once you get that perfect shape you're after, put a thin coat of epoxy resin only, just to seal it. After that is cured, rub a couple of coats of hard car wax, or even better, mold release wax, on the sculpted piece. You can now put a couple of layers (maybe 4-6) over the waxed sculpted shape and then let that cure. Now carefully pry the outer fiberglass shell off the inner shape. You can now use the outer fiberglass shell for Then, I layer on some joint compound, fairly thick..maybe more than 1/2" thick. Let that set for about 24 hours, until |
0 | Quote: | | Then, I layer on some joint compound, fairly thick..maybe more than 1/2" thick. Let that set for about 24 hours, until |
1 | Quote: | | Then, I layer on some joint compound, fairly thick..maybe more than 1/2" thick. Let that set for about 24 hours, until |
2Connect and share in new ways with Windows Live. Get it now! | Quote: | | Then, I layer on some joint compound, fairly thick..maybe more than 1/2" thick. Let that set for about 24 hours, until |
3Then, I layer on some joint compound, fairly thick..maybe more than 1/2" thick. Let that set for about 24 hours, until |
4 |
| | - The Matronics Kolb-List Email Forum - | | | Use the List Feature Navigator to browse the many List utilities available such as the Email Subscriptions page, Archive Search & Download, 7-Day Browse, Chat, FAQ, Photoshare, and much more:
http://www.matronics.com/Navigator?Kolb-List |
|
|
|
| Back to top |
|
|
MKIIIX040
Joined: 31 Mar 2006
Posts: 123
Location: Millinocket, Maine
|
| Posted: Wed Mar 05, 2008 7:47 am Post subject: Lost mold strut faring |
|
|
Just a thought. I've used Durabond 90 in the  construction business. Its drywall compound you mix yourself. It dries completly  in 90 min.


 I thought you had to take off the plaster or  drywall mold to lay up the first fiberglass. I can't seem to get the sequence  right in my mind.


 Vic

 N740VP


 Mike Welch


PS.  Another safe layer to use, at the beginning of  your build-up, that may be quite a bit more resilient than plastic [quote]wrap, is to use aluminum foil.  NO resins will eat it away, or otherwise seep through and get to your plane beneath. [b]
| | - The Matronics Kolb-List Email Forum - | | | Use the List Feature Navigator to browse the many List utilities available such as the Email Subscriptions page, Archive Search & Download, 7-Day Browse, Chat, FAQ, Photoshare, and much more:
http://www.matronics.com/Navigator?Kolb-List |
|
_________________
MKIIIX040
912UL |
|
| Back to top |
|
|
airspeedx3(at)yahoo.com
Guest
|
| Posted: Wed Mar 05, 2008 10:30 am Post subject: Lost mold strut faring |
|
|
Hi Vic,


    Generally, to make a fiberglass part you have to make a mold.  Usually, this mold is destroyed in order to get out your finished fiberglass part.  That's why they refer to it as "lost mold".

    In most situations to make a custom fiberglass part the sequence goes something like this;  (let's continue the fairing for the wing struts)


  1) protect the background structure from any mess you do.  Uncle Craig suggested using plastic food wrap.  His suggestion was very appropriate, because the mold material he was using was fabric and plaster of paris.  That stuff isn't corrosive or harmful, just mainly messy.  If you make a mold out of fiberglass, then you'll need to use something more durable.  I suggested aluminum foil.  Regardless of the specific product, you don't want to screw up your airplane underneath all the mess.


  2)  Not is the time to begin the basic build up.  Tape is a good idea.  Flat wood strips and a glue gun, urethane carving foam, etc.  The idea is to begin to shape the final product, and your very rough shape needs to be reasonably firm.


  3)  Now comes the sculting part.  At this point, you want the final product to be as smooth and perfect as you can get it.  I suggested dry wall compound, other's have suggested the rapid set joint compound.  I've never used it, but if it is easy to sculpt...why not??  (I've got an idea it's pretty close to the ingredients of plaster of paris)  You can use modeling clay, joint compound, bondo....whatever you want.  The point is you want to layer some on, and then sand your fairing to be as smooth and flawless as you can.


  4)At this point you're happy that what you have built looks  awesome!!  It was easy to shape and contour, but structurally it just a bunch of junk underneath.  If you were to paint it the same color as your plane, it would LOOK like a beautiful fairing.  Now is the time to make your "LOST MOLD".  Whether you use plaster of paris, or fiberglass can depend on the size of the item being made.  Certainly fiberglass will have a bit more flex than plaster.  But, for small one-off parts, plaster of paris might be the best choice.

    Coat the sculpted shape with wax, so that the mold doesn't stick to it.  Several layers of wax won't hurt!  Then mix up a good amount of plaster of paris and cloth strips.  Begin by laying on these strips to the fairing, and using a popcycle strip, spoon, etc., make sure you don't trap any bubbles of air against the surface.  These will be holes in your mold.  Continue carefully laying up all the strips of cloth drenched in  plaster.


  5)  I would highly recommend making your "lost mold" MUCH bigger and longer than you think (maybe an extra 1 1/2" in all directions).  You'd be surprised how much trimming you need to do to your finished part.  If you don't allow for this cosmetic trimming, you may add a ton of extra work to get it to look good.


  6)  After letting your mold set frimly, whether it is plaster or fiberglass, carefully pry it away from the sculpted fairing.  This is going to be the point where you wished you put on more releasing agent.  It is surprising how much that female mold wants to stick to the shape you made.  If you greatly underestimate that release agent, you may find the only way to get the two pieces apart is with a claw hammer.


  7)  If you managed to successfully seperate your "lost mold", you shouldn't need too much cosmetic work on the  inside.  Once you feel you've dressed up the inside, coat it a few times with mold release wax.  Then cut many (as in a LOT)  small strips of fiberglass cloth.

  Mix an appropriate amount of resin + 50% more, since running low in the middle of your project isn't smart, and do the similar job of whetting the strips, and laying them in, being conscientous to remove any bubbles.


  Here, watch this...it's essentially what we're after.  Just realize that this mold in the video is significantly better quality than what we may need for just one part...


  http://howtofiberglass.wordpress.com/2007/11/20/video-how-to-make-a-fiberglass-mold/


  Hope this helps give you an idea to do some fiberglass experimenting.  It really is fun!!!


   Mike Welch


  Vic Peters <vicsvinyl(at)verizon.net> wrote:

  [quote]        Just a thought. I've used Durabond 90 in the construction business. Its drywall compound you mix yourself. It dries completly in 90 min.


  I thought you had to take off the plaster or drywall mold to lay up the first fiberglass. I can't seem to get the sequence right in my       [quote][b]
| | - The Matronics Kolb-List Email Forum - | | | Use the List Feature Navigator to browse the many List utilities available such as the Email Subscriptions page, Archive Search & Download, 7-Day Browse, Chat, FAQ, Photoshare, and much more:
http://www.matronics.com/Navigator?Kolb-List |
|
|
|
| Back to top |
|
|
craig.nelson(at)heraeus.c
Guest
|
| Posted: Thu Mar 06, 2008 7:13 pm Post subject: Lost mold strut faring |
|
|
Yes I do take off the plaster shape it seal it wax it then lay up the part
Uncle craig
Do not archive
From: owner-kolb-list-server(at)matronics.com [mailto:owner-kolb-list-server(at)matronics.com] On Behalf Of Vic Peters
Sent: Wednesday, March 05, 2008 8:35 AM
To: kolb-list(at)matronics.com
Subject: Re: Kolb-List: Lost mold strut faring
Just a thought. I've used Durabond 90 in the construction business. Its drywall compound you mix yourself. It dries completly in 90 min.
I thought you had to take off the plaster or drywall mold to lay up the first fiberglass. I can't seem to get the sequence right in my mind.
Vic
N740VP
Mike Welch
PS. Another safe layer to use, at the beginning of your build-up, that may be quite a bit more resilient than plastic | Quote: | wrap, is to use aluminum foil. NO resins will eat it away, or otherwise seep through and get to your plane beneath.
seep through and get to your plane beneath.
|
0 | Quote: | seep through and get to your plane beneath.
|
1 | Quote: | seep through and get to your plane beneath.
|
2 | Quote: | seep through and get to your plane beneath.
|
3 | Quote: | seep through and get to your plane beneath.
|
4 | Quote: | seep through and get to your plane beneath.
|
5 | Quote: | seep through and get to your plane beneath.
|
6 | Quote: | seep through and get to your plane beneath.
|
7 | Quote: | seep through and get to your plane beneath.
|
8 | Quote: | seep through and get to your plane beneath.
|
901
[quote][b]
| | - The Matronics Kolb-List Email Forum - | | | Use the List Feature Navigator to browse the many List utilities available such as the Email Subscriptions page, Archive Search & Download, 7-Day Browse, Chat, FAQ, Photoshare, and much more:
http://www.matronics.com/Navigator?Kolb-List |
|
|
|
| Back to top |
|
|
|
|
You cannot post new topics in this forum
You cannot reply to topics in this forum
You cannot edit your posts in this forum
You cannot delete your posts in this forum
You cannot vote in polls in this forum
You cannot attach files in this forum
You can download files in this forum
|
Powered by phpBB © 2001, 2005 phpBB Group
|

