 |
Matronics Email Lists
Web Forum Interface to the Matronics Email Lists
|
| View previous topic :: View next topic |
| Author |
Message |
william(at)gbta.net
Guest
|
 Posted: Wed Feb 24, 2010 10:04 am Post subject: How did you set these rivets Posted: Wed Feb 24, 2010 10:04 am Post subject: How did you set these rivets |
 |
|
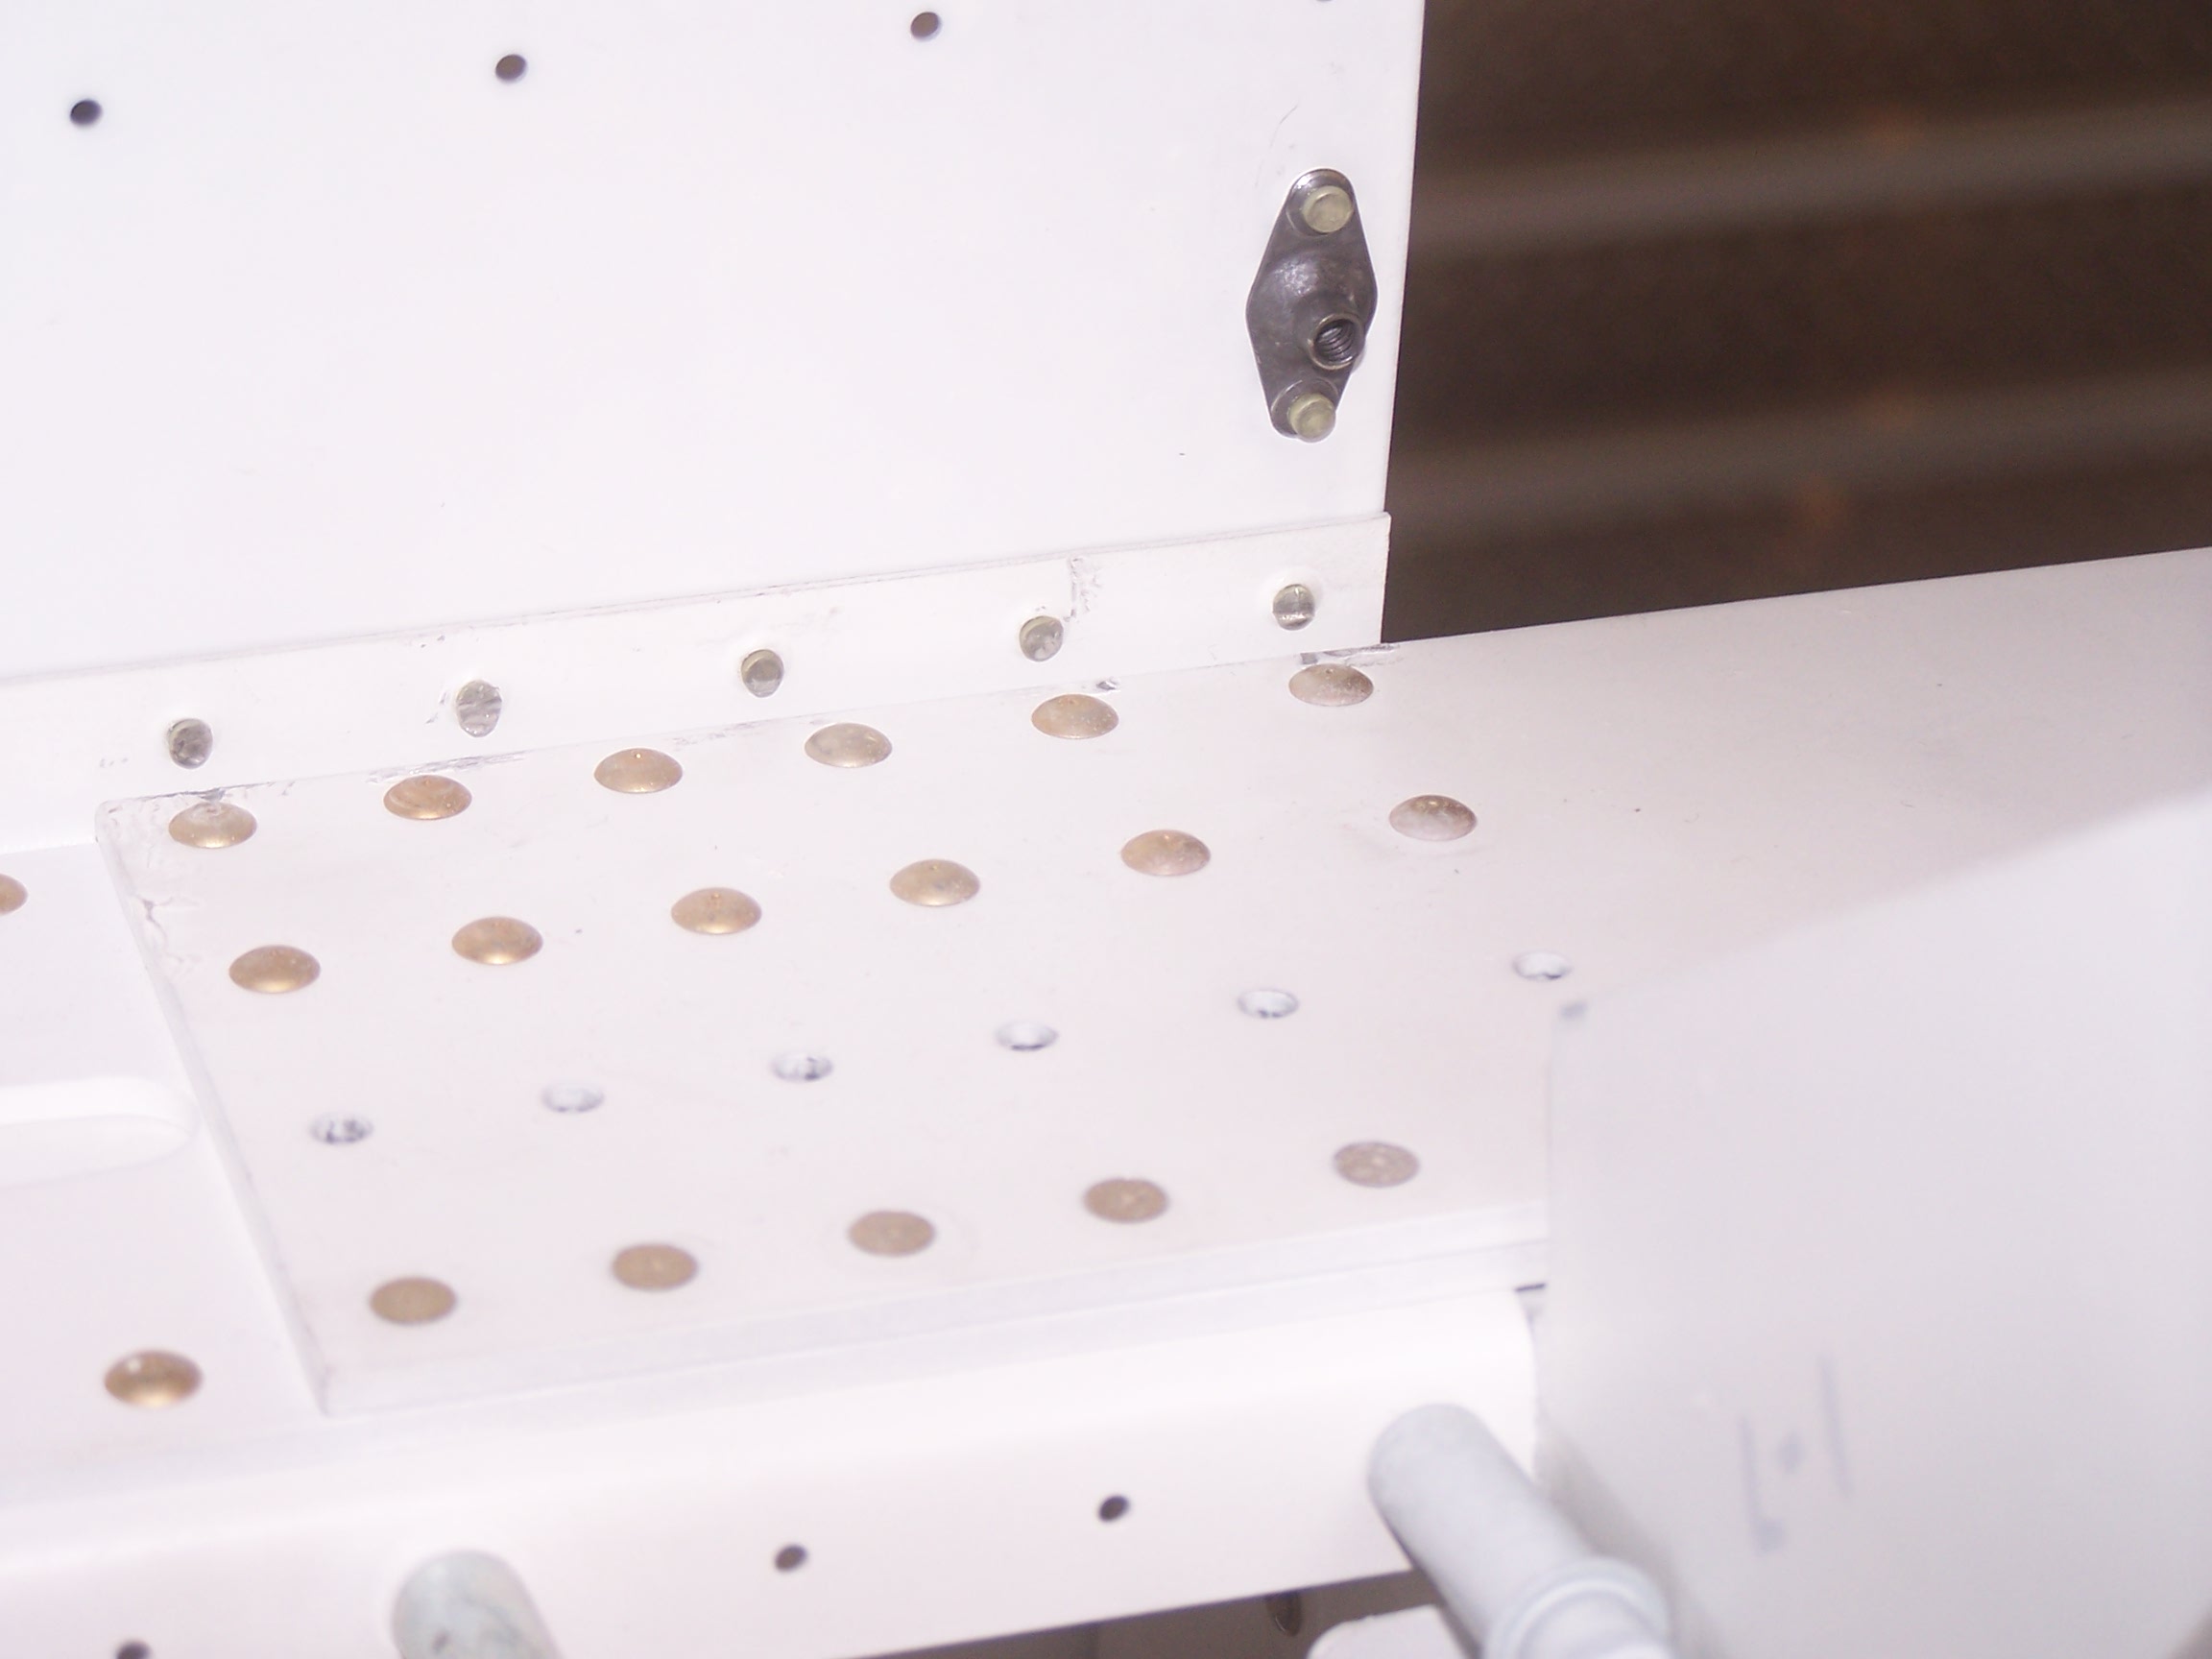
These are on the top wing skin (section 16).   Riveting the skin to the rear spar flange on the inboard edge (where the  rear spar reinforcement fork and doubler plate are).   As you can see,  mine turned out less than stellar.  I'll drill them out and try again but  thought I'd see if anybody has any secrets.  There isn't much room  between the tail of the rivet and the doubler plate to get a bucking bar on it  square and I don't have a squeezer head deep enough to reach over the skin  edge.


 Thanks in advance

 Bill
| | - The Matronics RV10-List Email Forum - | | | Use the List Feature Navigator to browse the many List utilities available such as the Email Subscriptions page, Archive Search & Download, 7-Day Browse, Chat, FAQ, Photoshare, and much more:
http://www.matronics.com/Navigator?RV10-List |
|
| Description: |
|
| Filesize: |
191.66 KB |
| Viewed: |
5628 Time(s) |
|
|
|
| Back to top |
|
 |
tsts4
Joined: 06 Aug 2007
Posts: 167
Location: Tampa, FL
|
| Posted: Wed Feb 24, 2010 10:21 am Post subject: Re: How did you set these rivets |
|
|
Bill,

What shape is your bucking bar?  There's no problem with resting the bar on the heads of the 470s in order to keep it square.  It also might help to use a partner so that the bucker can focus 100% on keeping the bar square to the rivet.


While you're at it you might want to check your pressure as all of those rivets look over-driven.  35-38psi is all you need for a 3-3 to 3-5 rivet.  Also try shortening your shooting duration to say just over a second, stop and see how the rivet's setting.  Better to under set and hit it again with a quick blurp then to blast away.  Don't worry about work hardening these small rivets.
| | - The Matronics RV10-List Email Forum - | | | Use the List Feature Navigator to browse the many List utilities available such as the Email Subscriptions page, Archive Search & Download, 7-Day Browse, Chat, FAQ, Photoshare, and much more:
http://www.matronics.com/Navigator?RV10-List |
|
_________________
Todd Stovall
aka "Auburntsts" on EAA and VAF
RV-10 N728TT -- Flying |
|
| Back to top |
|
|
Phil.Perry(at)netapp.com
Guest
|
| Posted: Wed Feb 24, 2010 10:47 am Post subject: How did you set these rivets |
|
|
Disclaimer - I haven't built my wings....


But you might be able to drill out the interfering rivets, then reset

them after the other one's are bucked??


Phil


--
| | - The Matronics RV10-List Email Forum - | | | Use the List Feature Navigator to browse the many List utilities available such as the Email Subscriptions page, Archive Search & Download, 7-Day Browse, Chat, FAQ, Photoshare, and much more:
http://www.matronics.com/Navigator?RV10-List |
|
|
|
| Back to top |
|
|
AV8ORJWC
Joined: 13 Jul 2006
Posts: 1149
Location: Aurora, Oregon "Home of VANS"
|
| Posted: Wed Feb 24, 2010 11:05 am Post subject: How did you set these rivets |
|
|
3M prop tape (Impact Tape) or in a pinch cheap electrician tape placed on the side of the bucking bar which is resting on the 470 heads should work nicely.


 I would redrill and reset the toenailed bucked heads as you recommend.  Often, it is the bucking bar skipping off the rivet that causes the imperfection shown in your picture.  Use of a 2X instead of a 3X gun or lower line pressure can help the outcome.  Having a teaser trigger helps with the rhythm as well.


 Paul Grimstad #40450, found a 0.0625" foam with adhesive used by journeyman electricians inside junction boxes which is the cat's meow.  He had a bigger sheet of it and it had little tabs which could be placed on several sides of a bucking bar.  The foam also damned some of the vibration into the assistant's hand. Prop tape last a little longer.  Electricians tape has poor quality adhesive but they all provide a cushion on those 470 heads.


  John Cox

 #40600

 do not archive


  From: owner-rv10-list-server(at)matronics.com on behalf of Bill and Tami Britton

Sent: Wed 2/24/2010 8:07 AM

To: rv10-list(at)matronics.com

Subject: How did you set these rivets

  These are on the top wing skin (section 16).  Riveting the skin to the rear spar flange on the inboard edge (where the rear spar reinforcement fork and doubler plate are).   As you can see, mine turned out less than stellar.  I'll drill them out and try again but thought I'd see if anybody has any secrets.  There isn't much room between the tail of the rivet and the doubler plate to get a bucking bar on it square and I don't have a squeezer head deep enough to reach over the skin edge.


 Thanks in advance

 Bill


 [quote][b]
| | - The Matronics RV10-List Email Forum - | | | Use the List Feature Navigator to browse the many List utilities available such as the Email Subscriptions page, Archive Search & Download, 7-Day Browse, Chat, FAQ, Photoshare, and much more:
http://www.matronics.com/Navigator?RV10-List |
|
|
|
| Back to top |
|
|
jeff(at)westcottpress.com
Guest
|
| Posted: Wed Feb 24, 2010 11:05 am Post subject: How did you set these rivets |
|
|
you can also run a piece of wide masking tape over the heads of the
470's up to the corner to keep the bucking bar that's resting on them
from mucking anything up.
Jeff Carpenter
40304
on the cusp of final install of the cabin top
On Feb 24, 2010, at 10:21 AM, tsts4 wrote:
| Quote: |
Bill,
What shape is your bucking bar? There's no problem with resting the
bar on the heads of the 470s in order to keep it square. It also
might help to use a partner so that the bucker can focus 100% on
keeping the bar square to the rivet.
While you're at it you might want to check your pressure as all of
those rivets look over-driven. 35-38psi is all you need for a 3-3
to 3-5 rivet. Also try shortening your shooting duration to say
just over a second, stop and see how the rivet's setting. Better to
under set and hit it again with a quick blurp then to blast away.
Don't worry about work hardening these small rivets.
--------
Todd Stovall
728TT (reserved)
RV-10 Empacone, Wings
Read this topic online here:
http://forums.matronics.com/viewtopic.php?p=287987#287987
|
| | - The Matronics RV10-List Email Forum - | | | Use the List Feature Navigator to browse the many List utilities available such as the Email Subscriptions page, Archive Search & Download, 7-Day Browse, Chat, FAQ, Photoshare, and much more:
http://www.matronics.com/Navigator?RV10-List |
|
|
|
| Back to top |
|
|
Sstella(at)incisaledge.co
Guest
|
| Posted: Wed Feb 24, 2010 11:23 am Post subject: How did you set these rivets |
|
|
I just laid the square shaped bucking bar on the 470’s and that kept it square to the rivet and the duct tape on the bucking bar protected the rivets.


Steve Stella

#40654  Wings

N521RV reserved


From: owner-rv10-list-server(at)matronics.com [mailto:owner-rv10-list-server(at)matronics.com] On Behalf Of Bill and Tami Britton

 Sent: Wednesday, February 24, 2010 11:08 AM

 To: rv10-list(at)matronics.com

 Subject: How did you set these rivets


These are on the top wing skin (section 16).  Riveting the skin to the rear spar flange on the inboard edge (where the rear spar reinforcement fork and doubler plate are).   As you can see, mine turned out less than stellar.  I'll drill them out and try again but thought I'd see if anybody has any secrets.  There isn't much room between the tail of the rivet and the doubler plate to get a bucking bar on it square and I don't have a squeezer head deep enough to reach over the skin edge.


Thanks in advance


Bill


       [quote][b]
| | - The Matronics RV10-List Email Forum - | | | Use the List Feature Navigator to browse the many List utilities available such as the Email Subscriptions page, Archive Search & Download, 7-Day Browse, Chat, FAQ, Photoshare, and much more:
http://www.matronics.com/Navigator?RV10-List |
|
|
|
| Back to top |
|
|
william(at)gbta.net
Guest
|
| Posted: Wed Feb 24, 2010 3:54 pm Post subject: How did you set these rivets |
|
|
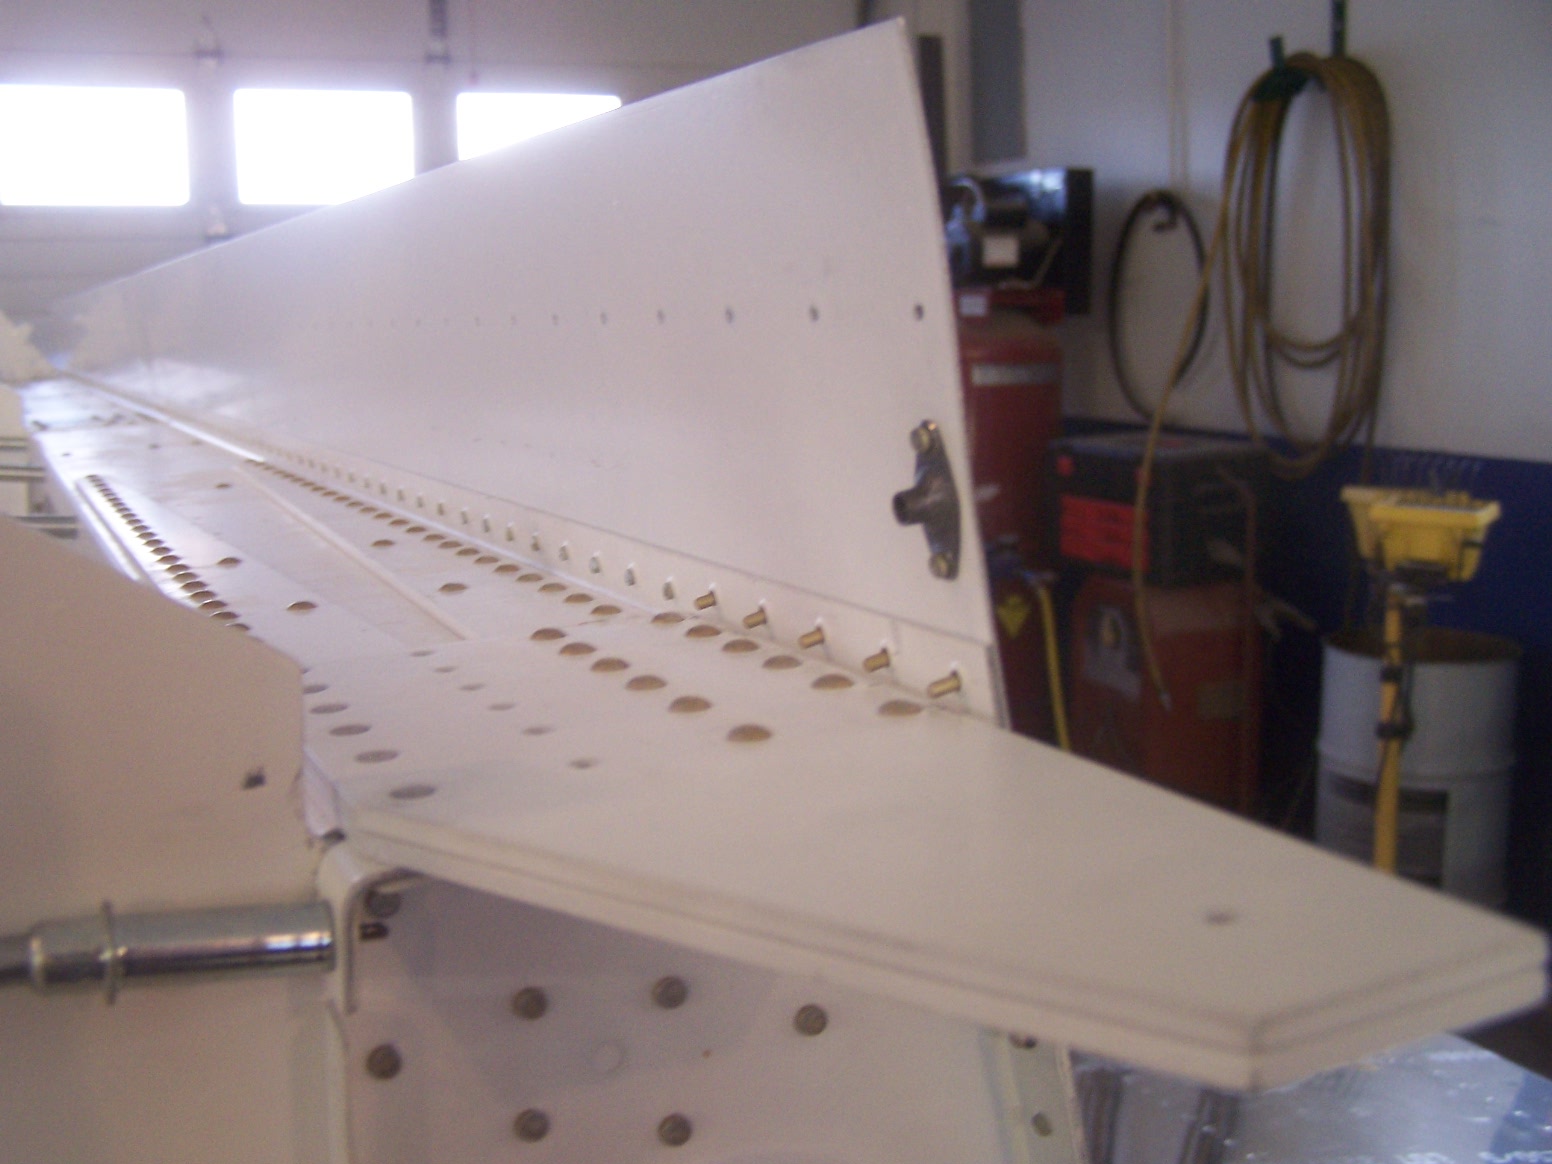
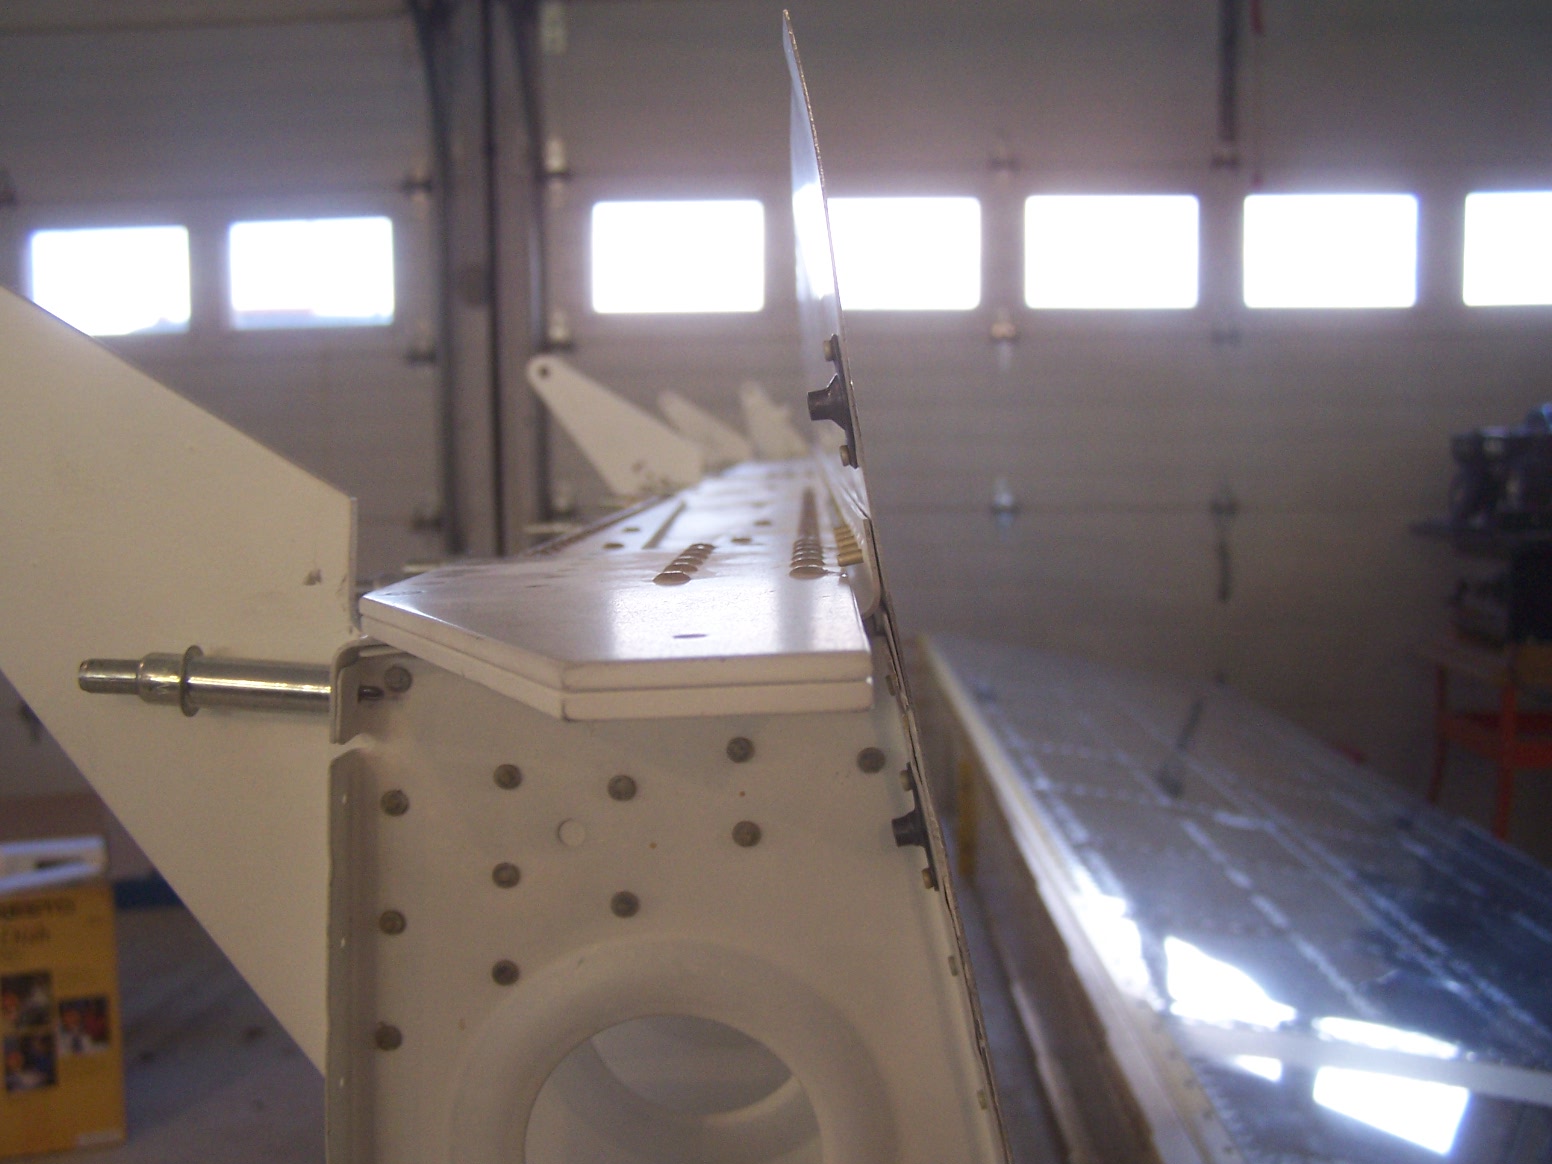
I guess I didn't get my point across in the original e-mail. The 470's
aren't the problem. The problem is that the tails of the AN426AD3's when
not driven are nearly below the surface of that doubler so they are about
impossible to get at. Compound that with the fact that they ARE NOT
perpendicular to the doubler plate (the flange on that rear spar is at an
angle to the doubler) makes them pretty tough to get at. Laying a bucking
bar flat on the 470's and driving the AD3's in the flange will just lay them
over.
Clear as mud?? I'll try to get a pic to explain.
Thanks,
Bill
--------------------------------------------------
From: "tsts4" <tsts4(at)verizon.net>
Sent: Wednesday, February 24, 2010 12:21 PM
To: <rv10-list(at)matronics.com>
Subject: Re: How did you set these rivets
| Quote: |
Bill,
What shape is your bucking bar? There's no problem with resting the bar
on the heads of the 470s in order to keep it square. It also might help
to use a partner so that the bucker can focus 100% on keeping the bar
square to the rivet.
While you're at it you might want to check your pressure as all of those
rivets look over-driven. 35-38psi is all you need for a 3-3 to 3-5 rivet.
Also try shortening your shooting duration to say just over a second, stop
and see how the rivet's setting. Better to under set and hit it again
with a quick blurp then to blast away. Don't worry about work hardening
these small rivets.
--------
Todd Stovall
728TT (reserved)
RV-10 Empacone, Wings
Read this topic online here:
http://forums.matronics.com/viewtopic.php?p=287987#287987
|
| | - The Matronics RV10-List Email Forum - | | | Use the List Feature Navigator to browse the many List utilities available such as the Email Subscriptions page, Archive Search & Download, 7-Day Browse, Chat, FAQ, Photoshare, and much more:
http://www.matronics.com/Navigator?RV10-List |
|
|
|
| Back to top |
|
|
william(at)gbta.net
Guest
|
| Posted: Wed Feb 24, 2010 4:01 pm Post subject: How did you set these rivets |
|
|
The 470's weren't the problem.  Problem is very little room to get to the

tails to buck the AD3's.  Setting the bucking bar directly on the 470's

isn't the best way either because there is actually some angle to the AD3's.

See the attached pictures for a better description.


BTW:  Sorry for the huge pictures I sent earlier.  Reset the megs on my

camera to it's lowest setting.  Maybe these won't take up as much space.


Do not archive


Bill

---
| | - The Matronics RV10-List Email Forum - | | | Use the List Feature Navigator to browse the many List utilities available such as the Email Subscriptions page, Archive Search & Download, 7-Day Browse, Chat, FAQ, Photoshare, and much more:
http://www.matronics.com/Navigator?RV10-List |
|
| Description: |
|
| Filesize: |
249.56 KB |
| Viewed: |
5603 Time(s) |
|
| Description: |
|
| Filesize: |
265.87 KB |
| Viewed: |
5603 Time(s) |
|
|
|
| Back to top |
|
|
pitts_pilot(at)bellsouth.
Guest
|
| Posted: Wed Feb 24, 2010 4:45 pm Post subject: How did you set these rivets |
|
|
I have a bucking bar just made for your application .... picture a soap

bar with a 'ledge' protruding from one of teh short edges.

Linn


Bill and Tami Britton wrote:

[quote] The 470's weren't the problem.  Problem is very little room to get to

 the tails to buck the AD3's.  Setting the bucking bar directly on the

 470's isn't the best way either because there is actually some angle to

 the AD3's. See the attached pictures for a better description.


 BTW:  Sorry for the huge pictures I sent earlier.  Reset the megs on my

 camera to it's lowest setting.  Maybe these won't take up as much space.


 Do not archive


 Bill

 ---
| | - The Matronics RV10-List Email Forum - | | | Use the List Feature Navigator to browse the many List utilities available such as the Email Subscriptions page, Archive Search & Download, 7-Day Browse, Chat, FAQ, Photoshare, and much more:
http://www.matronics.com/Navigator?RV10-List |
|
|
|
| Back to top |
|
|
jcumins(at)jcis.net
Guest
|
| Posted: Wed Feb 24, 2010 5:15 pm Post subject: How did you set these rivets |
|
|
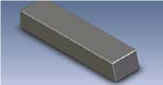
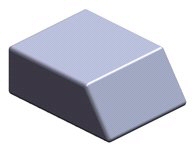
They make a bar that will fit in their real nice.  My tungsten bad has a end that has a edge with a lip that will allow the bar to be canted at the angle of the spar and skin what will fit between the rivet and the existing 470 rivet.


 [img]cid:image001.png(at)01CAB572.FB6B8FB0[/img]


This bar makes riveting so simple just don’t drop it or it will ding your skins in a heartbeat.  I am getting in the practice to lay carpet down on all material being bucked so if I do drop it no damage is done.


John 40864

Emp assembly (finally done primering)


--
| | - The Matronics RV10-List Email Forum - | | | Use the List Feature Navigator to browse the many List utilities available such as the Email Subscriptions page, Archive Search & Download, 7-Day Browse, Chat, FAQ, Photoshare, and much more:
http://www.matronics.com/Navigator?RV10-List |
|
| Description: |
|
| Filesize: |
17 KB |
| Viewed: |
5599 Time(s) |
|
|
|
| Back to top |
|
|
jeff(at)westcottpress.com
Guest
|
| Posted: Wed Feb 24, 2010 6:04 pm Post subject: How did you set these rivets |
|
|
You should be able to "free hand" an angled face bucking bar in that

spot without much of a problem.  Use your thumb and forefinger to

square up the face to the surface... and tape off the bar where it

might bounce in to something you don't want to scratch.


Jeff Carpenter

40304

On Feb 24, 2010, at 3:54 PM, Bill and Tami Britton wrote:


[quote] The 470's weren't the problem.  Problem is very little room to get

 to the tails to buck the AD3's.  Setting the bucking bar directly on

 the 470's isn't the best way either because there is actually some

 angle to the AD3's. See the attached pictures for a better

 description.


 BTW:  Sorry for the huge pictures I sent earlier.  Reset the megs on

 my camera to it's lowest setting.  Maybe these won't take up as much

 space.


 Do not archive


 Bill

 ---
| | - The Matronics RV10-List Email Forum - | | | Use the List Feature Navigator to browse the many List utilities available such as the Email Subscriptions page, Archive Search & Download, 7-Day Browse, Chat, FAQ, Photoshare, and much more:
http://www.matronics.com/Navigator?RV10-List |
|
|
|
| Back to top |
|
|
n223rv(at)wolflakeairport
Guest
|
| Posted: Wed Feb 24, 2010 6:04 pm Post subject: How did you set these rivets |
|
|
Can't you use a bucking bar with an angled face? Then you don't touch
the 470's and can adjust for the angle difference...
Sent from my iPhone
On Feb 24, 2010, at 6:31 PM, "Billy & Tami Britton" <william(at)gbta.net>
wrote:
| Quote: |
>
I guess I didn't get my point across in the original e-mail. The
470's aren't the problem. The problem is that the tails of the
AN426AD3's when not driven are nearly below the surface of that
doubler so they are about impossible to get at. Compound that with
the fact that they ARE NOT perpendicular to the doubler plate (the
flange on that rear spar is at an angle to the doubler) makes them
pretty tough to get at. Laying a bucking bar flat on the 470's and
driving the AD3's in the flange will just lay them over.
Clear as mud?? I'll try to get a pic to explain.
Thanks,
Bill
--------------------------------------------------
From: "tsts4" <tsts4(at)verizon.net>
Sent: Wednesday, February 24, 2010 12:21 PM
To: <rv10-list(at)matronics.com>
Subject: Re: How did you set these rivets
>
>
> Bill,
> What shape is your bucking bar? There's no problem with resting
> the bar on the heads of the 470s in order to keep it square. It
> also might help to use a partner so that the bucker can focus 100%
> on keeping the bar square to the rivet.
>
> While you're at it you might want to check your pressure as all of
> those rivets look over-driven. 35-38psi is all you need for a 3-3
> to 3-5 rivet. Also try shortening your shooting duration to say
> just over a second, stop and see how the rivet's setting. Better
> to under set and hit it again with a quick blurp then to blast
> away. Don't worry about work hardening these small rivets.
>
> --------
> Todd Stovall
> 728TT (reserved)
> RV-10 Empacone, Wings
>
>
> Read this topic online here:
>
> http://forums.matronics.com/viewtopic.php?p=287987#287987
>
|
<pre><b><font size=2 color="#000000" face="courier new,courier">
| | - The Matronics RV10-List Email Forum - | | | Use the List Feature Navigator to browse the many List utilities available such as the Email Subscriptions page, Archive Search & Download, 7-Day Browse, Chat, FAQ, Photoshare, and much more:
http://www.matronics.com/Navigator?RV10-List |
|
| Description: |
|
| Filesize: |
14.14 KB |
| Viewed: |
5592 Time(s) |
|
|
|
| Back to top |
|
|
william(at)gbta.net
Guest
|
| Posted: Wed Feb 24, 2010 6:14 pm Post subject: How did you set these rivets |
|
|
That looks exactly like what I need. Looks like I need to expand my bucking bar selection.
Thanks guys.
Bill--Trying to get wings done between all the mistakes and questions--Britton
RV-10
From: John Cumins (jcumins(at)jcis.net)
Sent: Wednesday, February 24, 2010 7:01 PM
To: rv10-list(at)matronics.com (rv10-list(at)matronics.com)
Subject: RE: Re: How did you set these rivets
They make a bar that will fit in their real nice. My tungsten bad has a end that has a edge with a lip that will allow the bar to be canted at the angle of the spar and skin what will fit between the rivet and the existing 470 rivet.
[img]cid:EB59362BB5BA48FBBCC5888459FB6396(at)BrittonPC[/img]
This bar makes riveting so simple just dont drop it or it will ding your skins in a heartbeat. I am getting in the practice to lay carpet down on all material being bucked so if I do drop it no damage is done.
John 40864
Emp assembly (finally done primering)
--
| | - The Matronics RV10-List Email Forum - | | | Use the List Feature Navigator to browse the many List utilities available such as the Email Subscriptions page, Archive Search & Download, 7-Day Browse, Chat, FAQ, Photoshare, and much more:
http://www.matronics.com/Navigator?RV10-List |
|
| Description: |
|
| Filesize: |
17 KB |
| Viewed: |
5592 Time(s) |

|
|
|
| Back to top |
|
|
|
|
You cannot post new topics in this forum
You cannot reply to topics in this forum
You cannot edit your posts in this forum
You cannot delete your posts in this forum
You cannot vote in polls in this forum
You cannot attach files in this forum
You can download files in this forum
|
Powered by phpBB © 2001, 2005 phpBB Group
|

