 |
Matronics Email Lists
Web Forum Interface to the Matronics Email Lists
|
| View previous topic :: View next topic |
| Author |
Message |
Matt Dralle
Site Admin

Joined: 08 Nov 2005
Posts: 26320
Location: Livermore CA USA
|
 Posted: Wed May 29, 2013 9:07 am Post subject: RV-8 Canopy Posted: Wed May 29, 2013 9:07 am Post subject: RV-8 Canopy |
 |
|
| Quote: | At 12:01 PM 5/28/2013 Tuesday, you wrote:
I'll second the air conditioner. Gets a little warm at LVK on summer afternoons. I bought an evaporative cooler that helps considerably. Nice video.
Regards,
Michael Wynn
|
Hey Michael,
How'd your canopy turn out? I'm on my second try now on the rebuild. I think this one might be the one. I drilled the mounting holes #36 then tapped for #6 screws. I like to be able to remove the skirts well into the process and using screws instead of rivets seems to work out a lot better. On Ruby 1.0 I used those Rivnuts which worked well. But, they are very large and its hard to properly fit the plexiglass because they protrude by 1/16" and you can't put them in until after the fitting is done - a Catch 22 of sorts. I'm hoping that tapping the frame will work. The frame metal is fairly thick and really hard so it would seem that tapping might work really well. You don't want to over tighten the screws because of the plexi anyway, so you don't need much to hold the screw. Today I enlarge the holes in the plexi from #40 to about 3/16" then try out my tapping/screw idea. Wish me luck!
-
Matt Dralle
RV-8 #82880 N998RV "Ruby Vixen"
http://www.mattsrv8.com - Matt's Complete RV-8 Construction Log
http://www.mattsrv8.com/Mishap - Landing Mishap Rebuild Log
http://www.youtube.com/MattsRV8 - Matt's RV-8 HDTV YouTube Channel
Status: 172+ Hours TTSN - Rebuilding Fuselage After Landing Mishap...
RV-6 #20916 N360EM "The Flyer"
http://www.mattsrv6.com - Matt's RV-6 Revitalization Log
Status: 150+ Hours Since Purchase - Upgrades Complete; Now In Full Flyer Mode
| | - The Matronics RV-List Email Forum - | | | Use the List Feature Navigator to browse the many List utilities available such as the Email Subscriptions page, Archive Search & Download, 7-Day Browse, Chat, FAQ, Photoshare, and much more:
http://www.matronics.com/Navigator?RV-List |
|
_________________
Matt Dralle
Matronics Email List Administrator |
|
| Back to top |
|
 |
rv8iator(at)gmail.com
Guest
|
| Posted: Wed May 29, 2013 10:36 am Post subject: RV-8 Canopy |
|
|
Matt et al...


I see from your log photos that you cut the forward top skin back to flush with the support brackets that attach to the windshield frame.  I was considering doing the same since the canopy frame does not really fit under the skin.  Further the fibre glass fabricated faring will cover this gap between canopy fairing and forward top skin.  Am I missing something here?


WRT your tapping the canopy frame for 6-32 screws...  are clecos not sufficient to hold things together during fitting?

You builders log has been a great reference...  Even though this is my second RV-8 with a couple of years in between builds the minds eye flickers and doesn't always present a clear mental picture as to the "best way".


Thanks!

Chris Stone

Newberg, OR


On Wed, May 29, 2013 at 10:06 AM, Matt Dralle <dralle(at)matronics.com (dralle(at)matronics.com)> wrote:

 [quote]--> RV-List message posted by: Matt Dralle <dralle(at)matronics.com (dralle(at)matronics.com)>


 >At 12:01 PM 5/28/2013 Tuesday, you wrote:

 >I'll second the air conditioner.  Gets a little warm at LVK on summer afternoons.  I bought an evaporative cooler that helps considerably.  Nice video.

 >

 >Regards,

 >

 >Michael Wynn


 Hey Michael,


 How'd your canopy turn out?  I'm on my second try now on the rebuild.  I think this one might be the one.  I drilled the mounting holes #36 then tapped for #6 screws.  I like to be able to remove the skirts well into the process and using screws instead of rivets seems to work out a lot better.  On Ruby 1.0 I used those Rivnuts which worked well.  But, they are very large and its hard to properly fit the plexiglass because they protrude by 1/16" and you can't put them in until after the fitting is done - a Catch 22 of sorts.  I'm hoping that tapping the frame will work.  The frame metal is fairly thick and really hard so it would seem that tapping might work really well.  You don't want to over tighten the screws because of the plexi anyway, so you don't need much to hold the screw.  Today I enlarge the holes in the plexi from #40 to about 3/16" then try out my tapping/screw idea.  Wish me luck!


 -

 Matt Dralle


 RV-8 #82880 N998RV "Ruby Vixen"

 http://www.mattsrv8.com - Matt's Complete RV-8 Construction Log

 http://www.mattsrv8.com/Mishap - Landing Mishap Rebuild Log

 http://www.youtube.com/MattsRV8 - Matt's RV-8 HDTV YouTube Channel

 Status: 172+ Hours TTSN - Rebuilding Fuselage After Landing Mishap...


 RV-6 #20916 N360EM "The Flyer"

 http://www.mattsrv6.com - Matt's RV-6 Revitalization Log

 Status: 150+ Hours Since Purchase - Upgrades Complete; Now In Full Flyer Mode


 ===========

 target="_blank">http://www.matronics.com/Navigator?RV-List

 ===========

 MS -

 k">http://forums.matronics.com

 ===========

 e -

           -Matt Dralle, List Admin.

 t="_blank">http://www.matronics.com/contribution

 ===========


 [b]
| | - The Matronics RV-List Email Forum - | | | Use the List Feature Navigator to browse the many List utilities available such as the Email Subscriptions page, Archive Search & Download, 7-Day Browse, Chat, FAQ, Photoshare, and much more:
http://www.matronics.com/Navigator?RV-List |
|
|
|
| Back to top |
|
|
flying-nut(at)cfl.rr.com
Guest
|
| Posted: Wed May 29, 2013 11:33 am Post subject: RV-8 Canopy |
|
|
Once you get everything drilled and tapped use your step drill to
enlarge the holes in the plexi to give it ample room to flex. I'd use
pan-head screws with the nylon washers underneath.
Linn
PS .... Good Luck!!! 
On 5/29/2013 1:06 PM, Matt Dralle wrote:
| Quote: |
> At 12:01 PM 5/28/2013 Tuesday, you wrote:
> I'll second the air conditioner. Gets a little warm at LVK on summer afternoons. I bought an evaporative cooler that helps considerably. Nice video.
>
> Regards,
>
> Michael Wynn
Hey Michael,
How'd your canopy turn out? I'm on my second try now on the rebuild. I think this one might be the one. I drilled the mounting holes #36 then tapped for #6 screws. I like to be able to remove the skirts well into the process and using screws instead of rivets seems to work out a lot better. On Ruby 1.0 I used those Rivnuts which worked well. But, they are very large and its hard to properly fit the plexiglass because they protrude by 1/16" and you can't put them in until after the fitting is done - a Catch 22 of sorts. I'm hoping that tapping the frame will work. The frame metal is fairly thick and really hard so it would seem that tapping might work really well. You don't want to over tighten the screws because of the plexi anyway, so you don't need much to hold the screw. Today I enlarge the holes in the plexi from #40 to about 3/16" then try out my tapping/screw idea. Wish me luck!
-
Matt Dralle
RV-8 #82880 N998RV "Ruby Vixen"
http://www.mattsrv8.com - Matt's Complete RV-8 Construction Log
http://www.mattsrv8.com/Mishap - Landing Mishap Rebuild Log
http://www.youtube.com/MattsRV8 - Matt's RV-8 HDTV YouTube Channel
Status: 172+ Hours TTSN - Rebuilding Fuselage After Landing Mishap...
RV-6 #20916 N360EM "The Flyer"
http://www.mattsrv6.com - Matt's RV-6 Revitalization Log
Status: 150+ Hours Since Purchase - Upgrades Complete; Now In Full Flyer Mode
-----
No virus found in this message.
Checked by AVG - www.avg.com
|
| | - The Matronics RV-List Email Forum - | | | Use the List Feature Navigator to browse the many List utilities available such as the Email Subscriptions page, Archive Search & Download, 7-Day Browse, Chat, FAQ, Photoshare, and much more:
http://www.matronics.com/Navigator?RV-List |
|
|
|
| Back to top |
|
|
n223rv(at)wolflakeairport
Guest
|
| Posted: Wed May 29, 2013 12:00 pm Post subject: RV-8 Canopy |
|
|
And remember to not use loc-tite on the screws!! It'll eat your canopy!!
-Mike Kraus
RV-4 sold 
RV-10 flying
KitFox SS7 Radial building
On May 29, 2013, at 3:32 PM, Linn <flying-nut(at)cfl.rr.com> wrote:
| Quote: |
Once you get everything drilled and tapped use your step drill to enlarge the holes in the plexi to give it ample room to flex. I'd use pan-head screws with the nylon washers underneath.
Linn
PS .... Good Luck!!!
On 5/29/2013 1:06 PM, Matt Dralle wrote:
>
>
>
>> At 12:01 PM 5/28/2013 Tuesday, you wrote:
>> I'll second the air conditioner. Gets a little warm at LVK on summer afternoons. I bought an evaporative cooler that helps considerably. Nice video.
>>
>> Regards,
>>
>> Michael Wynn
>
> Hey Michael,
>
> How'd your canopy turn out? I'm on my second try now on the rebuild. I think this one might be the one. I drilled the mounting holes #36 then tapped for #6 screws. I like to be able to remove the skirts well into the process and using screws instead of rivets seems to work out a lot better. On Ruby 1.0 I used those Rivnuts which worked well. But, they are very large and its hard to properly fit the plexiglass because they protrude by 1/16" and you can't put them in until after the fitting is done - a Catch 22 of sorts. I'm hoping that tapping the frame will work. The frame metal is fairly thick and really hard so it would seem that tapping might work really well. You don't want to over tighten the screws because of the plexi anyway, so you don't need much to hold the screw. Today I enlarge the holes in the plexi from #40 to about 3/16" then try out my tapping/screw idea. Wish me luck!
>
>
> -
> Matt Dralle
>
> RV-8 #82880 N998RV "Ruby Vixen"
> http://www.mattsrv8.com - Matt's Complete RV-8 Construction Log
> http://www.mattsrv8.com/Mishap - Landing Mishap Rebuild Log
> http://www.youtube.com/MattsRV8 - Matt's RV-8 HDTV YouTube Channel
> Status: 172+ Hours TTSN - Rebuilding Fuselage After Landing Mishap...
>
> RV-6 #20916 N360EM "The Flyer"
> http://www.mattsrv6.com - Matt's RV-6 Revitalization Log
> Status: 150+ Hours Since Purchase - Upgrades Complete; Now In Full Flyer Mode
>
>
>
>
>
>
>
> -----
> No virus found in this message.
> Checked by AVG - www.avg.com
|
| | - The Matronics RV-List Email Forum - | | | Use the List Feature Navigator to browse the many List utilities available such as the Email Subscriptions page, Archive Search & Download, 7-Day Browse, Chat, FAQ, Photoshare, and much more:
http://www.matronics.com/Navigator?RV-List |
|
|
|
| Back to top |
|
|
gyoung

Joined: 09 Jan 2006
Posts: 211
Location: Republic of Texas
|
| Posted: Wed May 29, 2013 1:14 pm Post subject: RV-8 Canopy |
|
|
I used the screws on my RV-6 canopy and was really happy with the way they worked out. I don't recall how big the holes were but they were big enough to use Tinnerman washers across the front bow. I dimpled the skirts and let that serve as the "washer" so I had countersunk screws all around. The canopy survived a crash and a round trip on a trailer to the salvage yard. I'd say it's pretty robust. It's going on the new RV with just a new skirt on one side.


Regards,

Greg Young

--
| | - The Matronics RV-List Email Forum - | | | Use the List Feature Navigator to browse the many List utilities available such as the Email Subscriptions page, Archive Search & Download, 7-Day Browse, Chat, FAQ, Photoshare, and much more:
http://www.matronics.com/Navigator?RV-List |
|
|
|
| Back to top |
|
|
Matt Dralle
Site Admin
Joined: 08 Nov 2005
Posts: 26320
Location: Livermore CA USA
|
| Posted: Wed May 29, 2013 2:35 pm Post subject: RV-8 Canopy |
|
|
At 10:06 AM 5/29/2013 Wednesday, you wrote:
| Quote: |
How'd your canopy turn out? I'm on my second try now on the rebuild. I think this one might be the one. I drilled the mounting holes #36 then tapped for #6 screws. I like to be able to remove the skirts well into the process and using screws instead of rivets seems to work out a lot better. On Ruby 1.0 I used those Rivnuts which worked well. But, they are very large and its hard to properly fit the plexiglass because they protrude by 1/16" and you can't put them in until after the fitting is done - a Catch 22 of sorts. I'm hoping that tapping the frame will work. The frame metal is fairly thick and really hard so it would seem that tapping might work really well. You don't want to over tighten the screws because of the plexi anyway, so you don't need much to hold the screw. Today I enlarge the holes in the plexi from #40 to about 3/16" then try out my tapping/screw idea. Wish me luck!
-
Matt Dralle
|
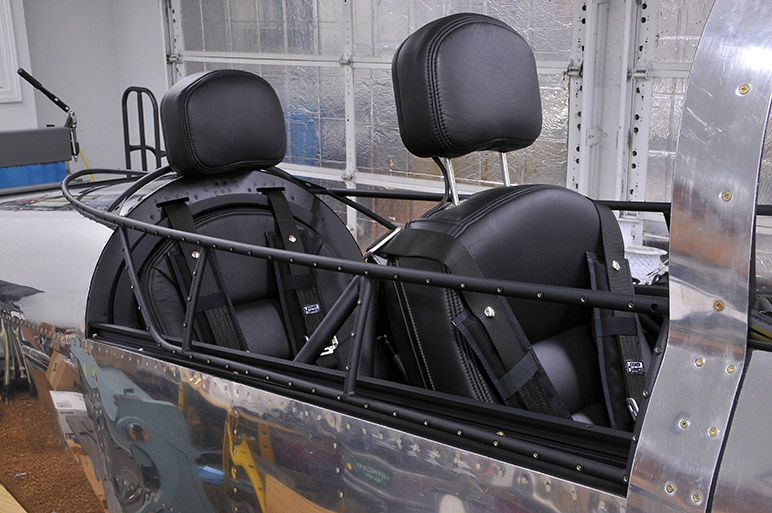
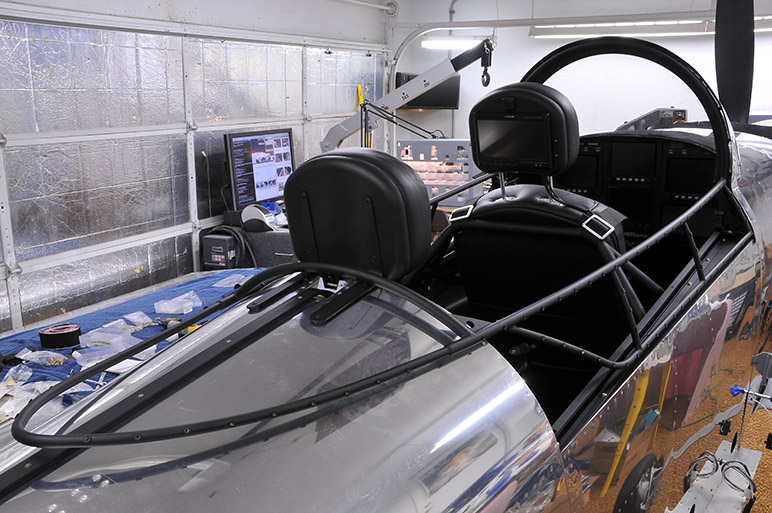
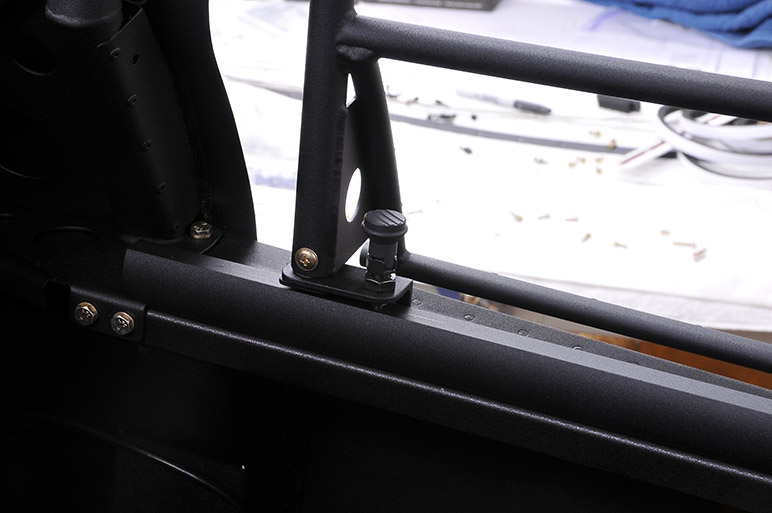
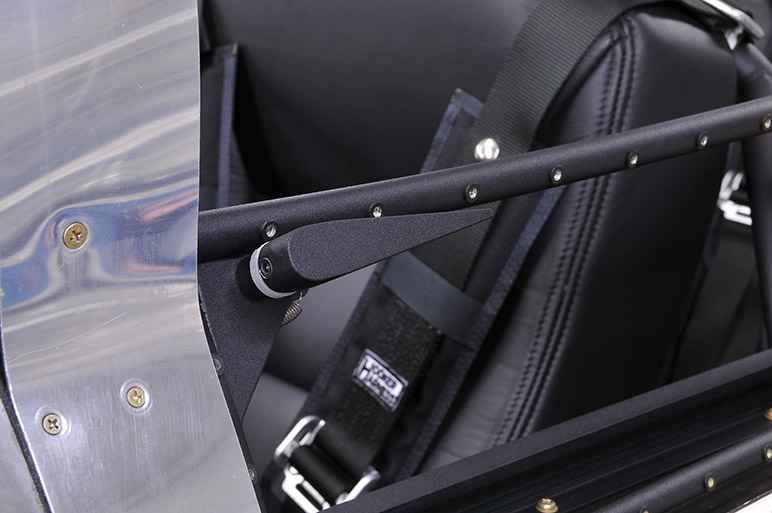
Yahoo! I'm elated to report that the Canopy 2.0 on Ruby 2.0 came out nearly perfect! I'm happy to report that the #6 tapping and screws works GREAT! Van's should recommend this as the standard installation. The best part is that you can "retap" the holes slightly to make sure that the flush-head of the screw perfectly aligns with the varying contours of the Plexiglass as you work around from the front to the back. Amazing! The screws seem to have plenty of bite into the steel frame and considering you don't want to ever over tighten them anyway for fear of cracking the Plexiglass, there shouldn't be any problem with the threads holding up. Attached are a few pictures.
-
Matt Dralle
RV-8 #82880 N998RV "Ruby Vixen"
http://www.mattsrv8.com - Matt's Complete RV-8 Construction Log
http://www.mattsrv8.com/Mishap - Landing Mishap Rebuild Log
http://www.youtube.com/MattsRV8 - Matt's RV-8 HDTV YouTube Channel
Status: 172+ Hours TTSN - Rebuilding Fuselage After Landing Mishap...
RV-6 #20916 N360EM "The Flyer"
http://www.mattsrv6.com - Matt's RV-6 Revitalization Log
Status: 150+ Hours Since Purchase - Upgrades Complete; Now In Full Flyer Mode
| | - The Matronics RV-List Email Forum - | | | Use the List Feature Navigator to browse the many List utilities available such as the Email Subscriptions page, Archive Search & Download, 7-Day Browse, Chat, FAQ, Photoshare, and much more:
http://www.matronics.com/Navigator?RV-List |
|
| Description: |
|
| Filesize: |
188.78 KB |
| Viewed: |
9709 Time(s) |

|
| Description: |
|
| Filesize: |
170.06 KB |
| Viewed: |
9709 Time(s) |

|
| Description: |
|
| Filesize: |
173.49 KB |
| Viewed: |
9709 Time(s) |

|
| Description: |
|
| Filesize: |
184.84 KB |
| Viewed: |
9709 Time(s) |

|
| Description: |
|
| Filesize: |
153.62 KB |
| Viewed: |
9709 Time(s) |

|
| Description: |
|
| Filesize: |
154.69 KB |
| Viewed: |
9709 Time(s) |

|
_________________
Matt Dralle
Matronics Email List Administrator |
|
| Back to top |
|
|
ceengland7(at)gmail.com
Guest
|
| Posted: Wed May 29, 2013 2:50 pm Post subject: RV-8 Canopy |
|
|
Hi Matt,


I haven't followed this thread closely, so ignore this if it's been

covered. There is always the Sikaflex option. No holes at all, & no risk

of plexi cracks. There's a fairly long history now of RV-s flying with

Sika'd canopies, with very good results.


Charlie

On 05/29/2013 04:13 PM, bigdog(at)bentwing.com wrote:

[quote]


 I used the screws on my RV-6 canopy and was really happy with the way they worked out. I don't recall how big the holes were but they were big enough to use Tinnerman washers across the front bow. I dimpled the skirts and let that serve as the "washer" so I had countersunk screws all around. The canopy survived a crash and a round trip on a trailer to the salvage yard. I'd say it's pretty robust. It's going on the new RV with just a new skirt on one side.


 Regards,

 Greg Young

 --
| | - The Matronics RV-List Email Forum - | | | Use the List Feature Navigator to browse the many List utilities available such as the Email Subscriptions page, Archive Search & Download, 7-Day Browse, Chat, FAQ, Photoshare, and much more:
http://www.matronics.com/Navigator?RV-List |
|
|
|
| Back to top |
|
|
vshimsl(at)live.com
Guest
|
| Posted: Wed May 29, 2013 3:19 pm Post subject: RV-8 Canopy |
|
|
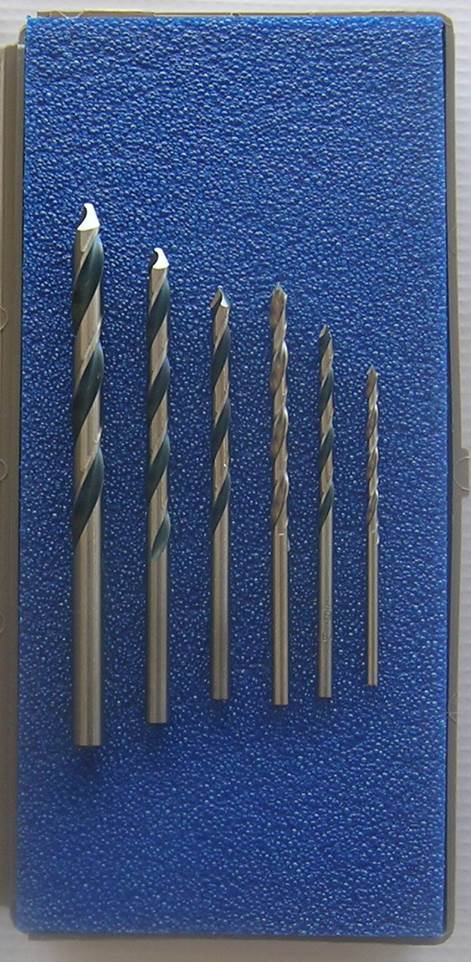
I used special pointed tipped plexiglass drill bits from Avery Tools. Didn't see that mentioned. I suppose you could grind the ends of conventional drill bits to a sharp point.

[img]cid:image003.jpg(at)01CE5C88.25D46FF0[/img]


Vince Himsl

RV8432 150 hours. SB traditional paint scheme (primer and metal), Idaho back country ready...ehr no wheel pants.


--
| | - The Matronics RV-List Email Forum - | | | Use the List Feature Navigator to browse the many List utilities available such as the Email Subscriptions page, Archive Search & Download, 7-Day Browse, Chat, FAQ, Photoshare, and much more:
http://www.matronics.com/Navigator?RV-List |
|
| Description: |
|
| Filesize: |
97.86 KB |
| Viewed: |
9709 Time(s) |
|
|
|
| Back to top |
|
|
flying-nut(at)cfl.rr.com
Guest
|
| Posted: Wed May 29, 2013 3:20 pm Post subject: RV-8 Canopy |
|
|
Charlie, which Sikaflex is recommended???

Linn


On 5/29/2013 6:49 PM, Charlie England wrote:

[quote]


 Hi Matt,


 I haven't followed this thread closely, so ignore this if it's been

 covered. There is always the Sikaflex option. No holes at all, & no

 risk of plexi cracks. There's a fairly long history now of RV-s flying

 with Sika'd canopies, with very good results.


 Charlie

 On 05/29/2013 04:13 PM, bigdog(at)bentwing.com wrote:

>

> <bigdog(at)bentwing.com>

>

> I used the screws on my RV-6 canopy and was really happy with the way

> they worked out. I don't recall how big the holes were but they were

> big enough to use Tinnerman washers across the front bow. I dimpled

> the skirts and let that serve as the "washer" so I had countersunk

> screws all around. The canopy survived a crash and a round trip on a

> trailer to the salvage yard. I'd say it's pretty robust. It's going

> on the new RV with just a new skirt on one side.

>

> Regards,

> Greg Young

> --
| | - The Matronics RV-List Email Forum - | | | Use the List Feature Navigator to browse the many List utilities available such as the Email Subscriptions page, Archive Search & Download, 7-Day Browse, Chat, FAQ, Photoshare, and much more:
http://www.matronics.com/Navigator?RV-List |
|
|
|
| Back to top |
|
|
Matt Dralle
Site Admin
Joined: 08 Nov 2005
Posts: 26320
Location: Livermore CA USA
|
| Posted: Wed May 29, 2013 3:28 pm Post subject: RV-8 Canopy |
|
|
Yes, I did in fact use these very drill bits from Avery to enlarge the holes in the Plexiglass from #40 up to 3/16" for the #6 screw.  They work great!  Also, I strongly recommend putting a piece of wood behind the Plexiglass with a ClecoClamp before drilling.  Didn't have a single problem with any of the holes; and I've got a couple that are a little close to the edge.  By the way, the 3/16" hole for a #6 may seem like a lot, but the swimming room greatly reduces the stress on the Plexiglass by any given screw.  Consider also that most all of the screw holes are sandwiched between the tube and the fiberglass skirt, so all you really need is the clamping action (and just a little shear action).


 Matt Dralle


 RV-8 #82880 N998RV "Ruby Vixen"

  http://www.mattsrv8.com - Matt's Complete RV-8 Construction Log

  http://www.mattsrv8.com/Mishap - Landing Mishap Rebuild Log

  http://www.youtube.com/MattsRV8 - Matt's RV-8 HDTV YouTube Channel

 Status: 172+ Hours TTSN - Rebuilding Fuselage After Landing Mishap...


 RV-6 #20916 N360EM "The Flyer"

  http://www.mattsrv6.com - Matt's RV-6 Revitalization Log

 Status: 150+ Hours Since Purchase - Upgrades Complete; Now In Full Flyer Mode


 At 04:18 PM 5/29/2013 Wednesday, Vincent Himsl wrote:

 [quote]I used special pointed tipped plexiglass drill bits from Avery Tools. Didn't see that mentioned. I suppose you could grind the ends of conventional drill bits to a sharp point.

  [img]cid:7.1.0.9.2.20130529162122.07e8e4f8(at)matronics.com.1[/img]


 Vince Himsl

 RV8432 150 hours. SB traditional paint scheme (primer and metal), Idaho back country ready...ehr no wheel pants.


 --
| | - The Matronics RV-List Email Forum - | | | Use the List Feature Navigator to browse the many List utilities available such as the Email Subscriptions page, Archive Search & Download, 7-Day Browse, Chat, FAQ, Photoshare, and much more:
http://www.matronics.com/Navigator?RV-List |
|
| Description: |
|
| Filesize: |
97.86 KB |
| Viewed: |
9709 Time(s) |

|
_________________
Matt Dralle
Matronics Email List Administrator |
|
| Back to top |
|
|
flying-nut(at)cfl.rr.com
Guest
|
| Posted: Wed May 29, 2013 3:36 pm Post subject: RV-8 Canopy |
|
|
| | - The Matronics RV-List Email Forum - | | | Use the List Feature Navigator to browse the many List utilities available such as the Email Subscriptions page, Archive Search & Download, 7-Day Browse, Chat, FAQ, Photoshare, and much more:
http://www.matronics.com/Navigator?RV-List |
|
|
|
| Back to top |
|
|
Matt Dralle
Site Admin
Joined: 08 Nov 2005
Posts: 26320
Location: Livermore CA USA
|
| Posted: Wed May 29, 2013 3:38 pm Post subject: RV-8 Canopy |
|
|
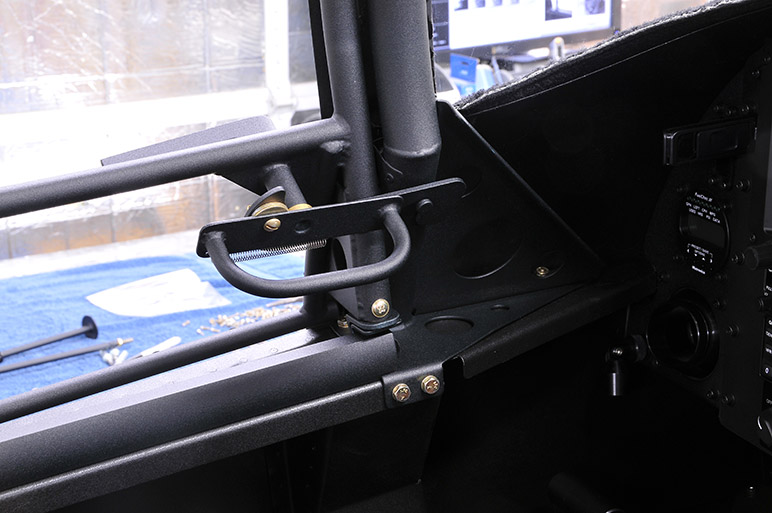
I definitely did consider the very elegant solution of bonding the canopy to the frame. It would certainly reduce the stress factor. For me, however, it presents a couple of problems. One, I like to be able to remove the skirts well after the initial flight for adding dampening and antiskuff material in just the right places. I had the skirts off at least three times after my first flight. The other issue with bonding for me is the painting process. I like to powder coat the frame, then match spray the insides of the skirts, then add labeling. For maximum flexibility, having everything simply screwed together really allows for a high-quality assembly and painting process. Attached are a few pictures from Ruby 1.0's canopy installation to give an idea what I'm talking about.
-
Matt Dralle
RV-8 #82880 N998RV "Ruby Vixen"
http://www.mattsrv8.com - Matt's Complete RV-8 Construction Log
http://www.mattsrv8.com/Mishap - Landing Mishap Rebuild Log
http://www.youtube.com/MattsRV8 - Matt's RV-8 HDTV YouTube Channel
Status: 172+ Hours TTSN - Rebuilding Fuselage After Landing Mishap...
RV-6 #20916 N360EM "The Flyer"
http://www.mattsrv6.com - Matt's RV-6 Revitalization Log
Status: 150+ Hours Since Purchase - Upgrades Complete; Now In Full Flyer Mode
At 03:49 PM 5/29/2013 Wednesday, you wrote:
| Quote: |
Hi Matt,
I haven't followed this thread closely, so ignore this if it's been covered. There is always the Sikaflex option. No holes at all, & no risk of plexi cracks. There's a fairly long history now of RV-s flying with Sika'd canopies, with very good results.
Charlie
|
| | - The Matronics RV-List Email Forum - | | | Use the List Feature Navigator to browse the many List utilities available such as the Email Subscriptions page, Archive Search & Download, 7-Day Browse, Chat, FAQ, Photoshare, and much more:
http://www.matronics.com/Navigator?RV-List |
|
| Description: |
|
| Filesize: |
144.57 KB |
| Viewed: |
9709 Time(s) |
|
| Description: |
|
| Filesize: |
164.11 KB |
| Viewed: |
9709 Time(s) |
|
| Description: |
|
| Filesize: |
84.27 KB |
| Viewed: |
9709 Time(s) |
|
| Description: |
|
| Filesize: |
98.34 KB |
| Viewed: |
9709 Time(s) |
|
| Description: |
|
| Filesize: |
108.11 KB |
| Viewed: |
9709 Time(s) |
|
| Description: |
|
| Filesize: |
179.29 KB |
| Viewed: |
9709 Time(s) |

|
| Description: |
|
| Filesize: |
186.66 KB |
| Viewed: |
9709 Time(s) |

|
| Description: |
|
| Filesize: |
180.9 KB |
| Viewed: |
9709 Time(s) |

|
| Description: |
|
| Filesize: |
104.39 KB |
| Viewed: |
9709 Time(s) |

|
| Description: |
|
| Filesize: |
121.41 KB |
| Viewed: |
9709 Time(s) |

|
| Description: |
|
| Filesize: |
131.54 KB |
| Viewed: |
9709 Time(s) |

|
| Description: |
|
| Filesize: |
140.23 KB |
| Viewed: |
9709 Time(s) |

|
| Description: |
|
| Filesize: |
106.8 KB |
| Viewed: |
9709 Time(s) |

|
_________________
Matt Dralle
Matronics Email List Administrator |
|
| Back to top |
|
|
robin(at)PaintTheWeb.com
Guest
|
| Posted: Wed May 29, 2013 4:14 pm Post subject: RV-8 Canopy |
|
|
The short answer is Yes. After having a -4 Canopy crack while in the hands of a ferry pilot (whoops) and seeing what it takes to replace a canopy on a flying RV my next canopy was going to avoid drilling holes at all cost. Here is my bonded 8A canopy. I got much help on this as I didn't want to it goof up.

Sorry I don't have a lot of detail on the process.


Robin

[cid:142292c5-02a5-447b-b8f6-bc6f9924c215]

[cid:a03f64c8-529c-4207-8897-71a66303caae]


One day it will look like this:

[cid:ba9b3118-777b-4112-a1e4-c3ff14200a11]

________________________________________

From: owner-rv-list-server(at)matronics.com [owner-rv-list-server(at)matronics.com] on behalf of Charlie England [ceengland7(at)gmail.com]

Sent: Wednesday, May 29, 2013 3:49 PM

To: rv-list(at)matronics.com

Subject: Re: Re: RV-8 Canopy


Hi Matt,


I haven't followed this thread closely, so ignore this if it's been

covered. There is always the Sikaflex option. No holes at all, & no risk

of plexi cracks. There's a fairly long history now of RV-s flying with

Sika'd canopies, with very good results.


Charlie

On 05/29/2013 04:13 PM, bigdog(at)bentwing.com wrote:

[quote]


 I used the screws on my RV-6 canopy and was really happy with the way they worked out. I don't recall how big the holes were but they were big enough to use Tinnerman washers across the front bow. I dimpled the skirts and let that serve as the "washer" so I had countersunk screws all around. The canopy survived a crash and a round trip on a trailer to the salvage yard. I'd say it's pretty robust. It's going on the new RV with just a new skirt on one side.


 Regards,

 Greg Young

 --
| | - The Matronics RV-List Email Forum - | | | Use the List Feature Navigator to browse the many List utilities available such as the Email Subscriptions page, Archive Search & Download, 7-Day Browse, Chat, FAQ, Photoshare, and much more:
http://www.matronics.com/Navigator?RV-List |
|
|
|
| Back to top |
|
|
ceengland7(at)gmail.com
Guest
|
| Posted: Wed May 29, 2013 6:39 pm Post subject: RV-8 Canopy |
|
|
Tomorrow, I'll head down to the hangar to look at the products I used &

let you know. There are some very detailed 'how-to' sites out there, as

well; I'll try to send a couple of links to those.


Charlie


On 05/29/2013 06:19 PM, Linn wrote:

[quote]


 Charlie, which Sikaflex is recommended???

 Linn


 On 5/29/2013 6:49 PM, Charlie England wrote:

>

>

> Hi Matt,

>

> I haven't followed this thread closely, so ignore this if it's been

> covered. There is always the Sikaflex option. No holes at all, & no

> risk of plexi cracks. There's a fairly long history now of RV-s

> flying with Sika'd canopies, with very good results.

>

> Charlie

> On 05/29/2013 04:13 PM, bigdog(at)bentwing.com wrote:

>>

>> <bigdog(at)bentwing.com>

>>

>> I used the screws on my RV-6 canopy and was really happy with the

>> way they worked out. I don't recall how big the holes were but they

>> were big enough to use Tinnerman washers across the front bow. I

>> dimpled the skirts and let that serve as the "washer" so I had

>> countersunk screws all around. The canopy survived a crash and a

>> round trip on a trailer to the salvage yard. I'd say it's pretty

>> robust. It's going on the new RV with just a new skirt on one side.

>>

>> Regards,

>> Greg Young

>>

>>

>> --
| | - The Matronics RV-List Email Forum - | | | Use the List Feature Navigator to browse the many List utilities available such as the Email Subscriptions page, Archive Search & Download, 7-Day Browse, Chat, FAQ, Photoshare, and much more:
http://www.matronics.com/Navigator?RV-List |
|
|
|
| Back to top |
|
|
|
|
You cannot post new topics in this forum
You cannot reply to topics in this forum
You cannot edit your posts in this forum
You cannot delete your posts in this forum
You cannot vote in polls in this forum
You cannot attach files in this forum
You can download files in this forum
|
Powered by phpBB © 2001, 2005 phpBB Group
|

