 |
Matronics Email Lists
Web Forum Interface to the Matronics Email Lists
|
| View previous topic :: View next topic |
| Author |
Message |
mburbidg(at)gmail.com
Guest
|
 Posted: Fri Jun 06, 2014 7:16 pm Post subject: Vans EGT gauge not working... Posted: Fri Jun 06, 2014 7:16 pm Post subject: Vans EGT gauge not working... |
 |
|
My Vans EGT gauge does not work. Not flying yet, but have done engine start. And after a few minutes the EGT gauge is still pegged at 0. The CHT gauge does work. These gauges are hooked to a single cylinder. Its a brand new gauge and sender.


Here's what I've done so far:


1) Verified power and ground to the gauge.

2) Verified continuity in the sender wires between the gauge and the space connectors.

3) Verified that the sender wires are on the correct terminal on the gauge.


I'm not sure what to do next, but I would like to figure some way to determine if the problem is with the gauge, or the sender.


How would I do that?


Michael-
| | - The Matronics AeroElectric-List Email Forum - | | | Use the List Feature Navigator to browse the many List utilities available such as the Email Subscriptions page, Archive Search & Download, 7-Day Browse, Chat, FAQ, Photoshare, and much more:
http://www.matronics.com/Navigator?AeroElectric-List |
|
|
|
| Back to top |
|
 |
Kellym
Joined: 10 Jan 2006
Posts: 1705
Location: Sun Lakes AZ
|
| Posted: Fri Jun 06, 2014 7:45 pm Post subject: Vans EGT gauge not working... |
|
|
I don't know much about Van's EGT. However, the analog EGT gauges such
as Alcor did not begin to register until temp got somewhere around
800-900 degrees. You won't get there with taxi power, but might with
some leaning get there at runup power. You don't say what engine it is
one. For carbureted engines it really isn't important. For fuel injected
engines you really need an analyzer for all cylinders.
On 6/6/2014 8:15 PM, Michael Burbidge wrote:
| Quote: |
My Vans EGT gauge does not work. Not flying yet, but have done engine start. And after a few minutes the EGT gauge is still pegged at 0. The CHT gauge does work. These gauges are hooked to a single cylinder. Its a brand new gauge and sender.
Here's what I've done so far:
1) Verified power and ground to the gauge.
2) Verified continuity in the sender wires between the gauge and the space connectors.
3) Verified that the sender wires are on the correct terminal on the gauge.
I'm not sure what to do next, but I would like to figure some way to determine if the problem is with the gauge, or the sender.
How would I do that?
Michael-
|
| | - The Matronics AeroElectric-List Email Forum - | | | Use the List Feature Navigator to browse the many List utilities available such as the Email Subscriptions page, Archive Search & Download, 7-Day Browse, Chat, FAQ, Photoshare, and much more:
http://www.matronics.com/Navigator?AeroElectric-List |
|
_________________
Kelly McMullen
A&P/IA, EAA Tech Counselor # 5286
KCHD |
|
| Back to top |
|
|
mburbidg(at)gmail.com
Guest
|
| Posted: Fri Jun 06, 2014 7:56 pm Post subject: Vans EGT gauge not working... |
|
|
Carbureted engine. Taxi power only. So maybe it is working.
Thanks
Michael
Sent from my iPhone
| Quote: | On Jun 6, 2014, at 8:44 PM, Kelly McMullen <kellym(at)aviating.com> wrote:
I don't know much about Van's EGT. However, the analog EGT gauges such as Alcor did not begin to register until temp got somewhere around 800-900 degrees. You won't get there with taxi power, but might with some leaning get there at runup power. You don't say what engine it is one. For carbureted engines it really isn't important. For fuel injected engines you really need an analyzer for all cylinders.
> On 6/6/2014 8:15 PM, Michael Burbidge wrote:
>
>
> My Vans EGT gauge does not work. Not flying yet, but have done engine start. And after a few minutes the EGT gauge is still pegged at 0. The CHT gauge does work. These gauges are hooked to a single cylinder. Its a brand new gauge and sender.
>
> Here's what I've done so far:
>
> 1) Verified power and ground to the gauge.
> 2) Verified continuity in the sender wires between the gauge and the space connectors.
> 3) Verified that the sender wires are on the correct terminal on the gauge.
>
> I'm not sure what to do next, but I would like to figure some way to determine if the problem is with the gauge, or the sender.
>
> How would I do that?
>
> Michael-
|
| | - The Matronics AeroElectric-List Email Forum - | | | Use the List Feature Navigator to browse the many List utilities available such as the Email Subscriptions page, Archive Search & Download, 7-Day Browse, Chat, FAQ, Photoshare, and much more:
http://www.matronics.com/Navigator?AeroElectric-List |
|
|
|
| Back to top |
|
|
racerjerry
Joined: 15 Dec 2009
Posts: 202
Location: Deer Park, NY
|
| Posted: Sun Jun 08, 2014 3:50 am Post subject: Re: Vans EGT gauge not working... |
|
|
| Quote: | 1) Verified power and ground to the gauge.
|
As far as I know, power to simple analog EGT/CHT indicating systems are for internal lighting only.
First of all, itâs much easier to test the EGT system by removing the sender from the exhaust system and heating the tip with a propane torch to see if you get needle movement â need another person in the cockpit to watch gauge. Please use some precautions here so as to not burn your airplane nor anyone elses down. A fire extinguisher AND a handy 5 gal bucket of water along with common sense can work wonders.
If that didnât work, the next thing to do is reverse the wires and recheck. Yeah, I know, color code, yadda yadda â Reverse the wires, reheat and see if needle moves
If that still donât work, disconnect wires from the gauge and check for continuity at the wires. By measuring the wires, you are checking the sender and any extension leads and eliminating everything except the gauge.
My Westach setup says sender resistance should be about 2.5 ohms for EGT, but meter lead resistance will add to this, so correct reading will be higher. You are really looking for continuity at this point. Now if all appears to be roughly correct, you could turn your digital meter to the millivolt scale, reheat the EGT probe and watch for a tiny millivolt output within seconds of applying flame.
The gauge itself can be checked for continuity with a DIGITAL ohmmeter (the gauge is so sensitive that an analog meter can burn the darned thing out).
Let me repeat - Test gauge using ONLY a digital ohmmeter
Again, you are just looking for continuity, but Westach says somewhere between 8 & 15 ohms.
Resistance readings may differ as EGT systems may use either J or K type thermocouples (sender), but you are mainly looking for continuity. These things generally either work well or not at all.
Any resistance in the system or any corrosion will generally result in no or very low indication
| | - The Matronics AeroElectric-List Email Forum - | | | Use the List Feature Navigator to browse the many List utilities available such as the Email Subscriptions page, Archive Search & Download, 7-Day Browse, Chat, FAQ, Photoshare, and much more:
http://www.matronics.com/Navigator?AeroElectric-List |
|
_________________
Jerry King |
|
| Back to top |
|
|
RnJCurtis(at)charter.net
Guest
|
| Posted: Sun Jun 08, 2014 7:05 am Post subject: Vans EGT gauge not working... |
|
|
| Quote: |
As far as I know, power to simple analog EGT/CHT indicating systems are
for internal lighting only.
First of all, itâ?Ts much easier to test the EGT system by removing the
sender from the exhaust system and heating the tip with a propane torch to
see if you get needle movement â?" need another person in the cockpit to
watch gauge. Please use some precautions here so as to not burn your
airplane nor anyone elses down. A fire extinguisher AND a handy 5 gal
bucket of water along with common sense can work wonders.
If that didnâ?Tt work, the next thing to do is reverse the wires and
recheck. Yeah, I know, color code, yadda yadda â?" Reverse the wires,
reheat and see if needle moves
If that still donâ?Tt work, disconnect wires from the gauge and check for
continuity at the wires. By measuring the wires, you are checking the
sender and any extension leads and eliminating everything except the
gauge.
My Westach setup says sender resistance should be about 2.5 ohms for EGT,
but meter lead resistance will add to this, so correct reading will be
higher. You are really looking for continuity at this point. Now if all
appears to be roughly correct, you could turn your digital meter to the
millivolt scale, reheat the EGT probe and watch for a tiny millivolt
output within seconds of applying flame.
The gauge itself can be checked for continuity with a DIGITAL ohmmeter
(the gauge is so sensitive that an analog meter can burn the darned thing
out).
Let me repeat - Test gauge using ONLY a digital ohmmeter
Again, you are just looking for continuity, but Westach says somewhere
between 8 & 15 ohms.
Resistance readings may differ as EGT systems may use either J or K type
thermocouples (sender), but you are mainly looking for continuity. These
things generally either work well or not at all.
Any resistance in the system or any corrosion will generally result in no
or very low indication
|
Just one other thought on this. If you added an extension
wire to the probe MAKE SURE that you used the proper wire.
If it is a "J" type, Red and White wires, be certain that you use
the red and white thermocouple extension wires. Use of other
wires can give you gross errors.
Roger
| | - The Matronics AeroElectric-List Email Forum - | | | Use the List Feature Navigator to browse the many List utilities available such as the Email Subscriptions page, Archive Search & Download, 7-Day Browse, Chat, FAQ, Photoshare, and much more:
http://www.matronics.com/Navigator?AeroElectric-List |
|
|
|
| Back to top |
|
|
nuckolls.bob(at)aeroelect
Guest
|
| Posted: Sun Jun 08, 2014 8:53 am Post subject: Vans EGT gauge not working... |
|
|
At 06:50 AM 6/8/2014, you wrote:
--> AeroElectric-List message posted by: "racerjerry" <gki(at)suffolk.lib.ny.us>
> 1) Verified power and ground to the gauge.
>
As far as I know, power to simple analog EGT/CHT indicating systems are for internal lighting only.
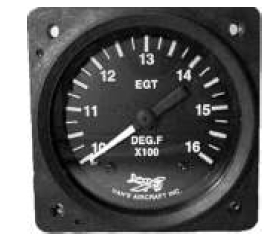
Van's line of analog instruments are built on
a common frame of circuitry used to position
pointers over approx 250 degrees of arc on
the dial.
[img]cid:.0[/img]
An exemplar instrument (ammeter) was examined
in our shop some years back . . .
http://tinyurl.com/mpx8hze
This particular device was found to be rather sensitive to
strong fields of radio frequency energy in
the cockpit . . .
First of all, itâs much easier to test the EGT system by removing the sender from the exhaust system and heating the tip with a propane torch to see if you get needle movement â need another person in the cockpit to watch gauge. Please use some precautions here so as to not burn your airplane nor anyone elses down. A fire extinguisher AND a handy 5 gal bucket of water along with common sense can work wonders.
If that didnât work, the next thing to do is reverse the wires and recheck. Yeah, I know, color code, yadda yadda â Reverse the wires, reheat and see if needle moves
If that still donât work, disconnect wires from the gauge and check for continuity at the wires. By measuring the wires, you are checking the sender and any extension leads and eliminating everything except the gauge.
My Westach setup says sender resistance should be about 2.5 ohms for EGT, but meter lead resistance will add to this, so correct reading will be higher. You are really looking for continuity at this point. Now if all appears to be roughly correct, you could turn your digital meter to the millivolt scale, reheat the EGT probe and watch for a tiny millivolt output within seconds of applying flame.
The gauge itself can be checked for continuity with a DIGITAL ohmmeter (the gauge is so sensitive that an analog meter can burn the darned thing out).
Let me repeat - Test gauge using ONLY a digital ohmmeter
Not true . . . the non-electronic instruments designed
to read millivolt levels DIRECTLY from a heated thermocouple
have VERY low winding resistance as matter of necessity . . .
as panel instruments they are generally designed for
full scale indication with only tens of millivolts
applied to the terminals at TENS of milliamps. "Self powered"
instruments of yesteryear were often calibrated assuming
thermocouple lead wires long enough to reach to the extreme
engine locations on a large airplane. Lead wires for closer
engines could be shortened and the lost-resistance
compensated for by inserting a "thermocouple spool
resistor" in one lead.

The resistor was shipped with some too-large value (about 10 ohms
as I recall). The installing technician could remove the
cover and peel off turns of wire on the spools underneath
the cover until the desired calibration was achieved.
Again, you are just looking for continuity, but Westach says somewhere between 8 & 15 ohms.
The input terminal to a Van's EGT will be considerably
higher resistance. Signal conditioners inside the instrument
are designed for insensitivity to total loop resistance
of the thermocouple signal . . . this is goes to the
goal of allowing thermocouples to be extended by any
practical length without concern for instrument
calibration as described above.
Bob . . .
| | - The Matronics AeroElectric-List Email Forum - | | | Use the List Feature Navigator to browse the many List utilities available such as the Email Subscriptions page, Archive Search & Download, 7-Day Browse, Chat, FAQ, Photoshare, and much more:
http://www.matronics.com/Navigator?AeroElectric-List |
|
| Description: |
|
| Filesize: |
37.08 KB |
| Viewed: |
4750 Time(s) |
|
|
|
| Back to top |
|
|
|
|
You cannot post new topics in this forum
You cannot reply to topics in this forum
You cannot edit your posts in this forum
You cannot delete your posts in this forum
You cannot vote in polls in this forum
You cannot attach files in this forum
You can download files in this forum
|
Powered by phpBB © 2001, 2005 phpBB Group
|

