 |
Matronics Email Lists
Web Forum Interface to the Matronics Email Lists
|
| View previous topic :: View next topic |
| Author |
Message |
jan_de_jong(at)casema.nl
Guest
|
 Posted: Mon Oct 28, 2013 3:50 am Post subject: access door hinges Posted: Mon Oct 28, 2013 3:50 am Post subject: access door hinges |
 |
|
Hi all,


This may be an old trick but I newly discovered it.

A small access door hinge of 2 x 0.5" one side, 0.25" + 0.5" + 0.25" the

other, can be made to come apart easily by putting in a 4 x 0.5" pin

instead of a 1 x 2" pin. Moving it 0.25" does it. The abutting hinge pin

sections are contained by a split pin or a piece of safety wire through

a 1mm hole at each end.

The advantage is that only very little room at one end of the hinge is

needed.


Jan de Jong
| | - The Matronics Europa-List Email Forum - | | | Use the List Feature Navigator to browse the many List utilities available such as the Email Subscriptions page, Archive Search & Download, 7-Day Browse, Chat, FAQ, Photoshare, and much more:
http://www.matronics.com/Navigator?Europa-List |
|
|
|
| Back to top |
|
 |
rlborger(at)mac.com
Guest
|
 Posted: Mon Oct 28, 2013 6:24 am Post subject: access door hinges Posted: Mon Oct 28, 2013 6:24 am Post subject: access door hinges |
 |
|
Jan,
Iím sorry, but Iím a visual person. Do you have a picture you could post?
Blue Skies & Tailwinds,
Bob Borger
On Oct 28, 2013, at 6:49 AM, Jan de Jong <jan_de_jong(at)casema.nl> wrote:
Hi all,
This may be an old trick but I newly discovered it.
A small access door hinge of 2 x 0.5" one side, 0.25" + 0.5" + 0.25" the other, can be made to come apart easily by putting in a 4 x 0.5" pin instead of a 1 x 2" pin. Moving it 0.25" does it. The abutting hinge pin sections are contained by a split pin or a piece of safety wire through a 1mm hole at each end.
The advantage is that only very little room at one end of the hinge is needed.
Jan de Jong
| | - The Matronics Europa-List Email Forum - | | | Use the List Feature Navigator to browse the many List utilities available such as the Email Subscriptions page, Archive Search & Download, 7-Day Browse, Chat, FAQ, Photoshare, and much more:
http://www.matronics.com/Navigator?Europa-List |
|
|
|
| Back to top |
|
 |
jan_de_jong(at)casema.nl
Guest
|
 Posted: Sun Nov 10, 2013 11:45 am Post subject: access door hinges Posted: Sun Nov 10, 2013 11:45 am Post subject: access door hinges |
 |
|
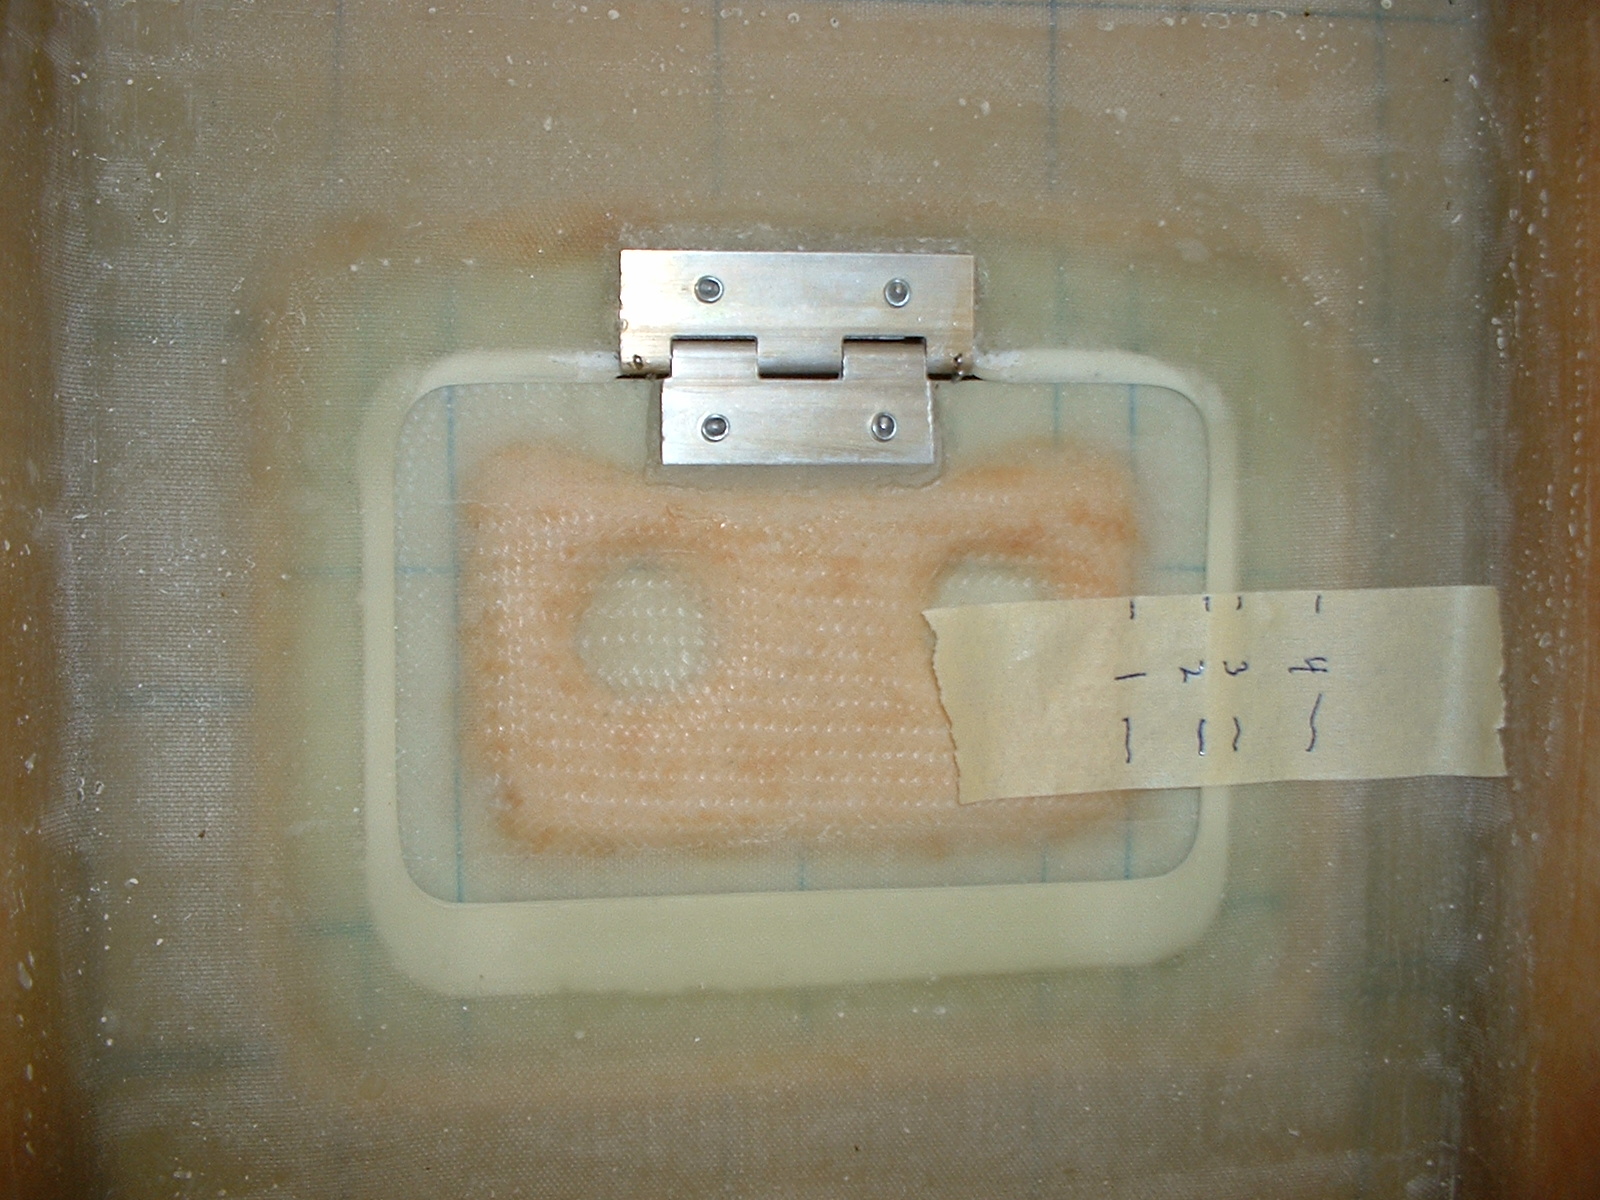
Further to my remarks regarding access door hinge pins: what I believe I

have learned.

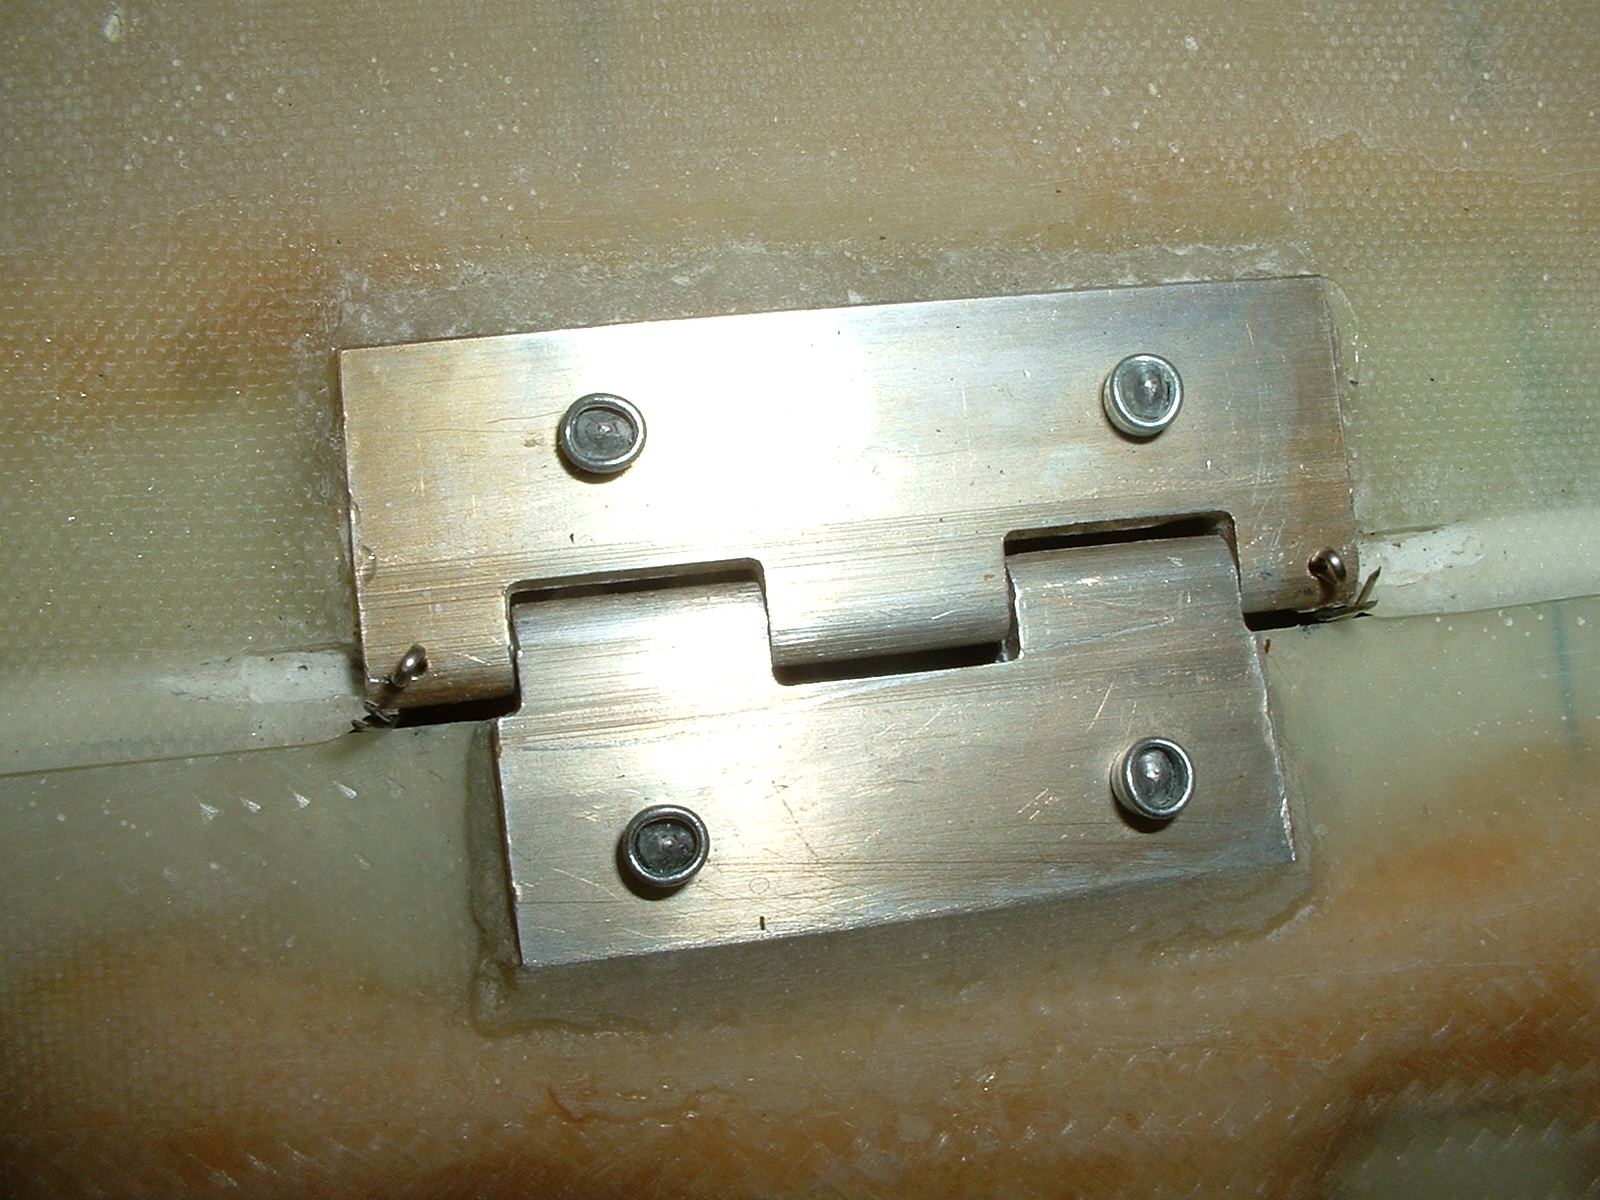
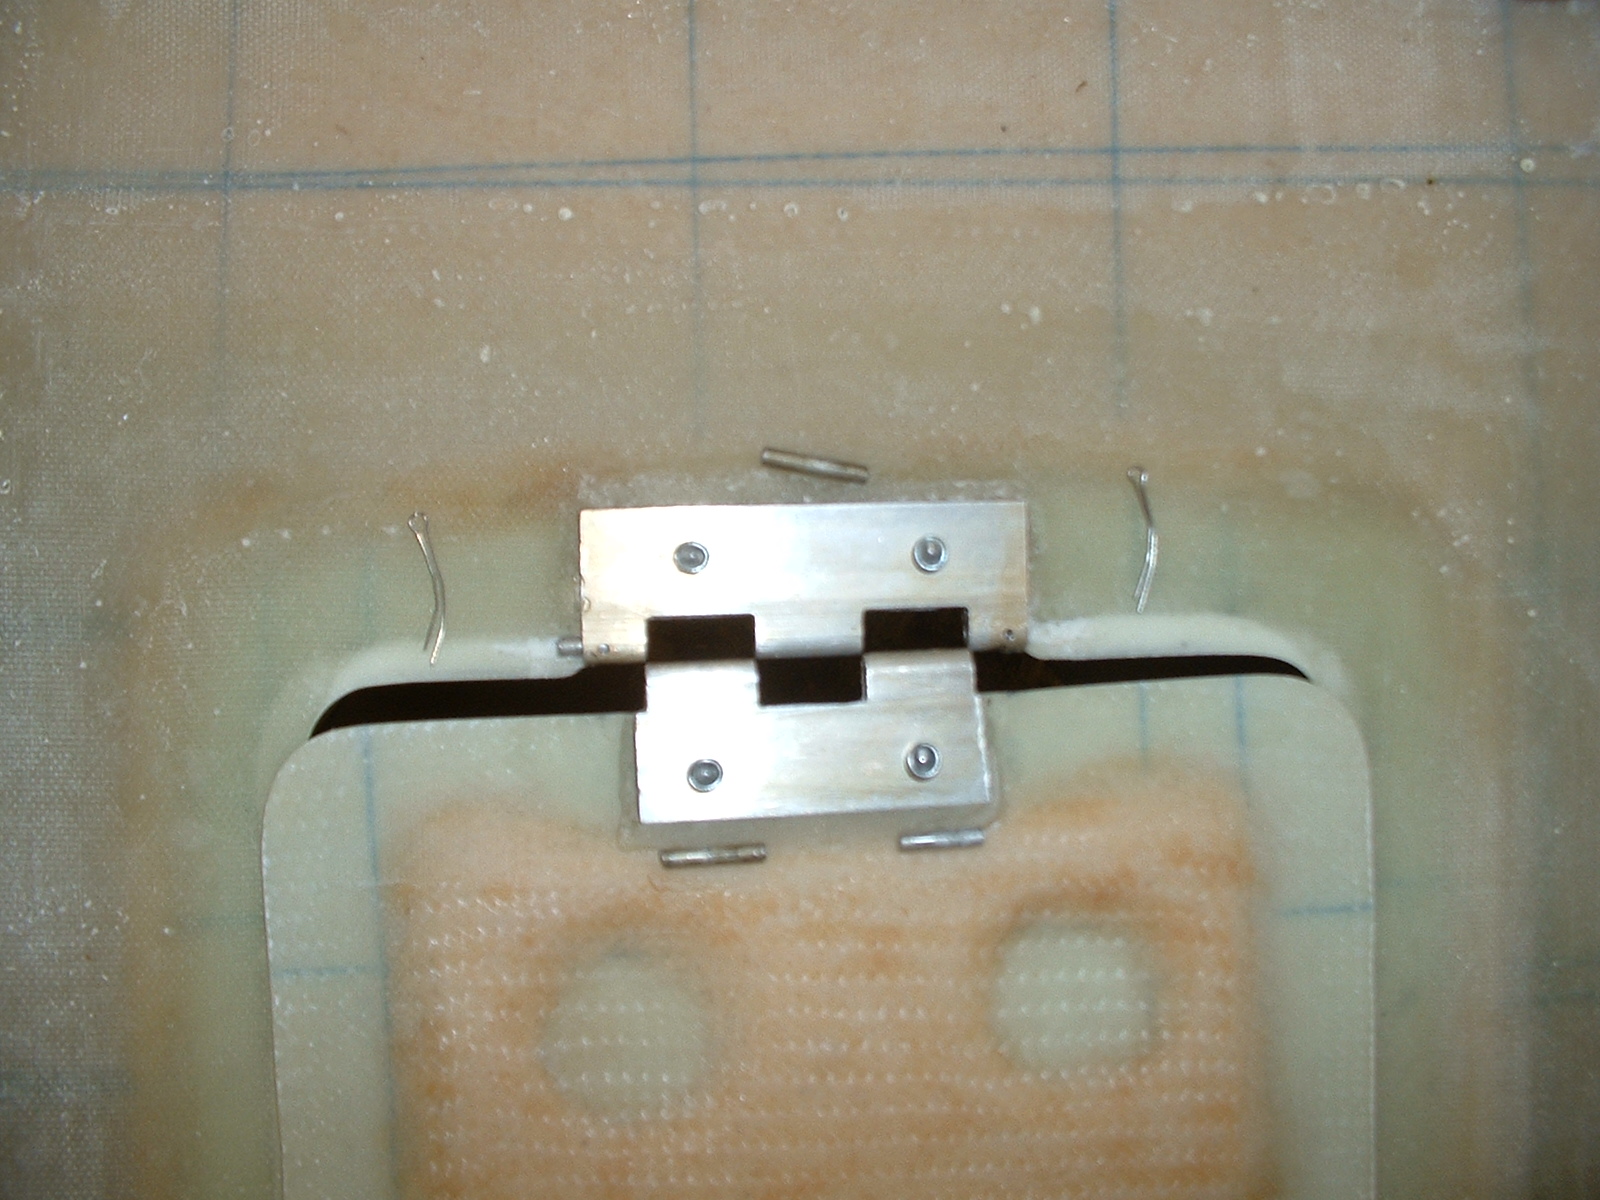
I hope the pictures (ancient 2002 digital camera) make it a bit more

clear than last time.


1 To remove all excuse for not opening an access door before flight I

provide the door with a hinge and a quarter turn dzus fastener with a

winged stud for finger operation.


2 Planning

- In closed condition the fastener stud wing and the fastener receptacle

have parallel long dimensions; to be able to mount

the receptacle along the hole edge and have the stud wing parallel to

the wind in flight the hinge should also be mounted

parallel to the wind. I did differently and will suffer (I will make a

right angle receptacle as soon as I acquire a choice of

spring steel wire).

- If in sandwich skin: determine the contours - from inside to outside

(picture): line 1 door sandwich to door flange, line 2

hole outline, line 3 door outline, line 4 glass-glass flange to

sandwich; beware the room needed for hinge flanges (see 4 and

5 below) and the fastener receptacle


3 Making

- Remove the inner skin and foam with router bit and sandpaper between

lines 1 and 4, fair the edges

- 2 bid between lines 1 and 4, overlapping, and well overlapping the

foam outside line 4, peel ply

- Cut out the door along line 3, then tape up for release, then put in

place and tape flush with the fuselage outside skin

- 2 bid between lines 1 and 4, well overlapping the foam outside 4, peel ply

- File and sand the flange produced (for the door to sit against) to

size and shape


4 More planning

- The hinge line must be outside line 3 for the access door to open well

- The hinge flanges need flox beds for the hinges to end up flush with

the outer skin

- The hinge pin cannot be put in and taken out without surgery unless

cut up in pieces in advance


5 More making

- Make the hinge with a sectioned hinge pin and holes each end for a

cotter pin or safety wire

- Remove the flange between 2 and 3 and a little out towards 4 where the

outer hinge flange will be; leave the door (inside

line 3) alone

- Put the hinge together with greased moving parts, position, apply flox

beds, and apply pop rivets when cured


6 Check

- Displacing the hinge pin sections 1/4" should now release the door easily


Jan de Jong
| | - The Matronics Europa-List Email Forum - | | | Use the List Feature Navigator to browse the many List utilities available such as the Email Subscriptions page, Archive Search & Download, 7-Day Browse, Chat, FAQ, Photoshare, and much more:
http://www.matronics.com/Navigator?Europa-List |
|
| Description: |
|
| Filesize: |
630.54 KB |
| Viewed: |
1487 Time(s) |

|
| Description: |
|
| Filesize: |
652.75 KB |
| Viewed: |
1487 Time(s) |

|
| Description: |
|
| Filesize: |
623.07 KB |
| Viewed: |
1487 Time(s) |

|
|
|
| Back to top |
|
 |
|
|
You cannot post new topics in this forum
You cannot reply to topics in this forum
You cannot edit your posts in this forum
You cannot delete your posts in this forum
You cannot vote in polls in this forum
You cannot attach files in this forum
You can download files in this forum
|
Powered by phpBB © 2001, 2005 phpBB Group
|


