 |
Matronics Email Lists
Web Forum Interface to the Matronics Email Lists
|
| View previous topic :: View next topic |
| Author |
Message |
tshankland(at)sbcglobal.n
Guest
|
 Posted: Sat Jan 24, 2015 2:28 pm Post subject: Backup ignition failure Posted: Sat Jan 24, 2015 2:28 pm Post subject: Backup ignition failure |
 |
|
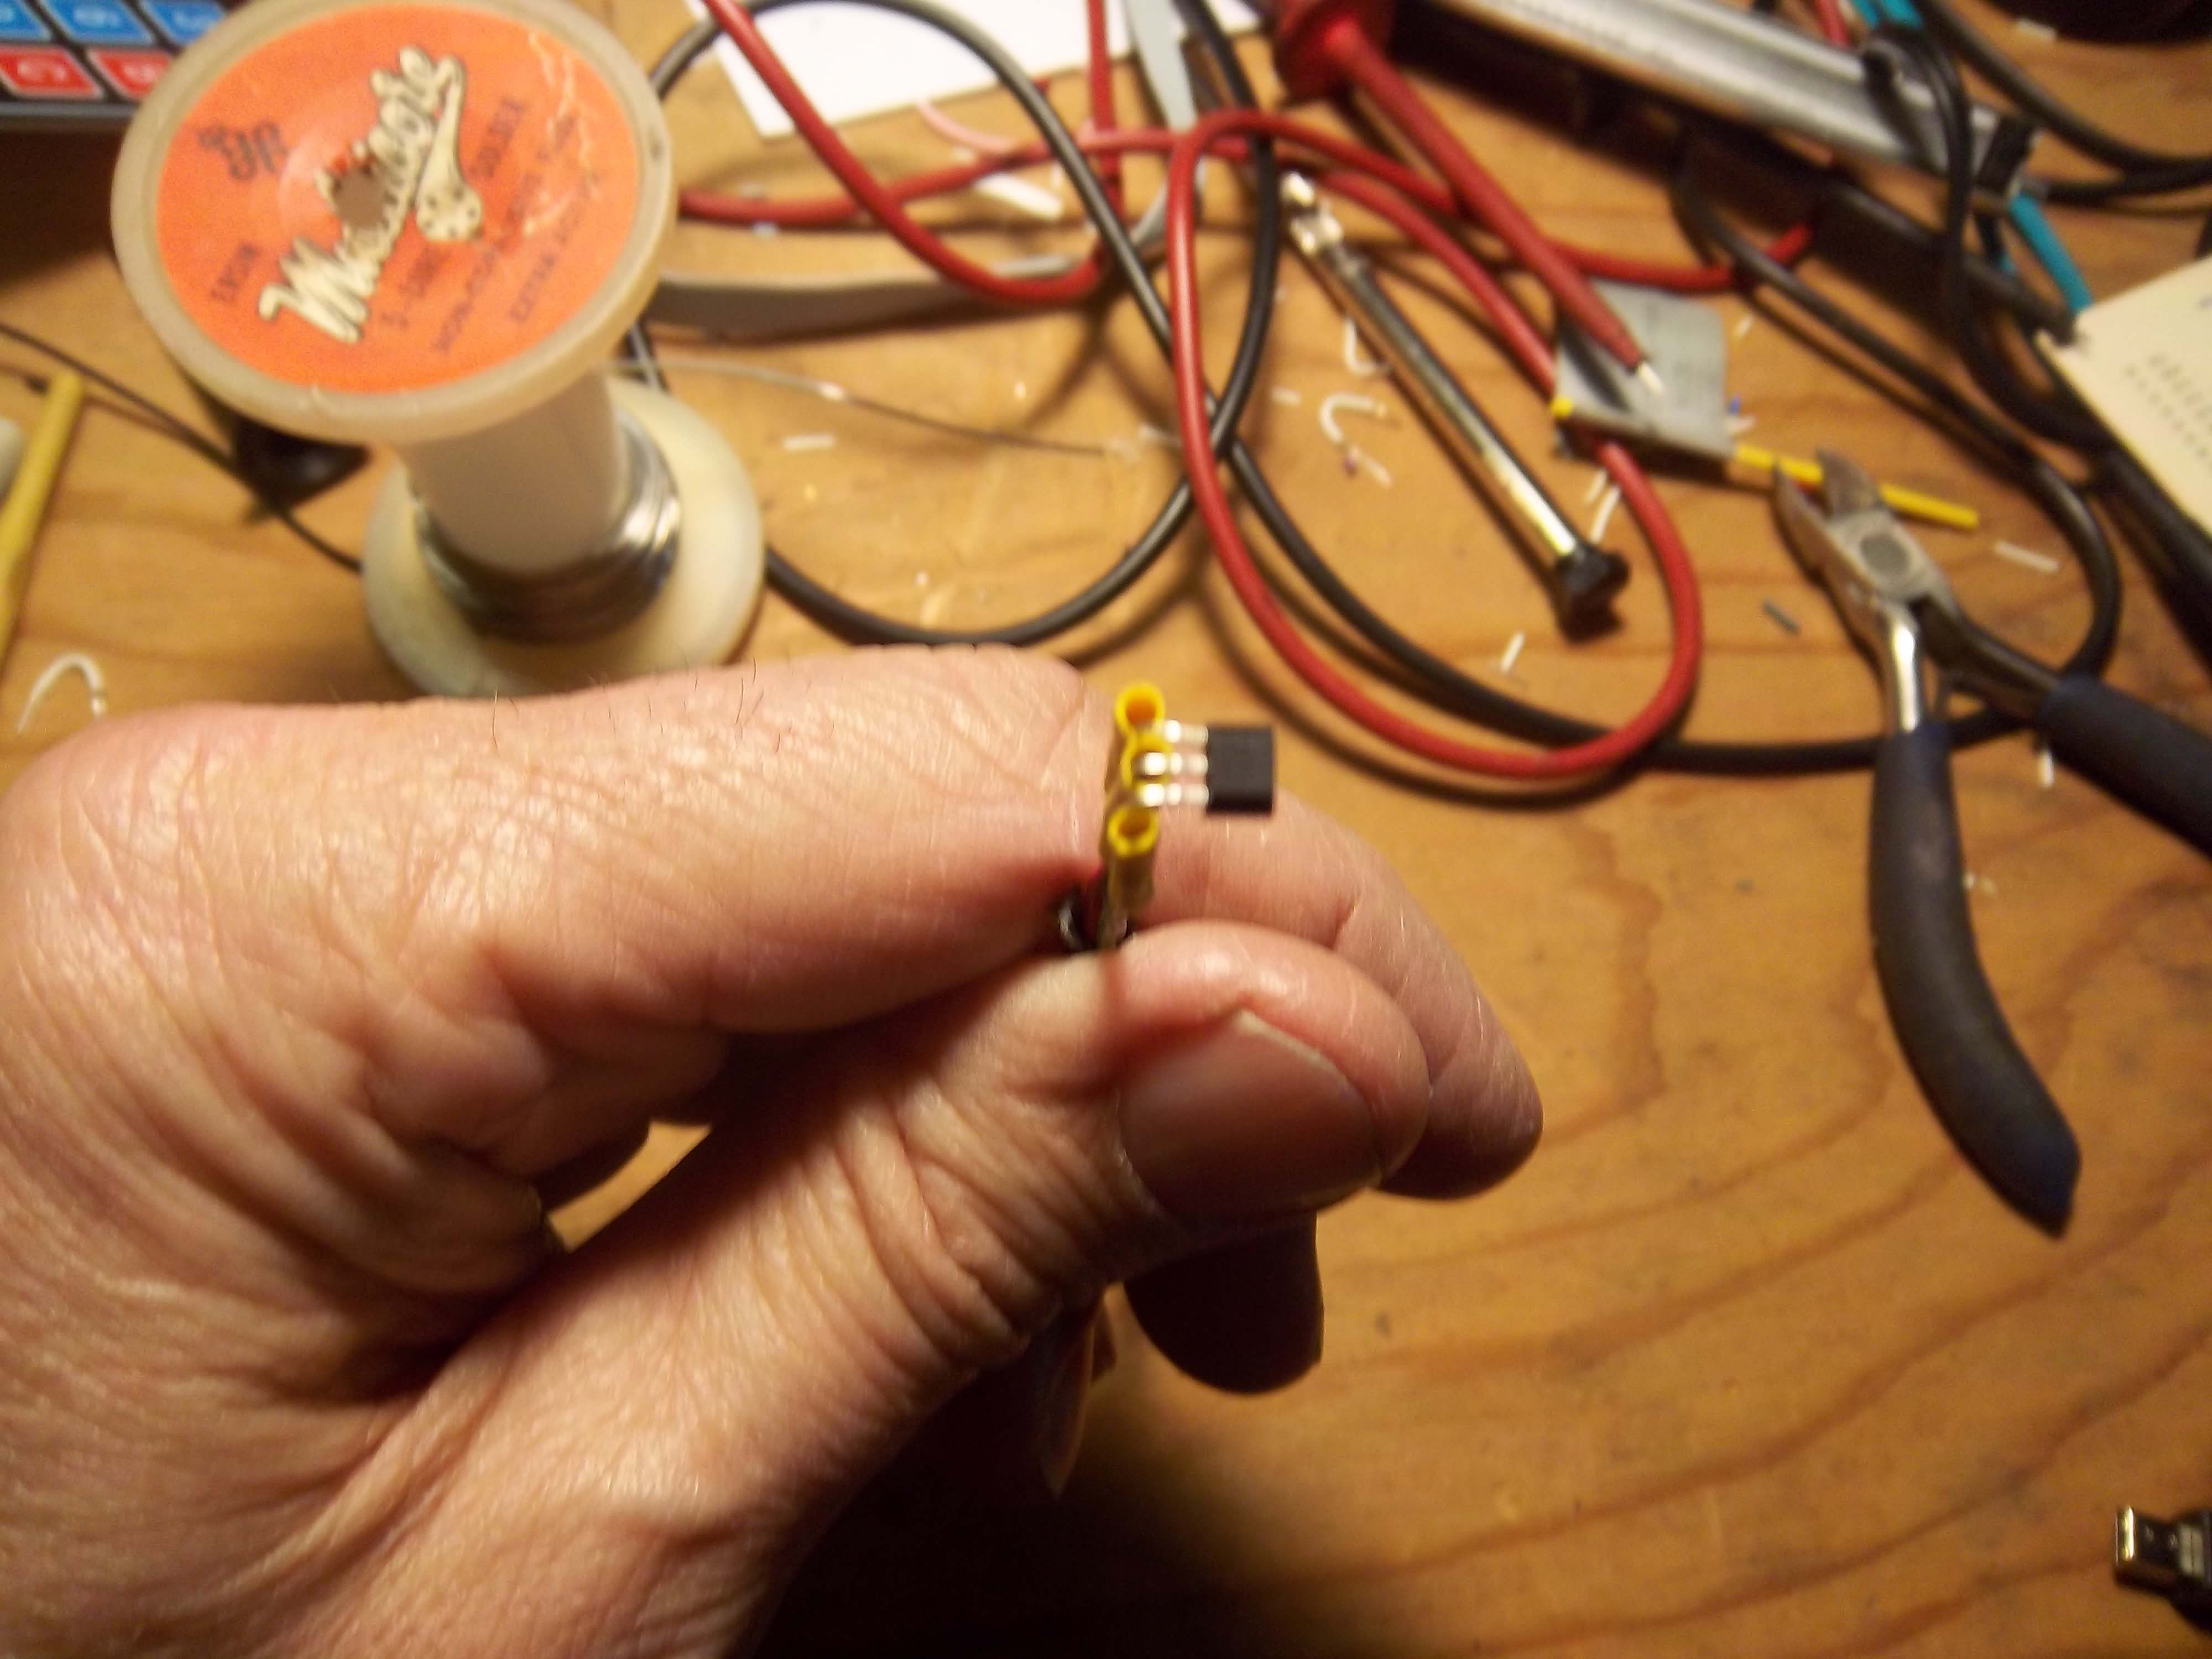
A couple of weeks ago the backup ignition on my  Stratus engine failed. I tracked the failure down to the sensor by the flywheel.  An e-mail Mykal gave me the news that the part was obsolete and no longer  available. My further inquiry with Mykal got the part number of the old part.  Some on line research gave me the specs of the old parts and a potential  replacement. I can tell you that I have been successful in repairing the dead  sensor. If you have a dead sensor or might this is what you have to do.


 The replacement part is a SS461A Hall effect switch  available from Jameco for about $1.10 each,  but you have to buy 10, that's  good that way you'll have spares if you mess up anything. First you have to  remove the "guts of the old sensor. I found a hot air gun and metal pick will  remove most of it with a little time. During this process the washer on the  end of the sensor will probably fall out if it hasn't all ready. The sensor is  just a 3/4 inch rod drilled through will a 25/64 hole and then drilled about  half way down with a 9/16th. When you get all the epoxy out of the 9/16 part  just heat it up good and punch the rest out. Remove the old device from the  wires. The new device will require one addition, a pull up resistor. It goes  between the + terminal of the device and the output. I put mine inside the  sensor but it could be attached at the plug end if desired. The resistor can be  between 4 and 24K 1/8 watt. The red lead to the plug connect to the + of the  device, the black lead to the - and the green lead to the O. If you put the  resistor inside make sure to get heat shrink over everything so the leads  don't touch each other or the metal housing. I used 1 hour epoxy to fill in the  housing. Put a piece of clear tap over the end and bend the sensor leads such  that faceted side of the device, the one with the number on it faces out. I  filled the small end of the sensor with epoxy first and positioned the device as  close as I could to the tape. Make sure the wire is such that the mounting screw  will fit in. After that part set up a little I put the mounting screw in and  fill the it up the top. After it sets a little bit turn the screw to break  it lose from the epoxy, it will be a LOT harder later. I filed the hole out  after it set up so the screw would turn easily and make sure the sensor was  solidly mounted to the engine. I expect that this sensor will hold up better  than the original since the old one was only rated up to 100 C and the crankcase  part of the engine can get up to 115 C. The new part is rated for up to 150  C.

 Hope this helps someone with a dead  ignition.

 Tim  Shankland
| | - The Matronics Stratus-List Email Forum - | | | Use the List Feature Navigator to browse the many List utilities available such as the Email Subscriptions page, Archive Search & Download, 7-Day Browse, Chat, FAQ, Photoshare, and much more:
http://www.matronics.com/Navigator?Stratus-List |
|
| Description: |
|
| Filesize: |
460.82 KB |
| Viewed: |
4139 Time(s) |

|
| Description: |
|
| Filesize: |
669.35 KB |
| Viewed: |
4139 Time(s) |

|
| Description: |
|
| Filesize: |
719.02 KB |
| Viewed: |
4139 Time(s) |

|
| Description: |
|

Download |
| Filename: |
SS461A_Hall_effect_switch.pdf |
| Filesize: |
234.46 KB |
| Downloaded: |
866 Time(s) |
|
|
| Back to top |
|
 |
ronhansen123(at)gmail.com
Guest
|
 Posted: Sat Jan 24, 2015 6:10 pm Post subject: Backup ignition failure Posted: Sat Jan 24, 2015 6:10 pm Post subject: Backup ignition failure |
 |
|
Tim, thanks so much for posting this.  I haven't had that part fail yet, but if I do, I know how to make one now.

Ron


Stratus/Ram heads/Ram rebuild/Zenair 601HDS/Los Angeles

On Sat, Jan 24, 2015 at 2:26 PM, Tim <tshankland(at)sbcglobal.net (tshankland(at)sbcglobal.net)> wrote:

[quote]        A couple of weeks ago the backup ignition on my  Stratus engine failed. I tracked the failure down to the sensor by the flywheel.  An e-mail Mykal gave me the news that the part was obsolete and no longer  available. My further inquiry with Mykal got the part number of the old part.  Some on line research gave me the specs of the old parts and a potential  replacement. I can tell you that I have been successful in repairing the dead  sensor. If you have a dead sensor or might this is what you have to do.


 The replacement part is a SS461A Hall effect switch  available from Jameco for about $1.10 each,  but you have to buy 10, that's  good that way you'll have spares if you mess up anything. First you have to  remove the "guts of the old sensor. I found a hot air gun and metal pick will  remove most of it with a little time. During this process the washer on the  end of the sensor will probably fall out if it hasn't all ready. The sensor is  just a 3/4 inch rod drilled through will a 25/64 hole and then drilled about  half way down with a 9/16th. When you get all the epoxy out of the 9/16 part  just heat it up good and punch the rest out. Remove the old device from the  wires. The new device will require one addition, a pull up resistor. It goes  between the + terminal of the device and the output. I put mine inside the  sensor but it could be attached at the plug end if desired. The resistor can be  between 4 and 24K 1/8 watt. The red lead to the plug connect to the + of the  device, the black lead to the - and the green lead to the O. If you put the  resistor inside make sure to get heat shrink over everything so the leads  don't touch each other or the metal housing. I used 1 hour epoxy to fill in the  housing. Put a piece of clear tap over the end and bend the sensor leads such  that faceted side of the device, the one with the number on it faces out. I  filled the small end of the sensor with epoxy first and positioned the device as  close as I could to the tape. Make sure the wire is such that the mounting screw  will fit in. After that part set up a little I put the mounting screw in and  fill the it up the top. After it sets a little bit turn the screw to break  it lose from the epoxy, it will be a LOT harder later. I filed the hole out  after it set up so the screw would turn easily and make sure the sensor was  solidly mounted to the engine. I expect that this sensor will hold up better  than the original since the old one was only rated up to 100 C and the crankcase  part of the engine can get up to 115 C. The new part is rated for up to 150  C.

 Hope this helps someone with a dead  ignition.

 Tim  Shankland

 [b]
| | - The Matronics Stratus-List Email Forum - | | | Use the List Feature Navigator to browse the many List utilities available such as the Email Subscriptions page, Archive Search & Download, 7-Day Browse, Chat, FAQ, Photoshare, and much more:
http://www.matronics.com/Navigator?Stratus-List |
|
|
|
| Back to top |
|
 |
frank.hinde(at)hp.com
Guest
|
 Posted: Sat Jan 24, 2015 9:19 pm Post subject: Backup ignition failure Posted: Sat Jan 24, 2015 9:19 pm Post subject: Backup ignition failure |
 |
|
Of course you could just put a second pickup in the distributor and drive 2 GM amplifier chips. But then for $1:10 you really can’t go wrong.


Frank


From: owner-stratus-list-server(at)matronics.com [mailto:owner-stratus-list-server(at)matronics.com] On Behalf Of ron hansen

Sent: Saturday, January 24, 2015 6:10 PM

To: stratus-list(at)matronics.com

Subject: Re: Stratus-List: Backup ignition failure


Tim, thanks so much for posting this.  I haven't had that part fail yet, but if I do, I know how to make one now.

Ron

Stratus/Ram heads/Ram rebuild/Zenair 601HDS/Los Angeles


On Sat, Jan 24, 2015 at 2:26 PM, Tim <tshankland(at)sbcglobal.net<mailto:tshankland(at)sbcglobal.net>> wrote:

A couple of weeks ago the backup ignition on my Stratus engine failed. I tracked the failure down to the sensor by the flywheel. An e-mail Mykal gave me the news that the part was obsolete and no longer available. My further inquiry with Mykal got the part number of the old part. Some on line research gave me the specs of the old parts and a potential replacement. I can tell you that I have been successful in repairing the dead sensor. If you have a dead sensor or might this is what you have to do.


The replacement part is a SS461A Hall effect switch available from Jameco for about $1.10 each,  but you have to buy 10, that's good that way you'll have spares if you mess up anything. First you have to remove the "guts of the old sensor. I found a hot air gun and metal pick will remove most of it with a little time. During this process the washer on the end of the sensor will probably fall out if it hasn't all ready. The sensor is just a 3/4 inch rod drilled through will a 25/64 hole and then drilled about half way down with a 9/16th. When you get all the epoxy out of the 9/16 part just heat it up good and punch the rest out. Remove the old device from the wires. The new device will require one addition, a pull up resistor. It goes between the + terminal of the device and the output. I put mine inside the sensor but it could be attached at the plug end if desired. The resistor can be between 4 and 24K 1/8 watt. The red lead to the plug connect to the + of the device, the black lead to the - and the green lead to the O. If you put the resistor inside make sure to get heat shrink over everything so the leads don't touch each other or the metal housing. I used 1 hour epoxy to fill in the housing. Put a piece of clear tap over the end and bend the sensor leads such that faceted side of the device, the one with the number on it faces out. I filled the small end of the sensor with epoxy first and positioned the device as close as I could to the tape. Make sure the wire is such that the mounting screw will fit in. After that part set up a little I put the mounting screw in and fill the it up the top. After it sets a little bit turn the screw to break it lose from the epoxy, it will be a LOT harder later. I filed the hole out after it set up so the screw would turn easily and make sure the sensor was solidly mounted to the engine. I expect that this sensor will hold up better than the original since the old one was only rated up to 100 C and the crankcase part of the engine can get up to 115 C. The new part is rated for up to 150 C.

Hope this helps someone with a dead ignition.

Tim Shankland
| | - The Matronics Stratus-List Email Forum - | | | Use the List Feature Navigator to browse the many List utilities available such as the Email Subscriptions page, Archive Search & Download, 7-Day Browse, Chat, FAQ, Photoshare, and much more:
http://www.matronics.com/Navigator?Stratus-List |
|
|
|
| Back to top |
|
 |
|
|
You cannot post new topics in this forum
You cannot reply to topics in this forum
You cannot edit your posts in this forum
You cannot delete your posts in this forum
You cannot vote in polls in this forum
You cannot attach files in this forum
You can download files in this forum
|
Powered by phpBB © 2001, 2005 phpBB Group
|


