 |
Matronics Email Lists
Web Forum Interface to the Matronics Email Lists
|
| View previous topic :: View next topic |
| Author |
Message |
robin1(at)mrmoisture.com
Guest
|
 Posted: Sat Aug 01, 2009 7:14 pm Post subject: DIY Panel Labeling $20.00 Posted: Sat Aug 01, 2009 7:14 pm Post subject: DIY Panel Labeling $20.00 |
 |
|
RV-List,
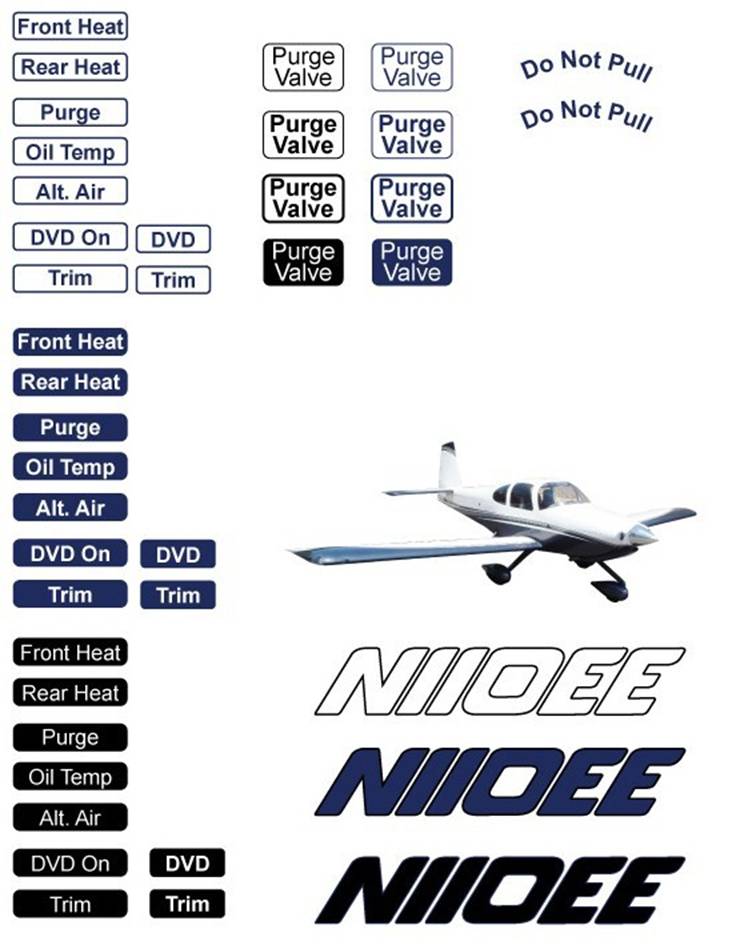
I thought I would share a sweet way to do your own panel labeling that is fast, inexpensive and great looking. In fact your graphic choices are nearly unlimited.
I had the unfortunate situation where the graphics on my panel we not acceptable. I paid to reshoot the panel and decided to label some of the items myself. I had considered using clear labels and a Dymo style label maker like I used with my RV-6A. The results were actually quite good but with limited choices in font selection, size and spacing. The ideal system would be to use my graphics software to design the correct labels and then transfer them to my panel in Decal form. With a little research I sourced:
Color Laser Water Slide Decal Paper by papoilio. www.papoilio.com
I purchased the large pack of 10 sheets ($13.00) in case I screwed up but I only needed one sheet as I was able to fit duplicate labels all on a single page. I designed my labels in Adobe Illustrator because it is a vector based program making the text and borders ultra crisp. I also happen to own a Minolta Magicolor 2400W color laser printer which gave me excellent results. If my printer didn’t work well my plan was to run a thumb drive down to Kinkos and use their large Color Laser Printer but there was no need after I output and tested the first sheet. If you are OK with Black graphics any Laser Printer will do.
From here the process was straight forward, trim, soak in bowl of water for 15 seconds, don’t spill the bowl of water in the plane (hardest step), place the decal on a pre-moistened portion of your panel and properly position. Do the next decal while the first one is drying.
I purchased a special rubber squeegee and floating agent at the same time I purchased the paper but never found the need to use them. If you are confident you only need the 5 sheet pack your cost may be as low as $10.00.
For high wear areas they suggest a clear coat over the decal but these are in a low touch location and they seem pretty durable to me.
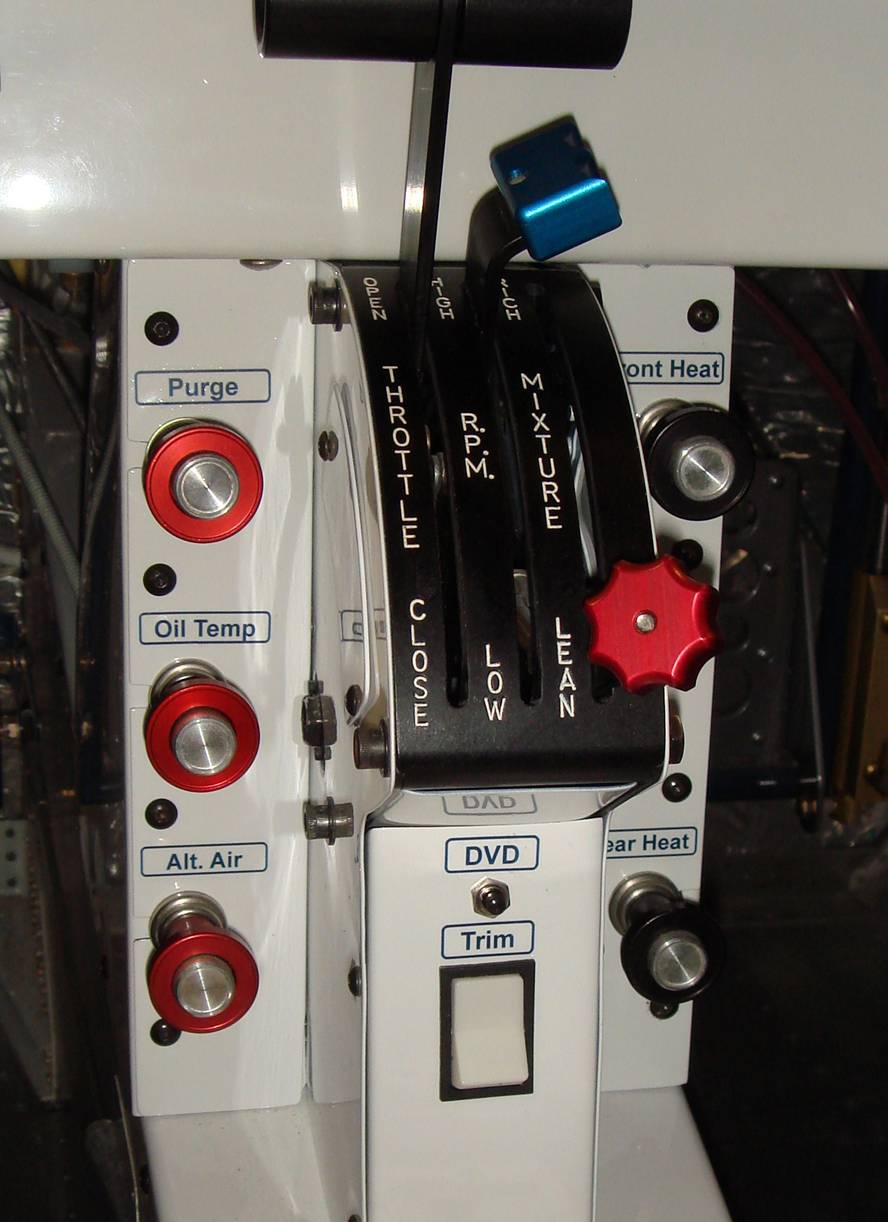
[img]cid:image005.jpg(at)01CA12E4.5C3B6400[/img]
With your own graphic designs your panel labeling choices are virtually unlimited including photographs or multi color process:
(note: labels below are fuzzy due to .jpg conversion)
[img]cid:image006.jpg(at)01CA12E4.5C3B6400[/img]
Robin
| | - The Matronics RV10-List Email Forum - | | | Use the List Feature Navigator to browse the many List utilities available such as the Email Subscriptions page, Archive Search & Download, 7-Day Browse, Chat, FAQ, Photoshare, and much more:
http://www.matronics.com/Navigator?RV10-List |
|
| Description: |
|
| Filesize: |
94.11 KB |
| Viewed: |
2373 Time(s) |

|
| Description: |
|
| Filesize: |
71.57 KB |
| Viewed: |
2373 Time(s) |

|
|
|
| Back to top |
|
 |
johnh38(at)yahoo.com
Guest
|
| Posted: Sun Aug 02, 2009 12:12 am Post subject: DIY Panel Labeling $20.00 |
|
|
Robin,
is this the stuff? your link wasn't working.
http://www.papilio.com/laser%20water%20slide%20decal%20paper.html
john
From: Robin Marks <robin1(at)mrmoisture.com>
To: rv10-list(at)matronics.com; rv-list(at)matronics.com
Sent: Saturday, August 1, 2009 11:12:14 PM
Subject: DIY Panel Labeling $20.00
RV-List,
I thought I would share a sweet way to do your own panel labeling that is fast, inexpensive and great looking. In fact your graphic choices are nearly unlimited.
I had the unfortunate situation where the graphics on my panel we not acceptable. I paid to reshoot the panel and decided to label some of the items myself. I had considered using clear labels and a Dymo style label maker like I used with my RV-6A. The results were actually quite good but with limited choices in font selection, size and spacing. The ideal system would be to use my graphics software to design the correct labels and then transfer them to my panel in Decal form. With a little research I sourced:
Color Laser Water Slide Decal Paper by papoilio. www.papoilio.com
I purchased the large pack of 10 sheets ($13.00) in case I screwed up but I only needed one sheet as I was able to fit duplicate labels all on a single page. I designed my labels in Adobe Illustrator because it is a vector based program making the text and borders ultra crisp. I also happen to own a Minolta Magicolor 2400W color laser printer which gave me excellent results. If my printer didnât work well my plan was to run a thumb drive down to Kinkos and use their large Color Laser Printer but there was no need after I output and tested the first sheet. If you are OK with Black graphics any Laser Printer will do.
From here the process was straight forward, trim, soak in bowl of water for 15 seconds, donât spill the bowl of water in the plane (hardest step), place the decal on a pre-moistened portion of your panel and properly position. Do the next decal while the first one is drying.
I purchased a special rubber squeegee and floating agent at the same time I purchased the paper but never found the need to use them. If you are confident you only need the 5 sheet pack your cost may be as low as $10.00.
For high wear areas they suggest a clear coat over the decal but these are in a low touch location and they seem pretty durable to me.
[img]cid:1.983859851(at)web84006.mail.mud.yahoo.com[/img]
With your own graphic designs your panel labeling choices are virtually unlimited including photographs or multi color process:
(note: labels below are fuzzy due to .jpg conversion)
[img]cid:2.983859851(at)web84006.mail.mud.yahoo.com[/img]
Robin
| | - The Matronics RV10-List Email Forum - | | | Use the List Feature Navigator to browse the many List utilities available such as the Email Subscriptions page, Archive Search & Download, 7-Day Browse, Chat, FAQ, Photoshare, and much more:
http://www.matronics.com/Navigator?RV10-List |
|
| Description: |
|
| Filesize: |
94.11 KB |
| Viewed: |
2365 Time(s) |

|
| Description: |
|
| Filesize: |
71.57 KB |
| Viewed: |
2365 Time(s) |
|
|
|
| Back to top |
|
|
robin1(at)mrmoisture.com
Guest
|
| Posted: Sun Aug 02, 2009 8:24 am Post subject: DIY Panel Labeling $20.00 |
|
|
Yes it is. My packaging has a different photo on it but the description is identical.
As stated I am very pleased with the results but I did receive a smack down from Stein stating that over time and exposure to UV the labels wonât last as long and are not as durable professionally printed labels and he suggested one can create the exact same graphics and email them to a panel shop like his and they will print decals on high quality Thermal Printers which apparently offer better UV protection and use waterproof inks. Stein states most places only charge $20.00 per sheet.
I really liked doing it âin houseâ and my test labels seem durable enough (much better than I expected) plus I see no issues labeling small items like circuit breakers and I doubt UV is a significant issue for my hangared plane. With the ultimate fall back that I can reprint the replace the decals for nothing more than my time if need be.
That being said Stein is exceptionally knowledgeable and âbeen there, done thatâ so I would suggest builders looking for a more perminate solution follow his advice. Especially beneficial because it has no additional expense.
Steinâs note:
This is similar to what most of us panel shops do now, but ther are a few more things to consider. First, if you don't clearcoat them the truth is thru will come off, you'll see the decals in the sun, and they are not very durable once they cure. Second, laser inks don't hold up well regarding uv and humidity. Third, in order to try and get white (you can't print white on a laser) you have to try and use dark borders for everything. That's ok on large fonts, but gets a bit klutzy on small labels or large rows of things like switches & cb's.
I would suggest if you want to go this route you just buy a sheet of printed decals from one of the shops (there are a number of us) that print the decals with high quality (and high buck) thermal printers. You get good uv and waterproof inks that can still be printed in colors, but also in pure white as well as metallic foils too. Most places still only charge about $20 per sheet of decals.
Robin's solution is a good start...but wihout good inks and a clearcoat the long term result will be less than stellar. We've tried almost every solution over the years and have learned the hard way.
My 2 cents as usual (from OSH)!
Cheers,
Stein
From: owner-rv10-list-server(at)matronics.com [mailto:owner-rv10-list-server(at)matronics.com] On Behalf Of John Hurst
Sent: Sunday, August 02, 2009 1:06 AM
To: rv10-list(at)matronics.com
Subject: Re: RV10-List: DIY Panel Labeling $20.00
Robin,
is this the stuff? your link wasn't working.
http://www.papilio.com/laser%20water%20slide%20decal%20paper.html
john
From: Robin Marks <robin1(at)mrmoisture.com>
To: rv10-list(at)matronics.com; rv-list(at)matronics.com
Sent: Saturday, August 1, 2009 11:12:14 PM
Subject: RV10-List: DIY Panel Labeling $20.00
RV-List,
I thought I would share a sweet way to do your own panel labeling that is fast, inexpensive and great looking. In fact your graphic choices are nearly unlimited.
I had the unfortunate situation where the graphics on my panel we not acceptable. I paid to reshoot the panel and decided to label some of the items myself. I had considered using clear labels and a Dymo style label maker like I used with my RV-6A. The results were actually quite good but with limited choices in font selection, size and spacing. The ideal system would be to use my graphics software to design the correct labels and then transfer them to my panel in Decal form. With a little research I sourced:
Color Laser Water Slide Decal Paper by papoilio. www.papoilio.com
I purchased the large pack of 10 sheets ($13.00) in case I screwed up but I only needed one sheet as I was able to fit duplicate labels all on a single page. I designed my labels in Adobe Illustrator because it is a vector based program making the text and borders ultra crisp. I also happen to own a Minolta Magicolor 2400W color laser printer which gave me excellent results. If my printer didnât work well my plan was to run a thumb drive down to Kinkos and use their large Color Laser Printer but there was no need after I output and tested the first sheet. If you are OK with Black graphics any Laser Printer will do.
From here the process was straight forward, trim, soak in bowl of water for 15 seconds, donât spill the bowl of water in the plane (hardest step), place the decal on a pre-moistened portion of your panel and properly position. Do the next decal while the first one is drying.
I purchased a special rubber squeegee and floating agent at the same time I purchased the paper but never found the need to use them. If you are confident you only need the 5 sheet pack your cost may be as low as $10.00.
For high wear areas they suggest a clear coat over the decal but these are in a low touch location and they seem pretty durable to me.
[img]cid:image001.jpg(at)01CA1350.E51524C0[/img]
With your own graphic designs your panel labeling choices are virtually unlimited including photographs or multi color process:
(note: labels below are fuzzy due to .jpg conversion)
[img]cid:image002.jpg(at)01CA1350.E51524C0[/img]
Robin
No virus found in this incoming message.
Checked by AVG - www.avg.com
Version: 8.5.392 / Virus Database: 270.13.38/2274 - Release Date: 08/02/09 05:56:00
| | - The Matronics RV10-List Email Forum - | | | Use the List Feature Navigator to browse the many List utilities available such as the Email Subscriptions page, Archive Search & Download, 7-Day Browse, Chat, FAQ, Photoshare, and much more:
http://www.matronics.com/Navigator?RV10-List |
|
| Description: |
|
| Filesize: |
94.11 KB |
| Viewed: |
2351 Time(s) |

|
| Description: |
|
| Filesize: |
71.57 KB |
| Viewed: |
2351 Time(s) |

|
|
|
| Back to top |
|
|
jcumins(at)jcis.net
Guest
|
| Posted: Mon Aug 03, 2009 7:43 am Post subject: DIY Panel Labeling $20.00 |
|
|
Mark


The link to the web site does not work could you please resend the linl


Thanks


John G. Cumins

40864 Elevator assymb.


From: owner-rv10-list-server(at)matronics.com [mailto:owner-rv10-list-server(at)matronics.com] On Behalf Of Robin Marks

 Sent: Saturday, August 01, 2009 8:12 PM

 To: rv10-list(at)matronics.com; rv-list(at)matronics.com

 Subject: DIY Panel Labeling $20.00


RV-List,

            I thought I would share a sweet way to do your own panel labeling that is fast, inexpensive and great looking. In fact your graphic choices are nearly unlimited.

            I had the unfortunate situation where the graphics on my panel we not acceptable. I paid to reshoot the panel and decided to label some of the items myself. I had considered using clear labels and a Dymo style label maker like I used with my RV-6A. The results were actually quite good but with limited choices in font selection, size and spacing. The ideal system would be to use my graphics software to design the correct labels and then transfer them to my panel in Decal form. With a little research I sourced:


Color Laser Water Slide Decal Paper by papoilio. www.papoilio.com


            I purchased the large pack of 10 sheets ($13.00) in case I screwed up but I only needed one sheet as I was able to fit duplicate labels all on a single page. I designed my labels in Adobe Illustrator because it is a vector based program making the text and borders ultra crisp. I also happen to own a Minolta Magicolor 2400W color laser printer which gave me excellent results. If my printer didn’t work well my plan was to run a thumb drive down to Kinkos and use their large Color Laser Printer but there was no need after I output and tested the first sheet. If you are OK with Black graphics any Laser Printer will do.

            >From here the process was straight forward, trim, soak in bowl of water for 15 seconds, don’t spill the bowl of water in the plane (hardest step), place the decal on a pre-moistened portion of your panel and properly position. Do the next decal while the first one is drying.

            I purchased a special rubber squeegee and floating agent at the same time I purchased the paper but never found the need to use them. If you are confident you only need the 5 sheet pack your cost may be as low as $10.00.

            For high wear areas they suggest a clear coat over the decal but these are in a low touch location and they seem pretty durable to me.


[img]cid:image001.jpg(at)01CA1413.CACF5540[/img]


With your own graphic designs your panel labeling choices are virtually unlimited including photographs or multi color process:

(note: labels below are fuzzy due to .jpg conversion)


[img]cid:image002.jpg(at)01CA1413.CACF5540[/img]

Robin
| | - The Matronics RV10-List Email Forum - | | | Use the List Feature Navigator to browse the many List utilities available such as the Email Subscriptions page, Archive Search & Download, 7-Day Browse, Chat, FAQ, Photoshare, and much more:
http://www.matronics.com/Navigator?RV10-List |
|
| Description: |
|
| Filesize: |
94.11 KB |
| Viewed: |
2332 Time(s) |

|
| Description: |
|
| Filesize: |
71.57 KB |
| Viewed: |
2332 Time(s) |

|
|
|
| Back to top |
|
|
AV8ORJWC
Joined: 13 Jul 2006
Posts: 1149
Location: Aurora, Oregon "Home of VANS"
|
| Posted: Mon Aug 03, 2009 9:22 am Post subject: DIY Panel Labeling $20.00 |
|
|
I found it as Robin intended, but at http://www.papilio.com/index.html


3M has an aerosol lacquer which can be sprayed over the finished product to extend its life and resistance to humidity.  it’s a DIY project.


John


From: owner-rv10-list-server(at)matronics.com [mailto:owner-rv10-list-server(at)matronics.com] On Behalf Of John Cumins

 Sent: Monday, August 03, 2009 8:24 AM

 To: rv10-list(at)matronics.com

 Subject: RE: DIY Panel Labeling $20.00


Mark


The link to the web site does not work could you please resend the linl


Thanks


John G. Cumins

40864 Elevator assymb.


From: owner-rv10-list-server(at)matronics.com [mailto:owner-rv10-list-server(at)matronics.com] On Behalf Of Robin Marks

 Sent: Saturday, August 01, 2009 8:12 PM

 To: rv10-list(at)matronics.com; rv-list(at)matronics.com

 Subject: DIY Panel Labeling $20.00


RV-List,

            I thought I would share a sweet way to do your own panel labeling that is fast, inexpensive and great looking. In fact your graphic choices are nearly unlimited.

            I had the unfortunate situation where the graphics on my panel we not acceptable. I paid to reshoot the panel and decided to label some of the items myself. I had considered using clear labels and a Dymo style label maker like I used with my RV-6A. The results were actually quite good but with limited choices in font selection, size and spacing. The ideal system would be to use my graphics software to design the correct labels and then transfer them to my panel in Decal form. With a little research I sourced:


Color Laser Water Slide Decal Paper by papoilio. www.papoilio.com


            I purchased the large pack of 10 sheets ($13.00) in case I screwed up but I only needed one sheet as I was able to fit duplicate labels all on a single page. I designed my labels in Adobe Illustrator because it is a vector based program making the text and borders ultra crisp. I also happen to own a Minolta Magicolor 2400W color laser printer which gave me excellent results. If my printer didn’t work well my plan was to run a thumb drive down to Kinkos and use their large Color Laser Printer but there was no need after I output and tested the first sheet. If you are OK with Black graphics any Laser Printer will do.

            >From here the process was straight forward, trim, soak in bowl of water for 15 seconds, don’t spill the bowl of water in the plane (hardest step), place the decal on a pre-moistened portion of your panel and properly position. Do the next decal while the first one is drying.

            I purchased a special rubber squeegee and floating agent at the same time I purchased the paper but never found the need to use them. If you are confident you only need the 5 sheet pack your cost may be as low as $10.00.

            For high wear areas they suggest a clear coat over the decal but these are in a low touch location and they seem pretty durable to me.


[img]cid:image001.jpg(at)01CA141A.20424680[/img]


With your own graphic designs your panel labeling choices are virtually unlimited including photographs or multi color process:

(note: labels below are fuzzy due to .jpg conversion)


[img]cid:image002.jpg(at)01CA141A.20424680[/img]

Robin
| | - The Matronics RV10-List Email Forum - | | | Use the List Feature Navigator to browse the many List utilities available such as the Email Subscriptions page, Archive Search & Download, 7-Day Browse, Chat, FAQ, Photoshare, and much more:
http://www.matronics.com/Navigator?RV10-List |
|
| Description: |
|
| Filesize: |
94.11 KB |
| Viewed: |
2329 Time(s) |
|
| Description: |
|
| Filesize: |
71.57 KB |
| Viewed: |
2329 Time(s) |

|
|
|
| Back to top |
|
|
robin1(at)mrmoisture.com
Guest
|
| Posted: Mon Aug 03, 2009 9:23 am Post subject: DIY Panel Labeling $20.00 |
|
|
http://www.papilio.com/


Specific Item I used:

http://www.papilio.com/laser%20water%20slide%20decal%20paper.html


Where I purchased:

http://www.texascraft.com/hps/home.php?cat=267


Interesting I now see they make a Bake On version that is more durable & suitable for Dishwasher cleaning. I wonder if one could use a hair dryer or heat gun to fix the label to the panel.


I also see they offer temporary tattoo paper so I can sport photos of my RV-10 on my massive biceps. J


Robin


From: owner-rv10-list-server(at)matronics.com [mailto:owner-rv10-list-server(at)matronics.com] On Behalf Of John Cumins

 Sent: Monday, August 03, 2009 8:24 AM

 To: rv10-list(at)matronics.com

 Subject: RE: DIY Panel Labeling $20.00


Mark


The link to the web site does not work could you please resend the linl


Thanks


John G. Cumins

40864 Elevator assymb.


From: owner-rv10-list-server(at)matronics.com [mailto:owner-rv10-list-server(at)matronics.com] On Behalf Of Robin Marks

 Sent: Saturday, August 01, 2009 8:12 PM

 To: rv10-list(at)matronics.com; rv-list(at)matronics.com

 Subject: DIY Panel Labeling $20.00


RV-List,

            I thought I would share a sweet way to do your own panel labeling that is fast, inexpensive and great looking. In fact your graphic choices are nearly unlimited.

            I had the unfortunate situation where the graphics on my panel we not acceptable. I paid to reshoot the panel and decided to label some of the items myself. I had considered using clear labels and a Dymo style label maker like I used with my RV-6A. The results were actually quite good but with limited choices in font selection, size and spacing. The ideal system would be to use my graphics software to design the correct labels and then transfer them to my panel in Decal form. With a little research I sourced:


Color Laser Water Slide Decal Paper by papoilio. www.papoilio.com


            I purchased the large pack of 10 sheets ($13.00) in case I screwed up but I only needed one sheet as I was able to fit duplicate labels all on a single page. I designed my labels in Adobe Illustrator because it is a vector based program making the text and borders ultra crisp. I also happen to own a Minolta Magicolor 2400W color laser printer which gave me excellent results. If my printer didn’t work well my plan was to run a thumb drive down to Kinkos and use their large Color Laser Printer but there was no need after I output and tested the first sheet. If you are OK with Black graphics any Laser Printer will do.

            >From here the process was straight forward, trim, soak in bowl of water for 15 seconds, don’t spill the bowl of water in the plane (hardest step), place the decal on a pre-moistened portion of your panel and properly position. Do the next decal while the first one is drying.

            I purchased a special rubber squeegee and floating agent at the same time I purchased the paper but never found the need to use them. If you are confident you only need the 5 sheet pack your cost may be as low as $10.00.

            For high wear areas they suggest a clear coat over the decal but these are in a low touch location and they seem pretty durable to me.


[img]cid:image001.jpg(at)01CA141A.B0871B30[/img]


With your own graphic designs your panel labeling choices are virtually unlimited including photographs or multi color process:

(note: labels below are fuzzy due to .jpg conversion)


[img]cid:image002.jpg(at)01CA141A.B0871B30[/img]

Robin

No virus found in this incoming message.

 Checked by AVG - www.avg.com

 08/02/09 17:56:00
| | - The Matronics RV10-List Email Forum - | | | Use the List Feature Navigator to browse the many List utilities available such as the Email Subscriptions page, Archive Search & Download, 7-Day Browse, Chat, FAQ, Photoshare, and much more:
http://www.matronics.com/Navigator?RV10-List |
|
| Description: |
|
| Filesize: |
94.11 KB |
| Viewed: |
2329 Time(s) |

|
| Description: |
|
| Filesize: |
71.57 KB |
| Viewed: |
2329 Time(s) |

|
|
|
| Back to top |
|
|
|
|
You cannot post new topics in this forum
You cannot reply to topics in this forum
You cannot edit your posts in this forum
You cannot delete your posts in this forum
You cannot vote in polls in this forum
You cannot attach files in this forum
You can download files in this forum
|
Powered by phpBB © 2001, 2005 phpBB Group
|

