n223rv(at)wolflakeairport
Guest
|
 Posted: Fri Apr 13, 2012 4:42 pm Post subject: Fitting Fairings to the Fuselage, how I do it...... Posted: Fri Apr 13, 2012 4:42 pm Post subject: Fitting Fairings to the Fuselage, how I do it...... |
 |
|
I am resending this as there have been a lot of talk about fuselage intersection fairings..... Do not use filler to fit the fairings, use filler to fill the pin holes and minor imperfections....
I hope this helps......
------ Forwarded Message
From: Michael Kraus <[url=n223rv(at)wolflakeairport.net]n223rv(at)wolflakeairport.net[/url]>
Date: Wed, 29 Feb 2012 22:12:11 -0400
To: "[url=rv10-list(at)matronics.com]rv10-list(at)matronics.com[/url]" <[url=rv10-list(at)matronics.com]rv10-list(at)matronics.com[/url]>, "[url=rv-list(at)matronics.com]rv-list(at)matronics.com[/url]" <[url=rv-list(at)matronics.com]rv-list(at)matronics.com[/url]>
Conversation: Fitting Fairing to the Fuselage, how I do it......
Subject: Fitting Fairing to the Fuselage, how I do it......
Here is a better description of how I fit my fairings..... Can be used for the gear leg to fuse, gear leg to wheel pant, or rear empennage intersection fairing.
- Rough cut and dry fit up fairing to airplane. Drill #30 holes in locations where screws will eventually hold fairing to fuselage. When satisfied with the fit, draw a marker line on the fuselage around perimeter of fairing. Remove fairing.
- Use mold release (I use the car wax stuff from Aircraft Spruce) and wipe it all over the fuselage about 2-4” or more around both sides of the line you drew. DO NOT FORGET TO DO THIS STEP OR YOU WILL VERY UNHAPPY!!
- Scuff up inside of fairing with 36-40 grit sandpaper on all surfaces where they will come into contact with the fuselage.
- Clean fairings real good with acetone or similar to remove any dust/dirt/residue/mold release, etc
- Work on one side of one fairing at a time (for instance, if you are working on the upper fuselage to gear leg intersection fairing, work on the fuselage to fairing interface first. Second time around work on the fairing to gear leg interface). Lay up 2-3 layers of approximately 9 oz cloth on the fuselage over the line drawn in step 1.
- Mix up flox and epoxy to a peanut butter consistency and apply about 1/16”-1/8” onto the fairing surface that mates to the fuselage. This will help fill any gaps that may be present due to poorly formed fairings.
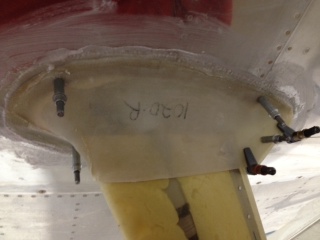
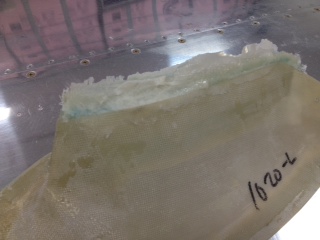
- Mash the fairing onto the fuselage in position. Use cleco’s/clamps/screws/whatever you desire to hold it in place exactly where you want it until dry.
- [img]cid:3417194456_3314298[/img][img]cid:3417194456_3299998[/img]
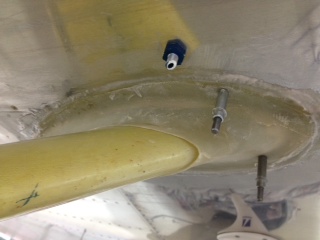
- Once dry, use compressed air to blow it free from the fuselage. Its amazing how well the compressed air works. Just get a little spot to break free, then blow air in the spot and the whole thing will pop off pretty easily.
- Clean the fuselage up with a plastic scraper and acetone and clean real well.
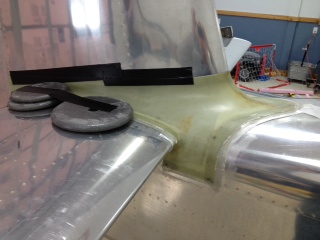
- Trim the fairing edge as desired to get a smooth edge.
- [img]cid:3417194456_3279677[/img]
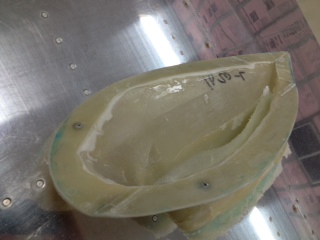
- Repeat the process for the other side of the same fairing. For this example, that would be the upper gear leg to fairing surface (or the lower line as described above). DON’T FORGET THE MOLD RELEASE ON THE SURFACE YOU DON’T WANT IT BONDED TOO!
- [img]cid:3417194456_3325894[/img][img]cid:3417194456_3304181[/img]
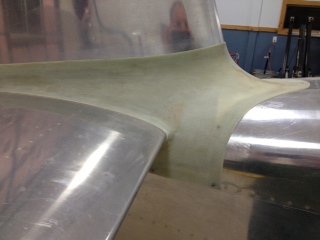
- Once complete, fill and sand, and fill, and sand, and fill, and sand until it is smooth to your satisfaction.
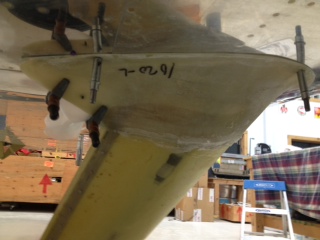
For the rear empannage intersection fairing, I followed the same process, but layed up the HS to fairing surface first, then the VS to fairing surface second.
[img]cid:3417194456_3269487[/img][img]cid:3417194456_3299661[/img]
I hope this is not too confusing. It is actually quite easy, just takes time.....especially in the Michigan winters when even fast drying epoxy takes 2 days to cure!
-Mike Kraus
RV-4 Flying and Sold
RV-10 Flying
------ End of Forwarded Message
| | - The Matronics RV10-List Email Forum - | | | Use the List Feature Navigator to browse the many List utilities available such as the Email Subscriptions page, Archive Search & Download, 7-Day Browse, Chat, FAQ, Photoshare, and much more:
http://www.matronics.com/Navigator?RV10-List |
|
| Description: |
|
| Filesize: |
27.18 KB |
| Viewed: |
1650 Time(s) |
|
| Description: |
|
| Filesize: |
27.89 KB |
| Viewed: |
1650 Time(s) |
|
| Description: |
|
| Filesize: |
29.68 KB |
| Viewed: |
1650 Time(s) |
|
| Description: |
|
| Filesize: |
33.15 KB |
| Viewed: |
1650 Time(s) |
|
| Description: |
|
| Filesize: |
28.45 KB |
| Viewed: |
1650 Time(s) |
|
| Description: |
|
| Filesize: |
33.26 KB |
| Viewed: |
1650 Time(s) |
|
| Description: |
|
| Filesize: |
27.28 KB |
| Viewed: |
1650 Time(s) |
|
|
|

