 |
Matronics Email Lists
Web Forum Interface to the Matronics Email Lists
|
| View previous topic :: View next topic |
| Author |
Message |
carl.froehlich(at)verizon
Guest
|
 Posted: Mon Jan 21, 2013 1:29 pm Post subject: Top Cowl aft edge - was Oil door deformation in flight Posted: Mon Jan 21, 2013 1:29 pm Post subject: Top Cowl aft edge - was Oil door deformation in flight |
 |
|
On the aft edge cowl ballooning up, I have a plenum so my cowl did not
balloon up but I did have a "smoke trail" from the ends of the pins -
evidenced there was vibration between the smaller diameter pin and the
hinge. I figured such relative motion was a quick way to break off cowl
mounting hinge eyelets.
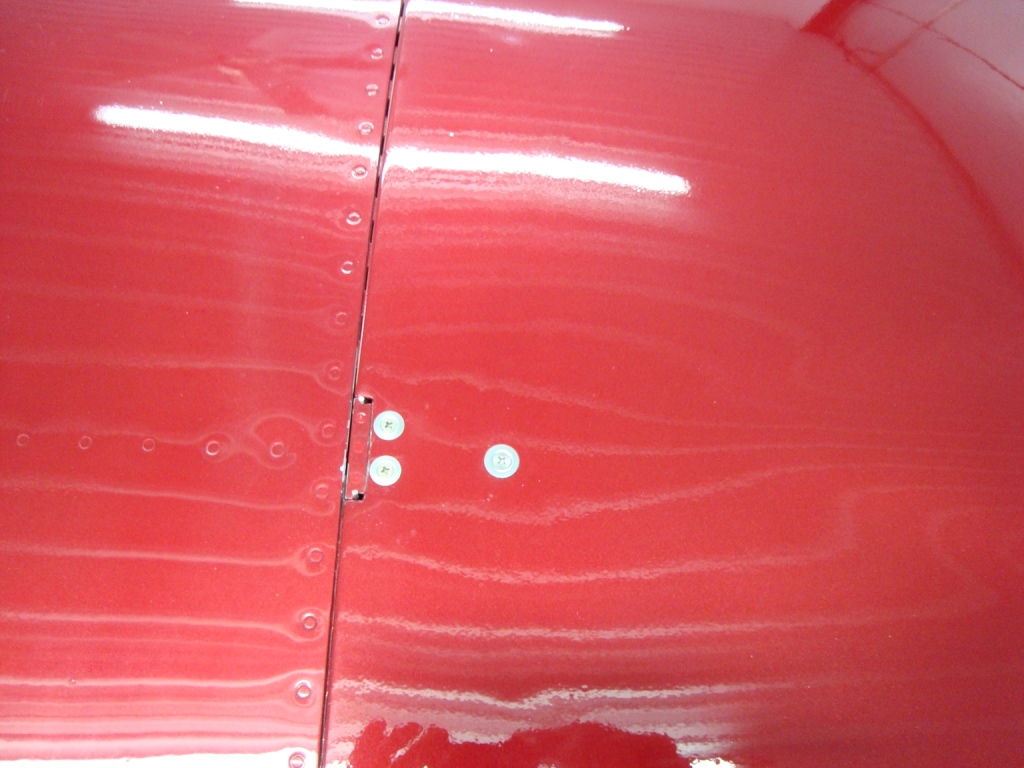
Attached photos show how I fixed the problem. It takes some careful
measurements to get the mount hole to end up flush to the bottom of the
cowl, then drill the hole through the cowl for the #8 screw (the screw goes
into a nutplate). Measure many times then drill. The white grease you see
allows for the final movement of the angle to go flush with the bottom of
the cowl. I also added a few layers of carbon fiber in this area to
preclude the brace angle from ablating the top of the cowl. Add these
layers before fit up of the brace.
70 hours now with no rattle, no movement, and no evidence of the top of the
cowl wearing.
Carl
--
| | - The Matronics RV10-List Email Forum - | | | Use the List Feature Navigator to browse the many List utilities available such as the Email Subscriptions page, Archive Search & Download, 7-Day Browse, Chat, FAQ, Photoshare, and much more:
http://www.matronics.com/Navigator?RV10-List |
|
| Description: |
|
| Filesize: |
308.67 KB |
| Viewed: |
1754 Time(s) |

|
| Description: |
|
| Filesize: |
296.82 KB |
| Viewed: |
1754 Time(s) |
|
|
|
| Back to top |
|
 |
rv10flyer(at)live.com
Guest
|
| Posted: Mon Jan 21, 2013 2:13 pm Post subject: Top Cowl aft edge - was Oil door deformation in flight |
|
|
Being I suffer from the same smoke trails every flight. Did you do the

bracket with the bottom cowl off to allow getting in there and positioning

the bracket or did you have the bottom on and came up with a good estimate

of where to position the firewall facing holes?

Thank you!

Pascal


--
| | - The Matronics RV10-List Email Forum - | | | Use the List Feature Navigator to browse the many List utilities available such as the Email Subscriptions page, Archive Search & Download, 7-Day Browse, Chat, FAQ, Photoshare, and much more:
http://www.matronics.com/Navigator?RV10-List |
|
|
|
| Back to top |
|
|
toaster73(at)embarqmail.c
Guest
|
| Posted: Mon Jan 21, 2013 5:17 pm Post subject: Top Cowl aft edge - was Oil door deformation in flight |
|
|
Interesting - I had no plans yet to do anything, something like that seems

pretty good. I had wondered if a tapered hinge pin could be devised so it

would tighten up at the last few inches before the pin was fully in its

installed position.

-Chris

N919AR


--
| | - The Matronics RV10-List Email Forum - | | | Use the List Feature Navigator to browse the many List utilities available such as the Email Subscriptions page, Archive Search & Download, 7-Day Browse, Chat, FAQ, Photoshare, and much more:
http://www.matronics.com/Navigator?RV10-List |
|
|
|
| Back to top |
|
|
carl.froehlich(at)verizon
Guest
|
| Posted: Mon Jan 21, 2013 5:35 pm Post subject: Top Cowl aft edge - was Oil door deformation in flight |
|
|
It took a lot of measurements to get this right the first time. I did this
after final paint, so I was paranoid about screwing up the paint job.
To outline what I did:
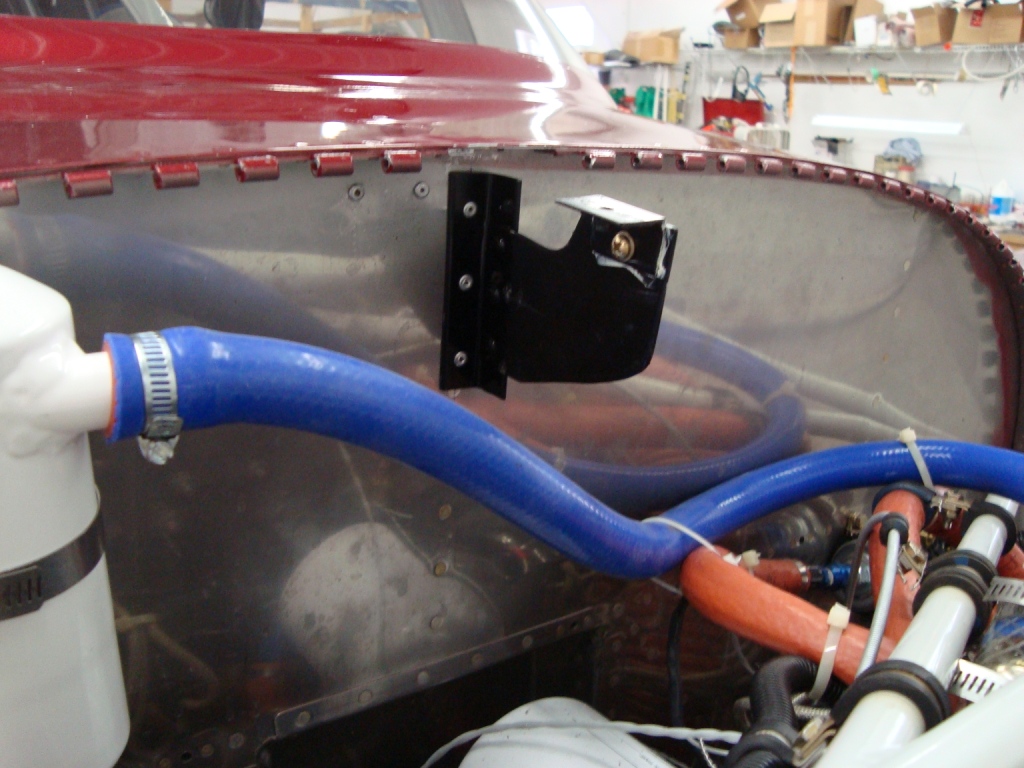
- The angle material is 3/4" x 3/4", 063" aluminum.
- The bracket is a single piece of .063" aluminum. Note the shape - the dip
allows for clearance of the pin locking plate.
- The angle that mounts to the firewall is on the centerline of the vertical
bulkhead flange that is on the other side of the firewall. I wanted this
spot as it would reduce flexing of the thin firewall SS.
- Bottom cowl was on throughout.
- I picked the spot on the top cowl such that it was far enough forward to
not interfere with the cowl pin locking plate but not much further, and
centered between the two cowl pin locking plate screws.
- With the spot marked on a piece of tape on the top cowl and the top cowl
on, put a strip of masking tape on the top of the fuselage to do reference
marks. I measured to perhaps 10" each side of the center line from the spot
on the top cowl, then the "triangle" measurement from these reference marks
to the spot on the cowl where the mounting screw will be. The ideas is to
be able to find the same spot with the cowl off using these measurements.
- With the top cowl on, use a piece of angle that sits on some shims on the
fuselage and spinner. You want this angle to be in exactly the same place
with the top cowl on as off, but not touching the top cowl - just above it.
Measure the distance between the angle and the top cowl where you want to
put the screw.
- With the top cowl off, and after you add a few layers of glass where the
hole will go (but not to interfere with the cowl pin locking plate), measure
the thickness of the cowl where you want to put the screw hole.
- With the top cowl off and angle in place, you can now find the position
where the screw will go into the bracket. The distance below the angle will
be the sum of the thickness of the cowl and the distance you measured
between the top of the cowl and the angle when the top cowl was on. The
spot in the horizontal plane will be on the centerline and per your
measurements to your marks on the fuselage.
- I clekoed the vertical angle onto the firewall. I used clamps to hold the
bracket arm in place as I adjusted the position of the angle that holds the
nutplate.
- Once you think you have the nutplate angle where you want it, mark the
pieces, put a piece of tape on the top of the nutplate angle, put the top
cowl on, drill a #40 hole in your spot enough to go through the cowl and
just enough to make a mark on the angle tape.
- Put your digital camera in the oil door and take a picture of the bracket
to verify the nutplate angle is flush against the top cowl.
- Take the top cowl off and see if you are happy where the nutplate hole
will be. If so, then final drill the bracket to the bulkhead angle and
drill the cowl to #30 and the nutplate hole to #30. Cleko the bracket to
the bulkhead angle, put the top cowl on, cross your fingers and see if the
nutplate hole lines up with the cowl hole. If so, cleko and take another
photo to make sure the nutplate angle is still flush to the top of the cowl.
- Disassemble, rivet the bracket together, drill the screw holes to #19,
countersink the top of the cowl for a SS #19 screw with SS tinnerman, and
rivet the nutplate in place.
- The nutplate angle is firm against the bracket, but not tight. I uses two
#19 nuts to make a locknut so once it would not vibrate loose. Put a dab of
grease between the nutplate angle and the bracket to allow it to rotate
flush to the top of the cowl when you put in the screw.
So, harder to put into words than what it is, but I did scratch my head
trying to figure out how to do this. Hopefully this at least give you
something to start with.
Carl
--
| | - The Matronics RV10-List Email Forum - | | | Use the List Feature Navigator to browse the many List utilities available such as the Email Subscriptions page, Archive Search & Download, 7-Day Browse, Chat, FAQ, Photoshare, and much more:
http://www.matronics.com/Navigator?RV10-List |
|
| Description: |
|
| Filesize: |
308.67 KB |
| Viewed: |
1739 Time(s) |
|
| Description: |
|
| Filesize: |
296.82 KB |
| Viewed: |
1739 Time(s) |

|
|
|
| Back to top |
|
|
Lew Gallagher
Joined: 04 Jan 2008
Posts: 402
Location: Greenville , SC
|
| Posted: Mon Jan 21, 2013 5:42 pm Post subject: Top Cowl aft edge - was Oil door deformation in flight |
|
|
Hey Chris,


I only use the hinge pins on the horizontal, preferring Sky Bolts/CamLocs

around the firewall, so this is REALLY less than my 2 cents worth.

Instead of messing with a tapered pin, if you wanted it to snug up the last

few inches, why not just squeeze the bottom couple of eyes a bit tighter, or

angle them a bit to grab the pin?


Just a thought for the pin heads.


Later, - Lew                           do not archive


--
| | - The Matronics RV10-List Email Forum - | | | Use the List Feature Navigator to browse the many List utilities available such as the Email Subscriptions page, Archive Search & Download, 7-Day Browse, Chat, FAQ, Photoshare, and much more:
http://www.matronics.com/Navigator?RV10-List |
|
_________________
non-pilot
crazy about building
NOW OFICIALLY BUILDER #40549
Fly off completed ! |
|
| Back to top |
|
|
rv10flyer(at)live.com
Guest
|
| Posted: Mon Jan 21, 2013 5:46 pm Post subject: Top Cowl aft edge - was Oil door deformation in flight |
|
|
Doesn't do much, I have mine sort of this way, just makes for pulling in and

out harder with little benefit.

Pascal


--
| | - The Matronics RV10-List Email Forum - | | | Use the List Feature Navigator to browse the many List utilities available such as the Email Subscriptions page, Archive Search & Download, 7-Day Browse, Chat, FAQ, Photoshare, and much more:
http://www.matronics.com/Navigator?RV10-List |
|
|
|
| Back to top |
|
|
|
|
You cannot post new topics in this forum
You cannot reply to topics in this forum
You cannot edit your posts in this forum
You cannot delete your posts in this forum
You cannot vote in polls in this forum
You cannot attach files in this forum
You can download files in this forum
|
Powered by phpBB © 2001, 2005 phpBB Group
|

