QCyakker
Joined: 17 Jul 2012
Posts: 6
Location: Queen Creek, AZ
|
 Posted: Wed May 08, 2013 4:04 pm Post subject: Adding a CJ step (as supplied by Doug Sapp) to a Yak 52 Posted: Wed May 08, 2013 4:04 pm Post subject: Adding a CJ step (as supplied by Doug Sapp) to a Yak 52 |
 |
|
Hi Folks.  When I bought my 1982 model Yak 52, it did not have a step.  It did not bother me much at first, but the convenience of a permanently mounted step became appealing after a while.

I am sure there are many solutions to the problem, but this is what we did.  My buddy Warren gave me his old CJ step and I had a local machinist manufacture custom aluminum attachment brackets.

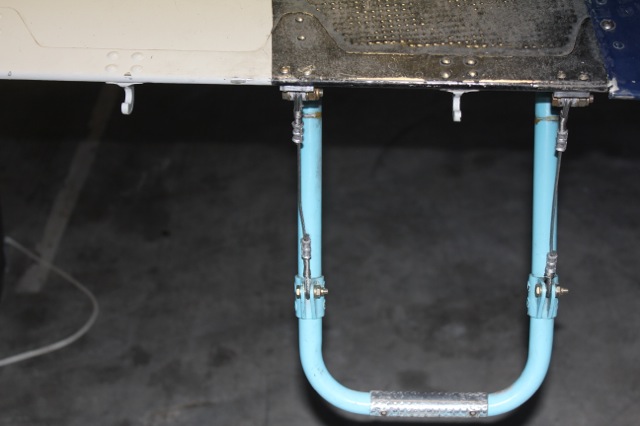
We obtained a nice strong aluminum plate that we attached to the wing undersurface by carefully de-rivetting the rivet line along a rib and the trailing edge.  The pictures show the work a lot better than I Can describe.

I post this here simply for info and hope that yak 52 pilots will find it interesting.  The step is supplied by Doug Sapp.  If anyone would like to copy our install, please contact me off list.

I will happily put you in touch with the machinist here in Mesa, Arizona if you want the brackets.  I think my buddy also made a template of the aluminum plate we installed.

The first pic shows the attached step.  We did not bother to remove the existing hooks that are used for the temporary step.  That was my personal preference.


[img]cid:38EF0D5D-020A-4DE3-AA01-F0CABB1FEFFA[/img]


IMG_2002


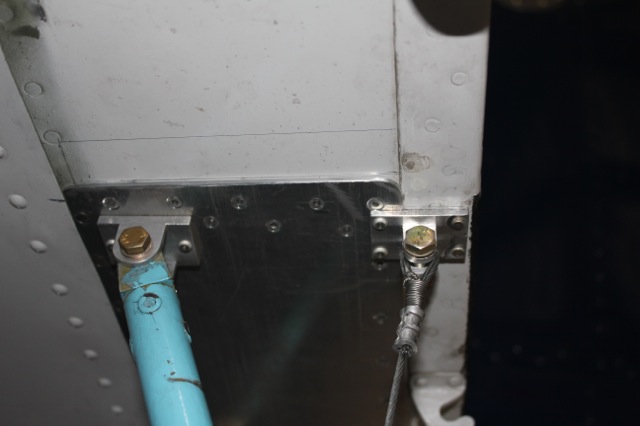
 Pic shows undersurface of wing, aluminum plate and the brackets we had specially made.  The four brackets cost $140.

The machinist did an incredible job.  The trailing edge bracket has a indent so that it marries with the reinforced wing trailing edge and the new aluminum plate.


[img]cid:FCBE8D1E-927B-4FA9-9494-715FD93802E0[/img]


IMG_2008


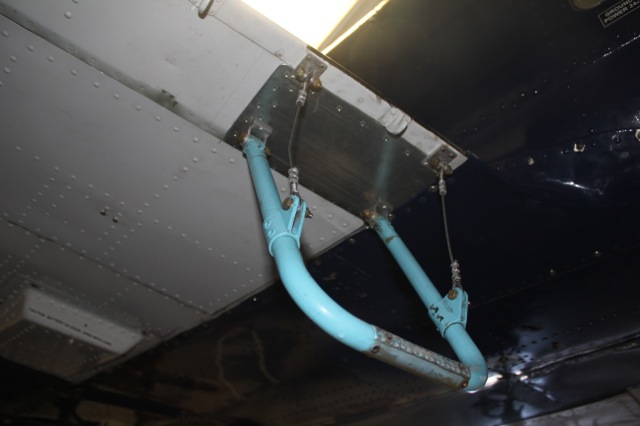
A view of the entire installation.  It is STRONG and neat.  I still need to paint it, but there you go.

[img]cid:2ED61059-D1D3-4DED-B975-3DEEE381E276[/img]


IMG_2010
| | - The Matronics Yak-List Email Forum - | | | Use the List Feature Navigator to browse the many List utilities available such as the Email Subscriptions page, Archive Search & Download, 7-Day Browse, Chat, FAQ, Photoshare, and much more:
http://www.matronics.com/Navigator?Yak-List |
|
| Description: |
|
| Filesize: |
52.34 KB |
| Viewed: |
1484 Time(s) |

|
| Description: |
|
| Filesize: |
42.41 KB |
| Viewed: |
1484 Time(s) |

|
| Description: |
|
| Filesize: |
50.15 KB |
| Viewed: |
1484 Time(s) |

|
|
|


